In this lesson, we’ll show you how to create a WP Ultimo membership plans.
WP Ultimo is a great way to monetize your SaaS platforms by selling membership plans.
We’ll guide you through every step to create a membership plan,.
Then you can create other plans by following the same steps if you want.
1- Optional – Enable the “Custom Domains” feature in WP Ultimo
Before creating a new membership plan, you can enable the Custom Domains feature.
This step is important if you’re thinking about allowing your customers to use a custom domain on their sites created on your platform.
Go to Network Admin > WP Ultimo > Settings > Domain Mapping and select the following values there:
- Enable domain mapping: Yes
- Enable single sign-on: This is optional
- Force admin redirect: Allow access to the admin by both mapped domain and network domain
- Enable custom domains: Yes

2- Add a new WP Ultimo Plan to your Multisite Networ
You can manage WP Ultimo products at Network Admin > WP Ultimo > Products.
Depending on your choice when setting up the plugin, WP Ultimo can create default products.
However, we’ll create a new plan from scratch.
Click on Add Product.

3- Add your membership plan information
You need to add your plan’s general information by editing the values in these fields:
- Add new product: Enter the plan’s name here.
- Product description: Add a general description for the new plan.
- Slug: You can enter the URL slug of the plan here. It’s important to mention the slug serves as the ID of the product.
- Product type: Select the Plan type here.
- Customer Role: When a customer buys this plan, he will get the role you select here. In this case, since customers will create and manage a site, select the Administrator role.

4- Select the upgrade / downgrade paths for your plan
If you’re creating more than one plan, you can create upgrade and downgrade paths that will allow your users to change between plans.
WP Ultimo allows you to create plan groups so that you add related plans to the same group.
For example, if you’re creating a Basic and a Pro plan, you can relate these plans in a Group so that your users change between these two plans.
Just move the Up & Downgrades and select the following values.
- Plan Group: Add the plan group name here.
- Product Order: This allows you to add membership levels. For example, the Basic plan’s order would be 1 so that users can upgrade to the Pro plan, whose order will be 2. You can sort as many related / grouped plans as you have.
- Offer add-ons: This is optional, and you can use it with the other types of products WP Ultimo allows you to create: services and packages.

5- Add price variations to the plan
In previous versions, WP Ultimo allowed monthly, quarterly, and yearly prices.
That has changed, and now you can add any price variations.
Price variations make offering discounter prices for longer subscriptions easy.
For this, move to Price Variations and toggle the Enable price variations field.
Then you can add the duration, the period, and the price for each price variation you want to add to your WP Ultimo membership plan.

6- Select if your plan is taxable
If you want to collect taxes from this plan, you can move to the Taxes tab and enable the Is taxable field.
Then, you can select the Tax Category for this product.

7- Optional – Select the site templates for this plan
If you move to the Site Templates option, you can allow site templates for this WP Ultimo plan.
In this example, we’ll add the site template we created in the previous lesson.
In Site Template Selection Mode, you can select how the site templates will be assigned or selected by the users. You have these three options:
- Assign site template: This method automatically assigns a template to the sites using this plan.
- Choose available site templates: This method allows users to select a template for their sites among different templates. You can enable which of your templates will be available for this plan. You can even choose a pre-selected template.
Important. Site templates need to be created before being able to select them here.

8- Select the sites limit for this plan
In the Sites tab, you can limit how many sites can be created with this site.
In this case, we’ll enable the Limit Sites field, and enter 1 in Site Allowance.

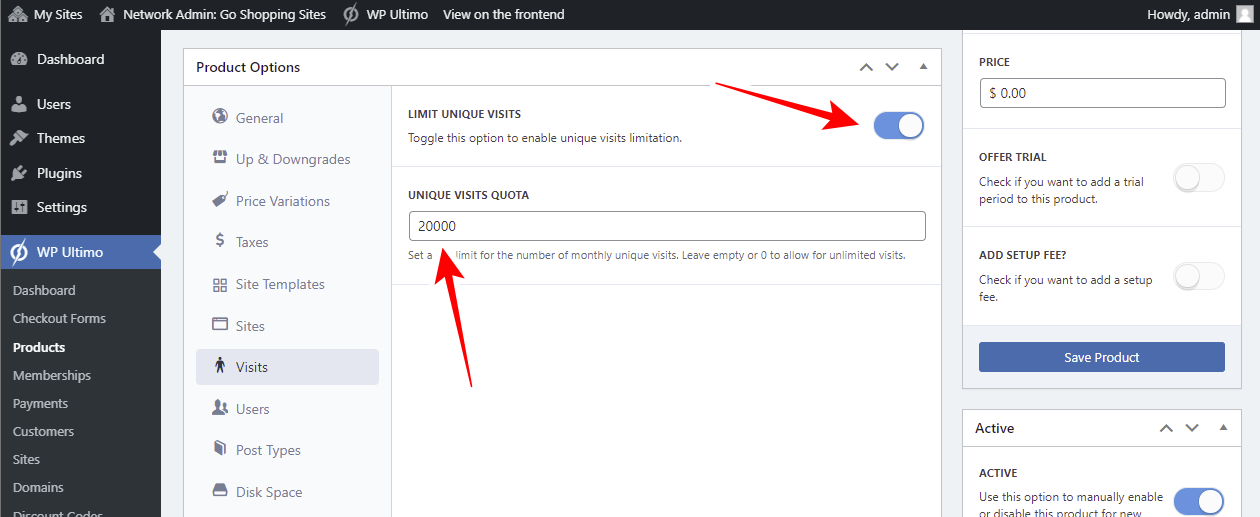
9- Select the visits limit for this plan
When you move to the Visits tab, you’ll be able to enable the Limit Unique Visits field.
This means the visits to this site will have a certain limit and if sites using this plan reach the visits limit, they will require a higher plan to continue showing their site publicly.
You can add how many visits this site can get in Unique Visits Quota.
10- Select the user limits for this plan
If you move to the Users tab and select the user limits.
WP Ultimo allows you to select how many administrators will be created with this membership plan in a site, how many authors, etc.
For this, you can enable the Limit user field.
Then, you can enable and establish a number for each user role.

11- Select the post type limits for this plan
In the Post Types tab, you can limit how many posts, how many pages, how many products the users can create.
You can enable the post type limits by enabling the Limit Post Types field.
Then, you can limit different post types and add how many of each post types can be created with this membership plan.

12- Assign a disk space for this plan
In the Disk Space tab, you can limit the disk space per site for this plan.
Enable the Limit Disk Spacer Per Site field, and add how many MBs will be allowed for this plan in Disk Space Allowance.

13- Set up the custom domain settings for this plan
If you want to allow your users to use a custom domain instead of using a subdomain on their sites, you can enable the Allow Custom Domains field in the Custom Domains tab.

14- Select which themes will be allowed for this plan
Users who buy these WP Ultimo plans can select from the available themes to customize their site’s appearance.
You can move to the Themes tab, and select the visibility and availability of the themes installed on your multisite network.
- Visibility: You can select if the theme will be Visible or Hidden.
- Behavior: This plan can be Available, Not Available, or Force Activate.

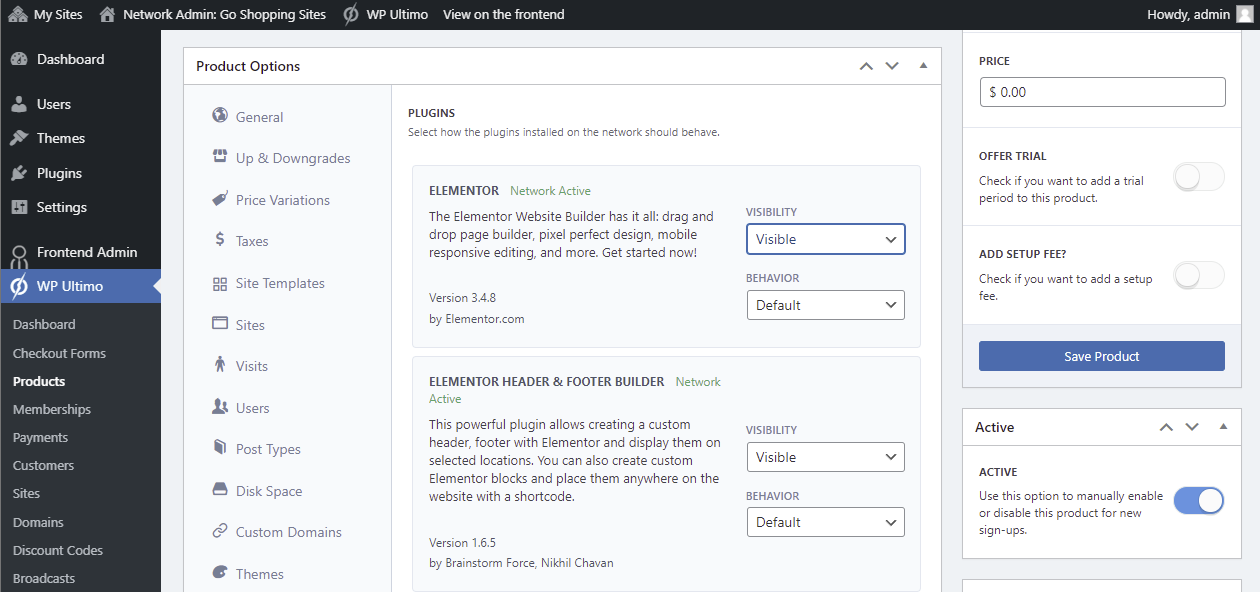
15- Select the plugins available for this plan
If you’re planning to allow users of this plan to use plugins to enrich their site’s features, you can select the plugins’ visibility and behavior in the Plugins tab.
- Visibility: Visible or Hidden
- Behavior: Force Activate, Force Inactivate, Force Activate and Lock, Force Inactivate and Lock
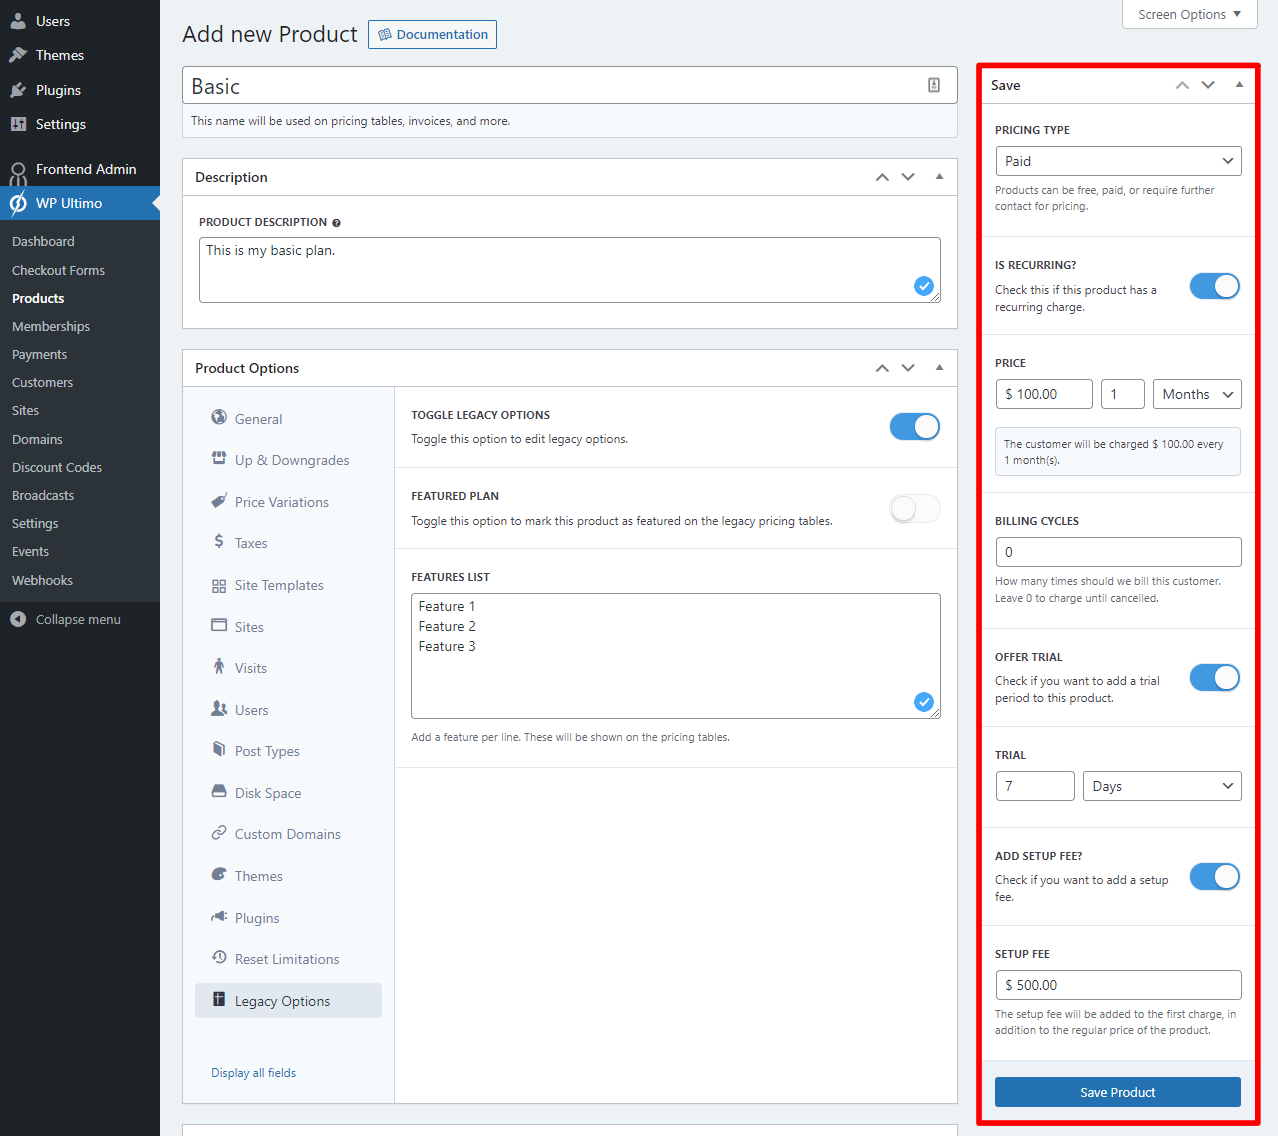
16- Set up the pricing options for this plan
Now that you have selected all the settings for this plan, you need to move to the pricing settings and select these values:
- Pricing type: WP Ultimo allows you to create Paid, Free, and Contact Us plans. A Contact Us plan allows your customers to contact you in order to inquire the plans price. In this example, we’re creating a Paid plan.
- Is recurring: You need to toggle this field if the product will collect recurring payments.
- Price: Enter the price and how many days, weeks, months, or years this membership will last.
- Billing Cycles: Here you can select how many times you will bill customers with this plan.
- Offer trial: You can offer a free trial period on your platform by enabling this field.
- Trial: Select how many days, weeks, months, or years will be offered as a trial period.
- Add set up fee: Enable this if you want to charge a specific amount on initial setup.
- Set up fee: Add the set up fee here.
Once you’ve selected all the necessary values, hit Save Product.
Once you save the product, you will be to see the new WP Ultimo plan added to the plans list at WP Ultimo > Products > Plans.

This is how you can easily create a new WP Ultimo plan for your WordPress Multisite platform.
In the next lesson, you’ll learn how to create a new WP Ultimo discount code for your online stores platform.