In this lesson, we will show you how to create a custom checkout page for WP Ultimo, using the free version of the Elementor page builder.
This is great because your WP Ultimo register page will look in accordance with the overall appearance of your multisite platform.
We will first show you how to create a custom WP Ultimo checkout form.
Then we will show you how to create the page with Elementor, so that your registration process looks beautiful.
1- Create a WP Ultimo checkout form
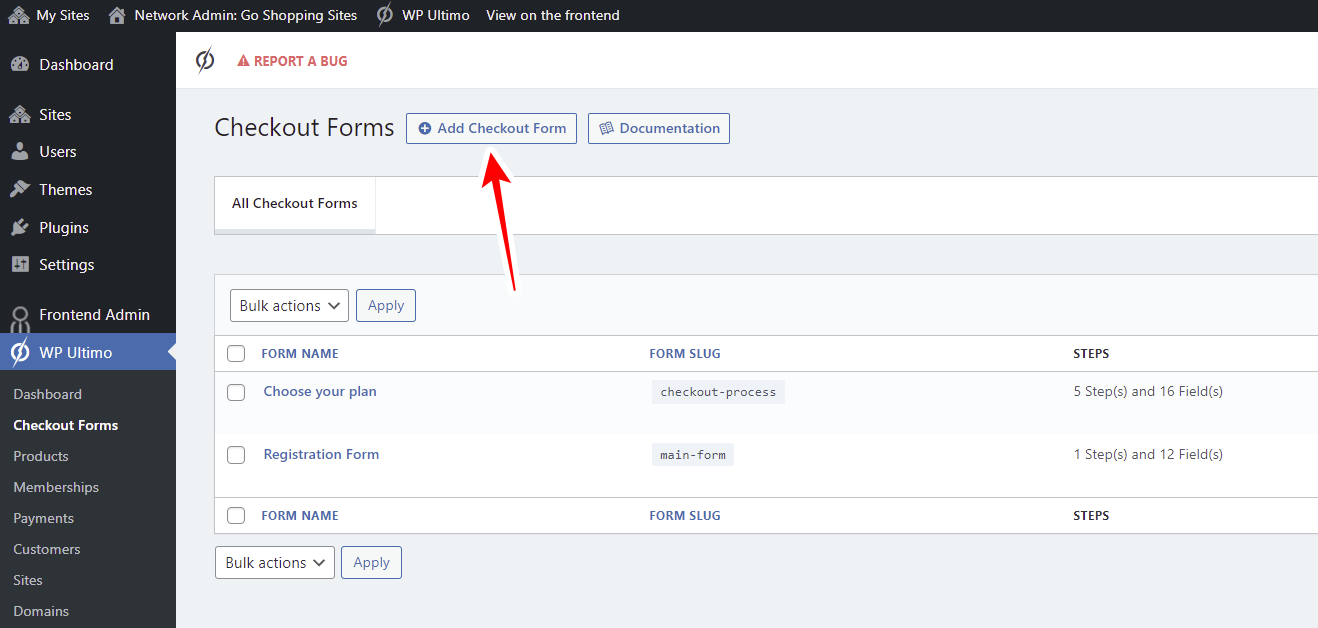
To create and manage WP Ultimo checkout forms, go to Network Admin > WP Ultimo > Checkout Forms.
Once you’re there, hit Add Checkout Form.
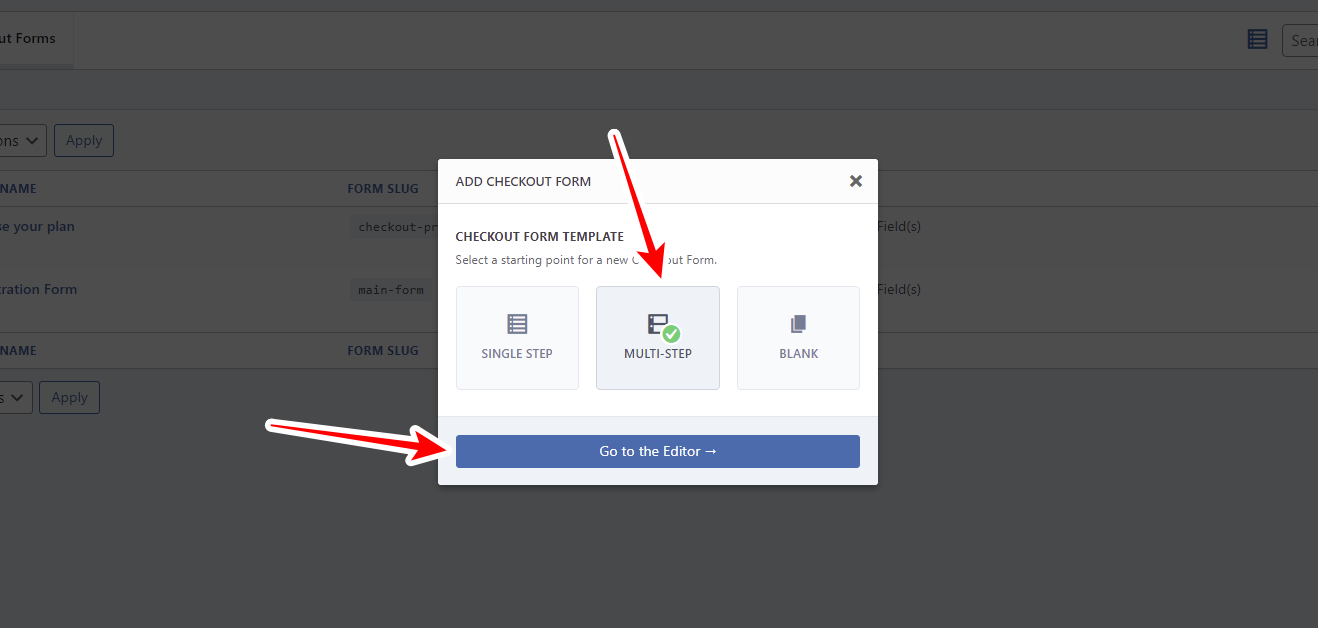
In this example, we will create a Multi-step checkout form. We want our customers to follow a registration process with these steps:
- Choose a membership plan
- Choose a template site (optional)
- Add the site information
- Add the user information
- Payment step
WP Ultimo‘s Multi-step registration form adds all the steps we have mentioned. However, it doesn’t include the template selection step.
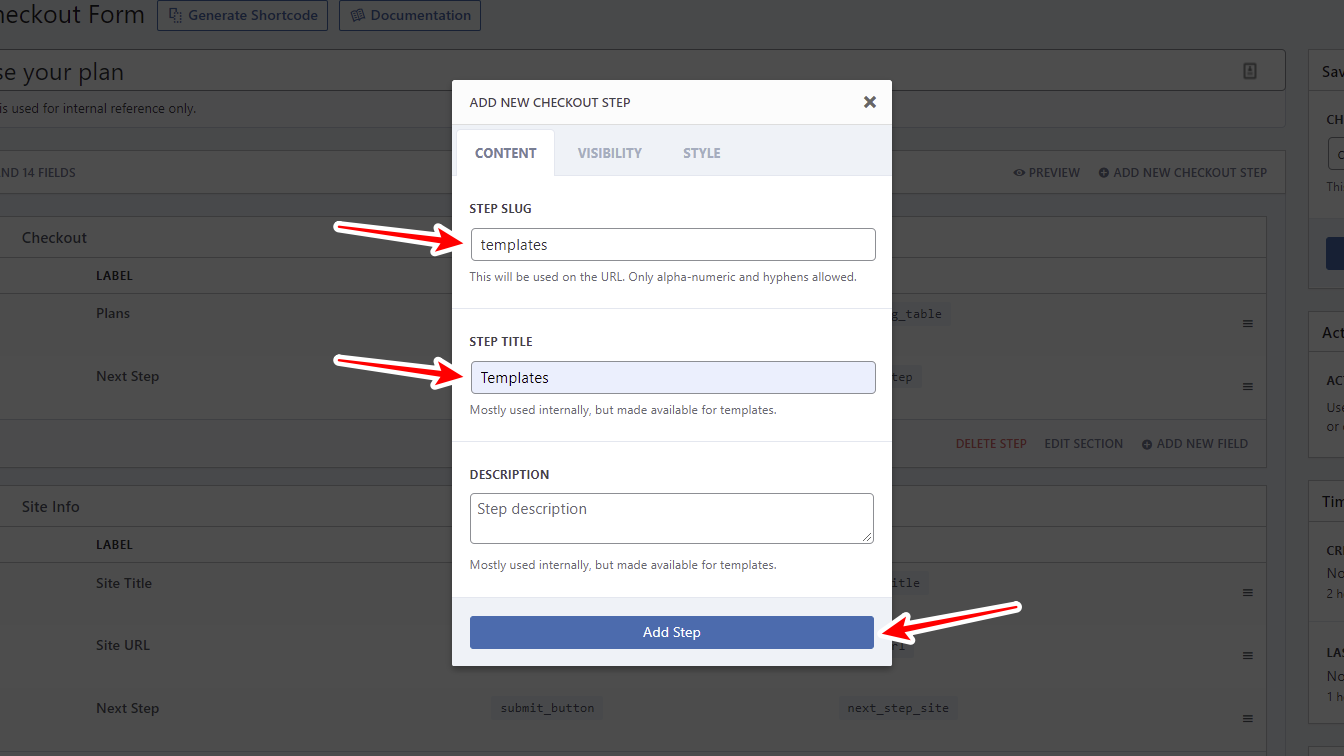
Therefore, we need to hit the Add New Checkout Step button to add that step to our checkout form.

Once we hit the Add New Checkout Step button, we’ll see a popup form asking us to add the step slug, title, and description.
Once you add that information, hit the Add Step button.
As you’ll see, a new step section will be added to the checkout form.
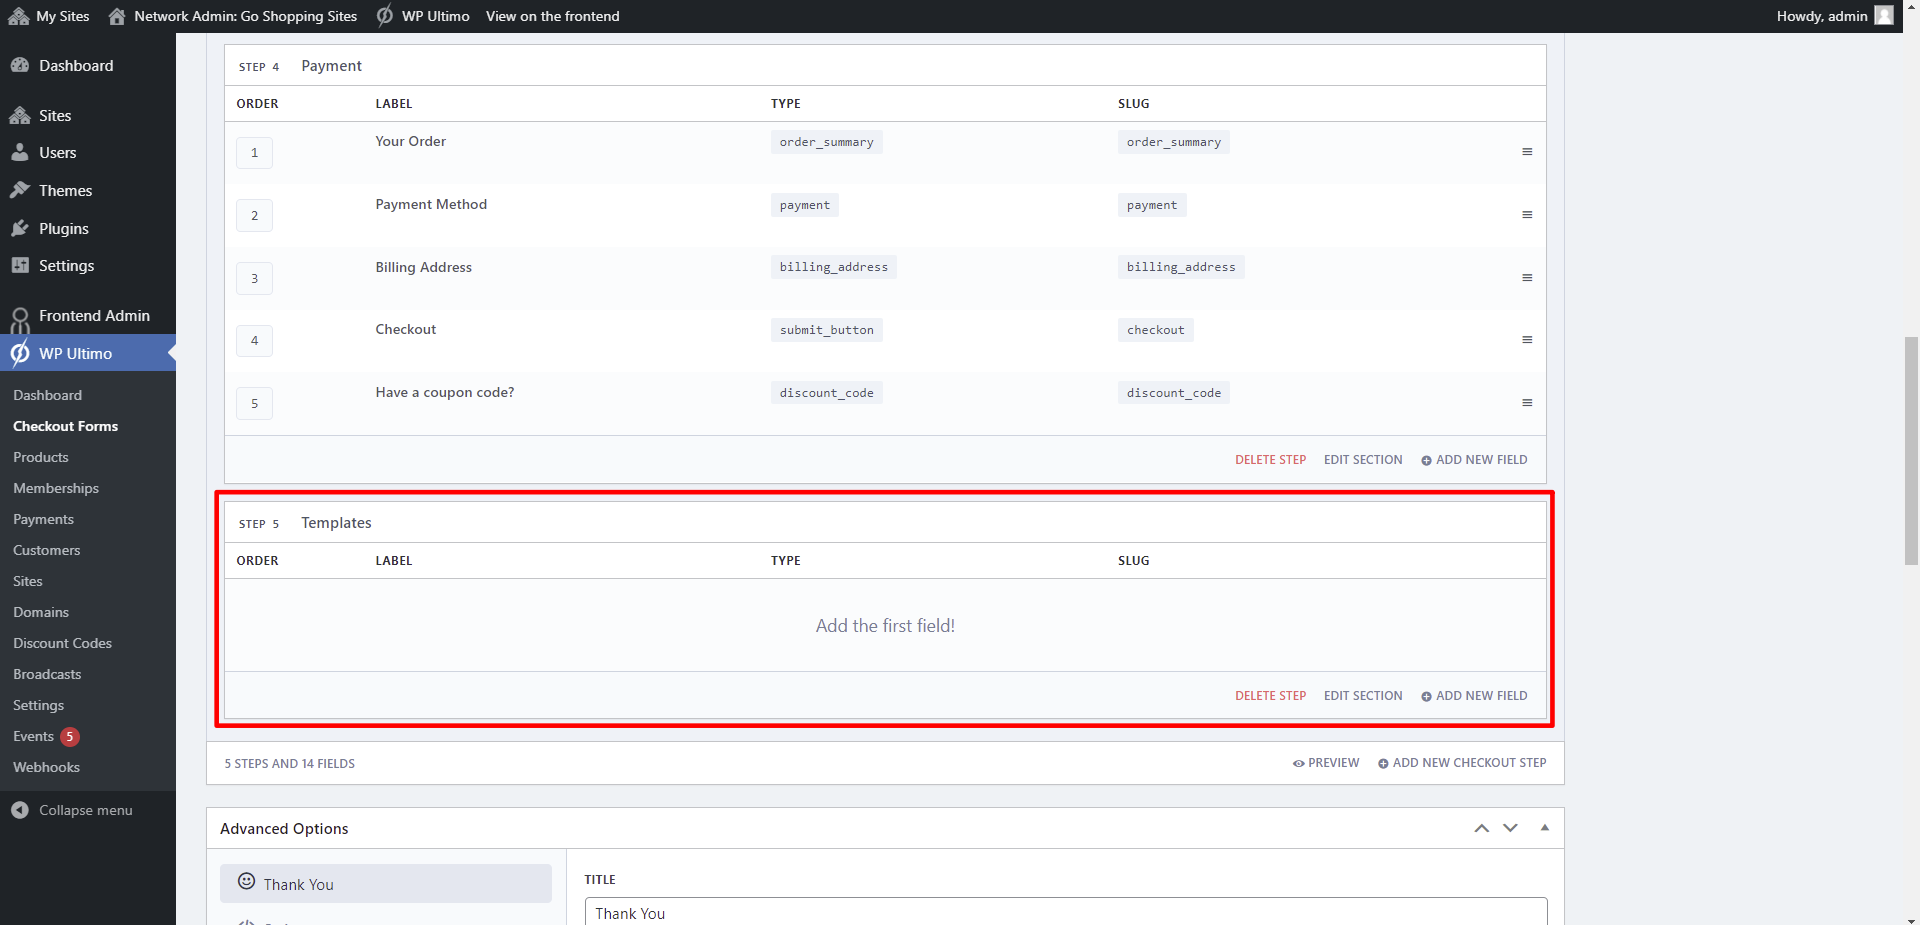
Now let’s move the Template selection step to the second place.
For this, we just need to drag the section up and place it below the first step.
Once you move it, hit the Add new field button because we need to add a new Templates button to allow customers to select a site template.

Click on Templates to choose it from the list of fields.

Now you need to add the following values:
- Field Label: Add a label for this field. We’ll enter something like “Choose your template”.
- Template sites: Here you need to select which template sites will be available for selection. In this example, we’re using the default site template added by WP Ultimo when we installed the plugin. However, if you’ve created other template sites, you’ll see them all here, and you can select which templates you want to make available. This will also depend on the plan selected by the customer. If there are templates not available for a specific plan, the customer won’t see it in this step.
- Template selector: Here you can select the template selector style.
- Once you select the necessary values, hit Save Field.

Now we’ll add a “Next-step“ button. For this, click the Add New Field button and select the Submit Button field from the list of fields.
This submit button should be called Next Step.

Now it’s time to add the Checkout Form Slug and make sure the checkout form is Active.
Once you’re done, hit Save Checkout Form.

2- Create a custom WP Ultimo checkout page with Elementor
Now that you have created a checkout form, let’s create a custom checkout page using the free version of Elementor.
This is what our custom pricing/checkout page will look like:

If you want to use our template, you can download it by clicking on the button below:
Being able to customize your checkout page is great because you can create it using your own style and design.
For this, you will need the checkout form shortcode to paste it on the page you will create.
Hit Generate Shortcode in the checkout form.

You’ll see a popup showing the checkout form’s shortcode, and you just need to hit Copy Shortcode.

Once you’re done, go to your multisite network’s main site and add a new page or edit the default registration page added by WP Ultimo.
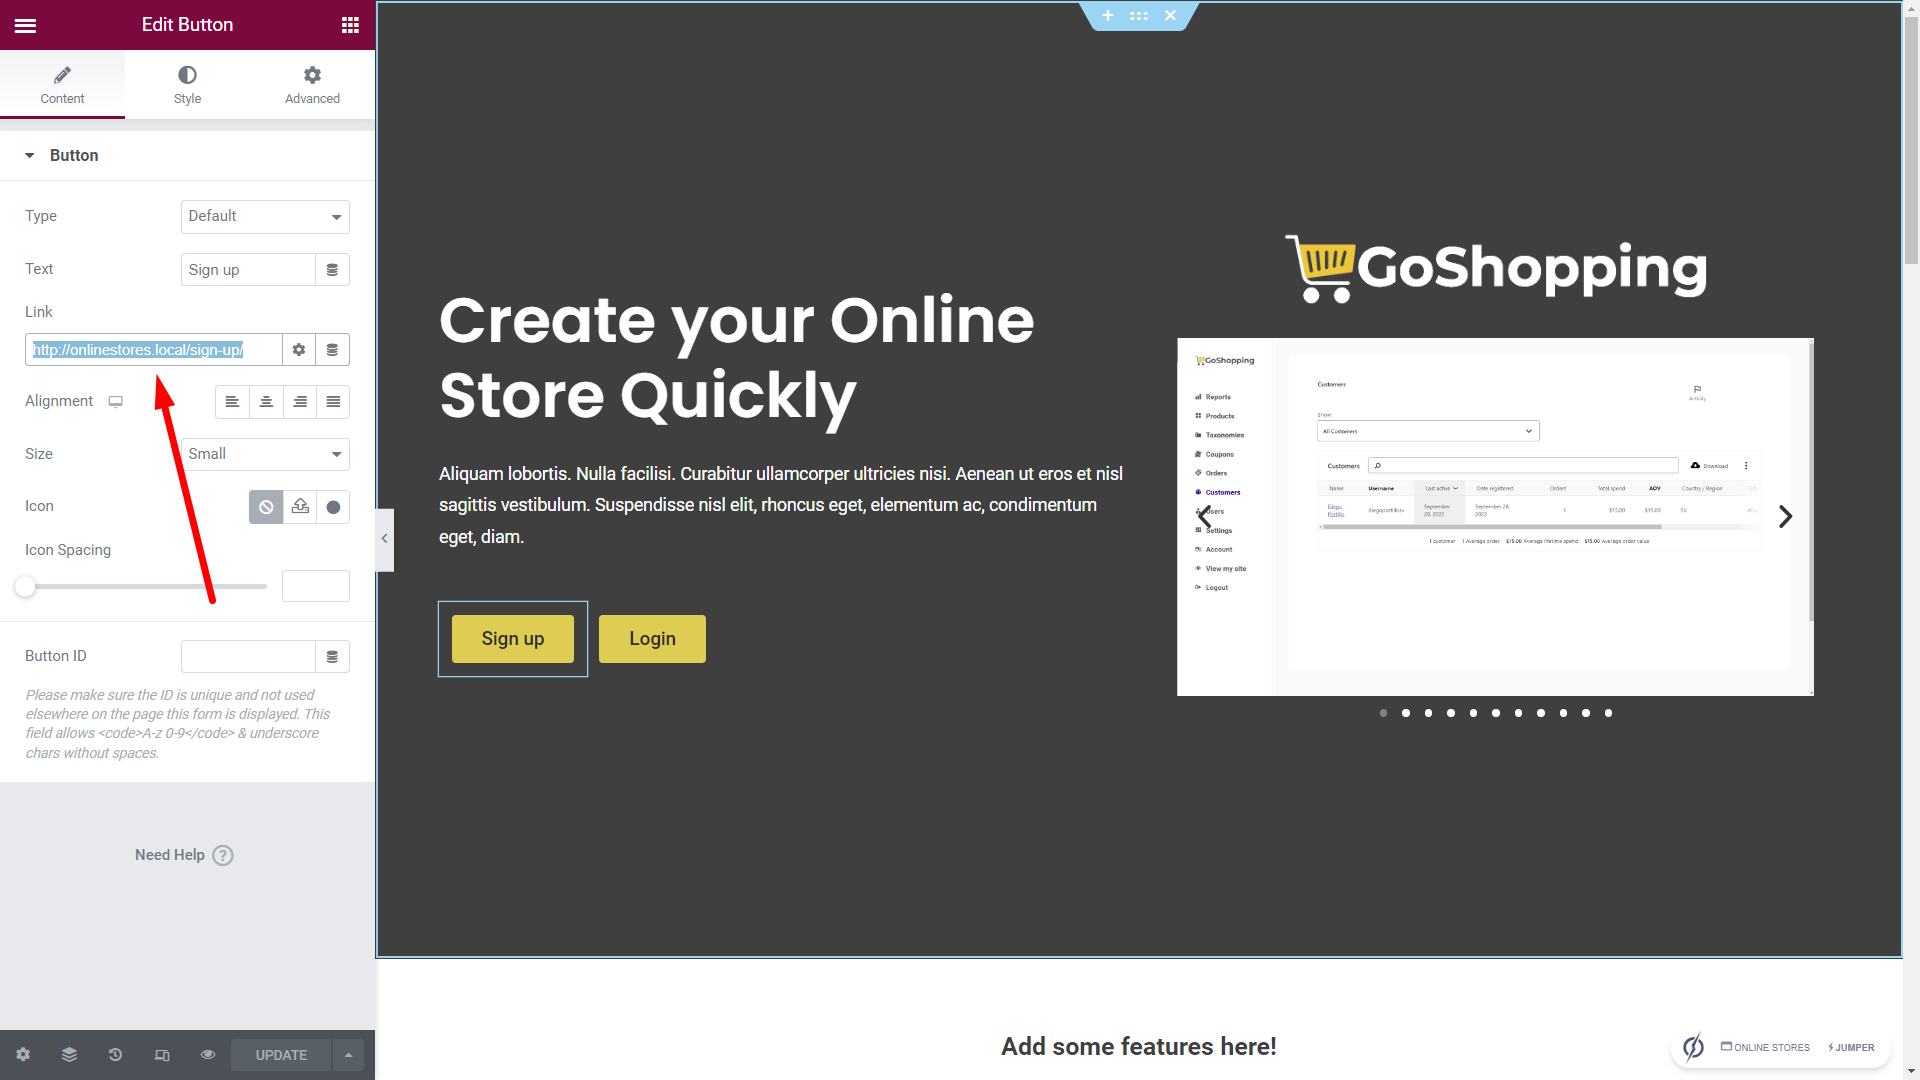
In this case, we’ll create a new page called “Checkout Process” and we will Edit with Elementor.

Once in Elementor, we need to add all the elements we want.
In this example, we have just added a page background, a site logo and a Shortcode element where we’ve pasted the checkout form shortcode.

Once we’re done editing our page, let’s hit Publish and our page will be ready.
3- Test the WP Ultimo checkout process
This is what the page will look like once it’s published.
As you can see, our customers will be able to select a membership plan in the first step of the checkout process.
In the second step, our users will view the available templates and be able to choose one template for their sites.
This is great because they will be able to configure their site’s appearance with one click.

After that, our users need to enter the Site Title and the Site subdomain. If they will use a custom domain, they can set it up after registration in the Account page on the frontend dashboard.
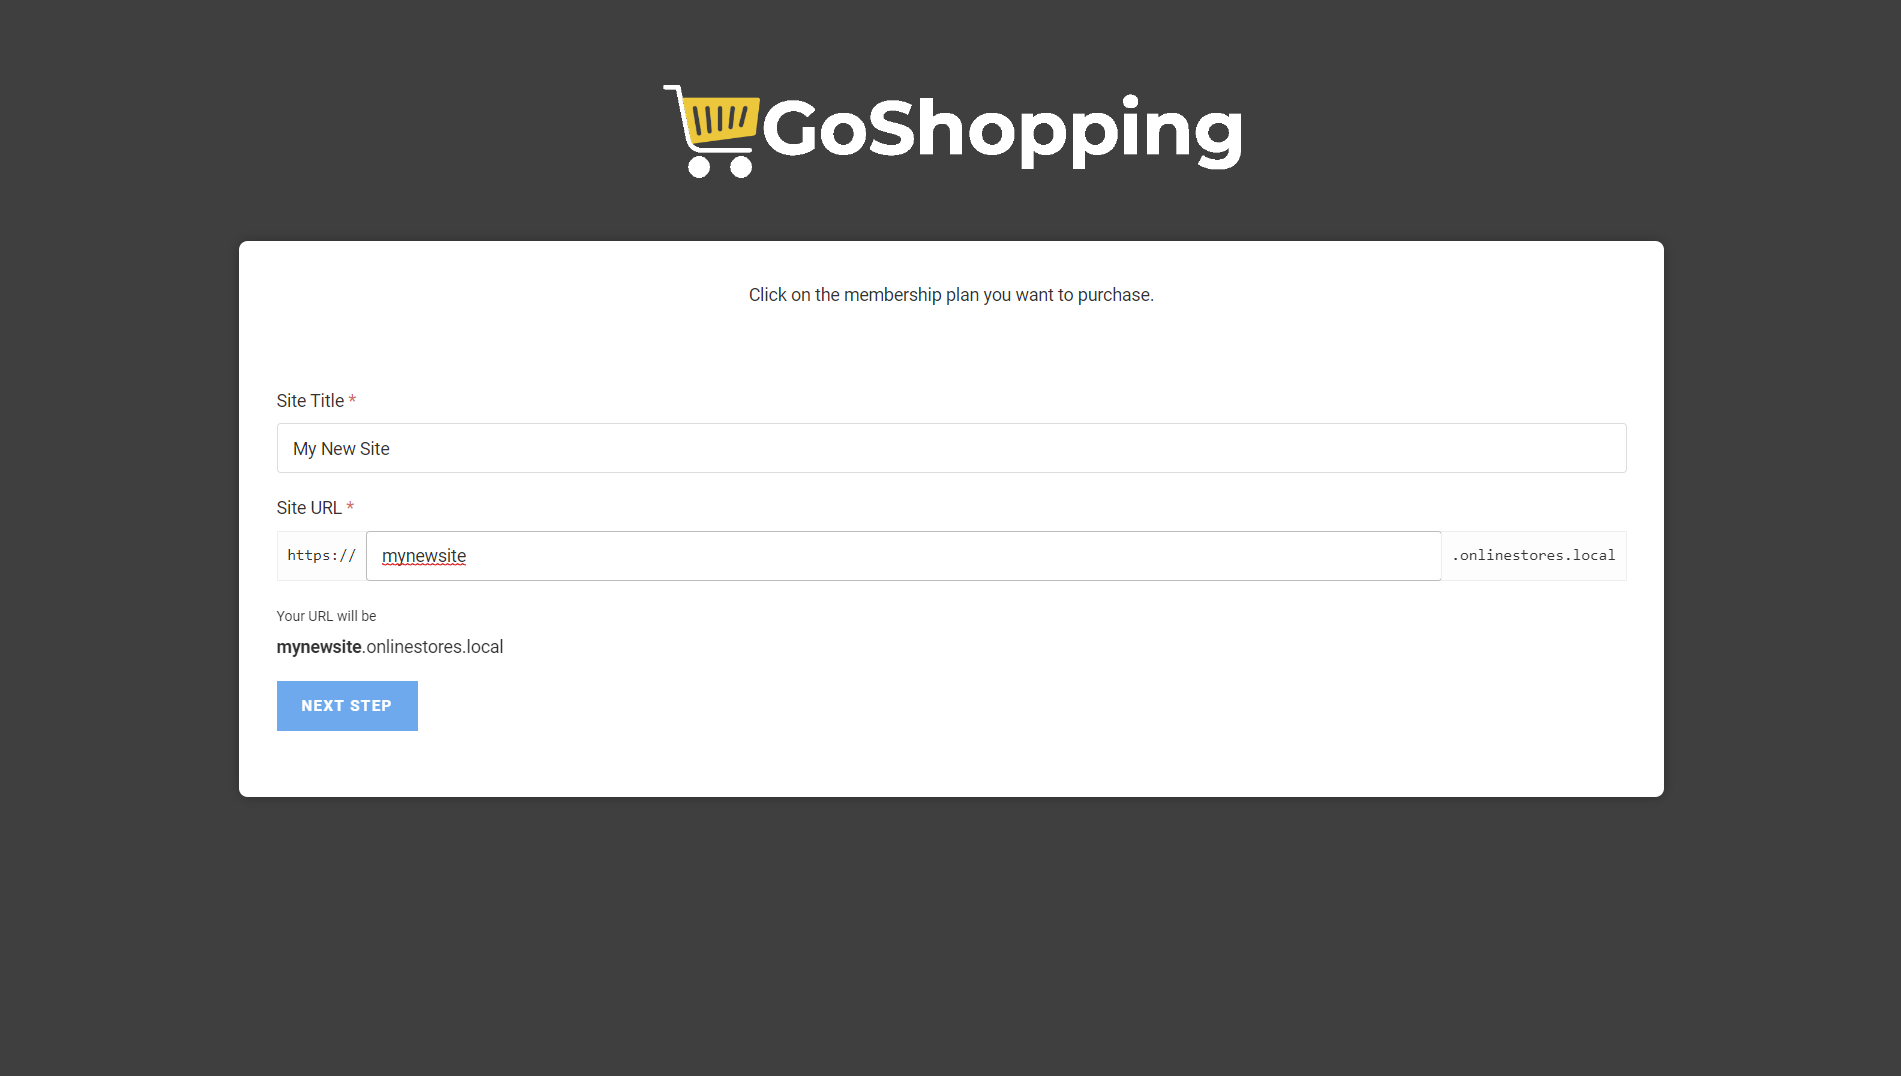
Next, users need to enter their email address, username, and password.

Finally, the customers will view the detailed information of their order, select their country and ZIP / Postal Code.

Once their order has been completed, they will see the “Thank You” step where they will be able to go to their Admin Panel or Visit the site.
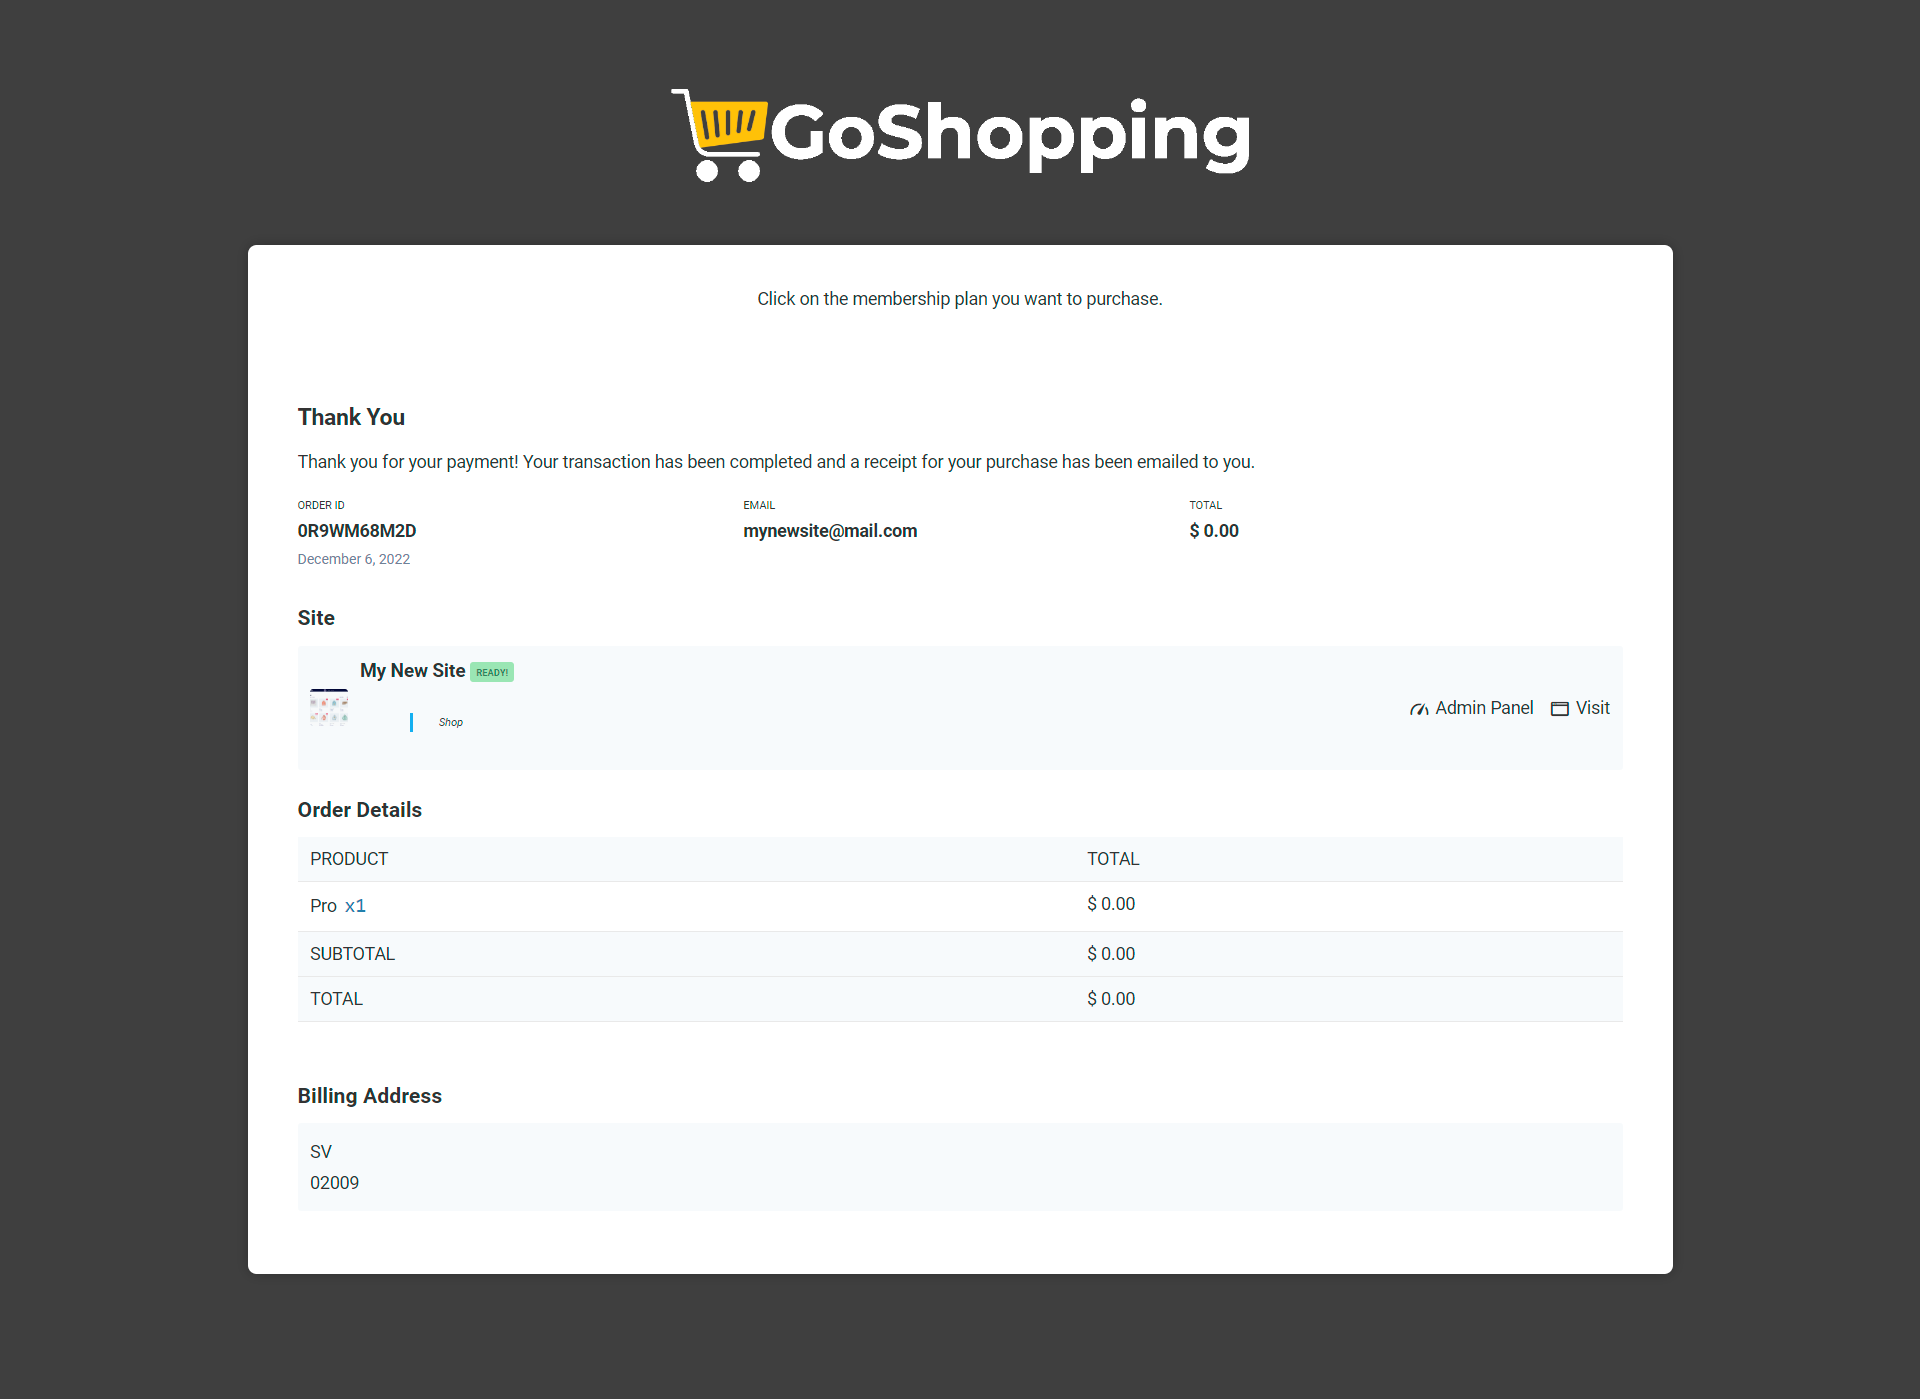
If they choose to go to the Admin Panel, they won’t use the normal wp-admin dashboard. Instead, they will use the Frontend Dashboard we created in the previous lessons.

OPTIONAL – ADD THE REGISTRATION PAGE TO YOUR HOMEPAGE
Now that you have created the checkout page, you can add a “Sign Up” button and add the URL of this page to it.
These are the steps you need to create a checkout form with WP Ultimo, and then display that checkout form in a beautiful registration page created with Elementor.
You can design your checkout page as you wish using Elementor or any other page builder.
In the next lesson, we’ll show you how to create a WP Ultimo discount code for your online stores platform.