In this lesson, we’ll learn how to add the WooCommerce orders and the WooCommerce coupons to the frontend dashboard.
First, let’s see how to add the WooCommerce orders page to the frontend dashboard.
1- Display the WooCommerce Orders on the frontend
- Go to Network Admin > WP Ultimo > Sites.
- Find the frontend dashboard site and click on Manage.
- Click on Dashboard to open the site’s admin panel.
- Go to Pages > Add New.
- Enter the page title, select the Elementor Canvas template, click on Edit with Elementor.

Once you’re in Elementor, you need to import the frontend dashboard page template into this new page.
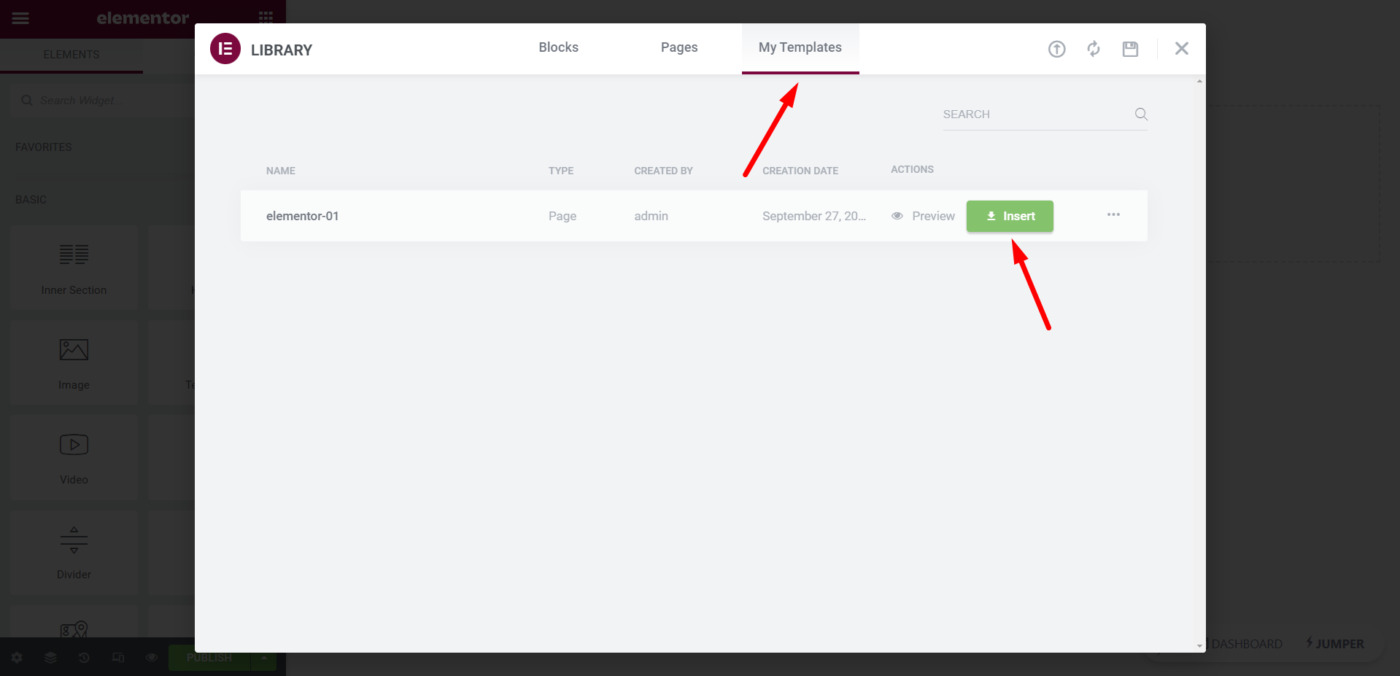
- Click on Add template.
- Go to My Templates.
- Find the frontend dashboard template.
- Click on Insert.
After inserting the page template, add the following shortcode to the content area:
[vg_display_admin_page page_url="edit.php?post_type=shop_order"]
Click on Preview changes to display the WooCommerce orders on the frontend.

2- Set up the WooCommerce orders on the frontend
You need to select the general information of the frontend WooCommerce orders page.
- Preview site: You can preview a specific subsite’s content, but right now we don’t have other subsites.
- Page Title: Enter the page title in this field.
- URL Slug: Enter the page slug on this page.
- Page Template: Default
- Add page to this menu: Select the frontend dashboard menu.

Since we have no orders, WooCommerce will show some useful links for us to learn more.
However, we will remove these links from the page.

You can also set up the “Add New Order” form on the frontend.
Click on the Add Order button.

Once here, you can remove any unnecessary elements from this page, using the Hide Element button.

You can also edit texts on this page, and select the WP Ultimo plans for which this page will be available.
Once you’re done, click on Save to apply the changes, and publish the page.
Note – You can create an order to view the list of orders on the page and hide elements or edit texts. You can also disable specific columns from the orders list.
This is what the WooCommerce orders page will look like on the frontend dashboard:

And this is what the add/edit order page will look like on the frontend:

3- Display the WooCommerce coupons on the frontend
Now let’s see how to display the WooCommerce coupons on the frontend, which is pretty much the same process we followed above.
- Go to Pages > Add New to create a new page on the frontend dashboard site.
- Enter the page title, select the Elementor Canvas template, click on Edit with Elementor.

Once you’re in Elementor, you need to import the frontend dashboard page template into this new page.
- Click on Add template.
- Go to My Templates.
- Find the frontend dashboard template.
- Click on Insert.
After inserting the page template, add the following shortcode to the content area:
[vg_display_admin_page page_url="edit.php?post_type=shop_coupon"]
Click on Preview changes to display the WooCommerce coupons on the frontend.
4- Set up the WooCommerce coupons page on the frontend
You need to apply the same steps applied above to set up the WooCommerce coupons page on the frontend dashboard.
- Select the page’s general info.
- Hide any unnecessary elements.
- Edit any texts.
- Disable any unnecessary columns.
- Restrict this page based on the WP Ultimo plan.
- Edit the add/edit coupon form.
- Publish the page.
This is what the WooCommerce coupons page will look like on the frontend dashboard:

And this is what the add/edit coupon form will look like on the frontend

In the next lesson, we’ll show you how to add the users and customers to the frontend dashboard.