IMPORTANT
WP Ultimo was abandoned by the author. But there is a free fork maintained by the community that you can use as a replacement of WP Ultimo. Read more and get the fork plugin here.
In this lesson, we’ll show you how to create a template site for your restaurant management platform.
WP Ultimo allows us to create template sites that can be cloned when a user creates a new site on our network. Therefore, this will help your customers a lot because they will be able to set up their restaurant sites with a few clicks.
Just follow these simple steps to create and set up a template site on your network.
1- Add a new template site to your network
We need to start by adding a new template site to our Multisite Network:
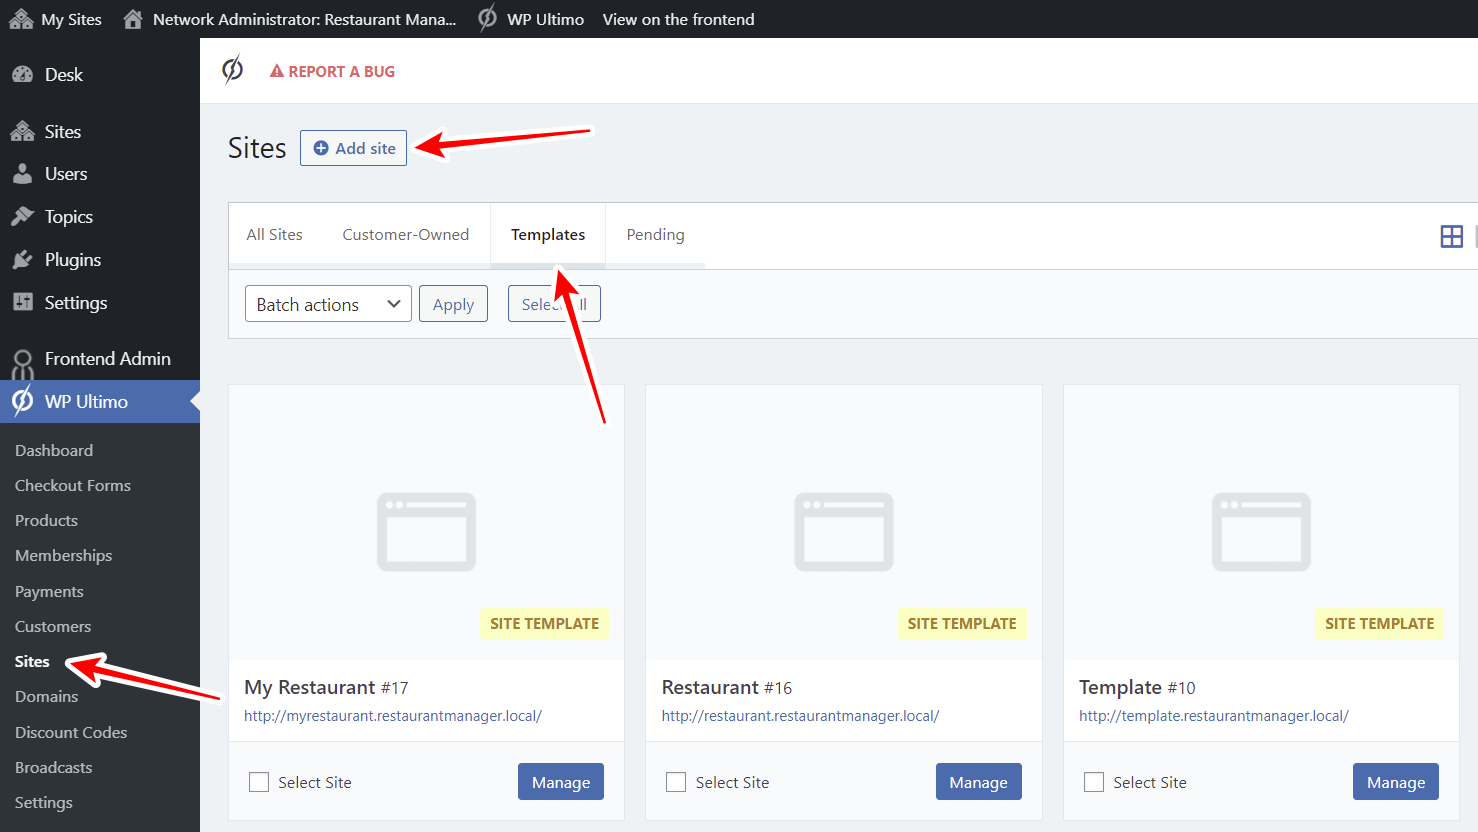
Go to Network Admin > WP Ultimo > Sites > Templates
Click Add Site.
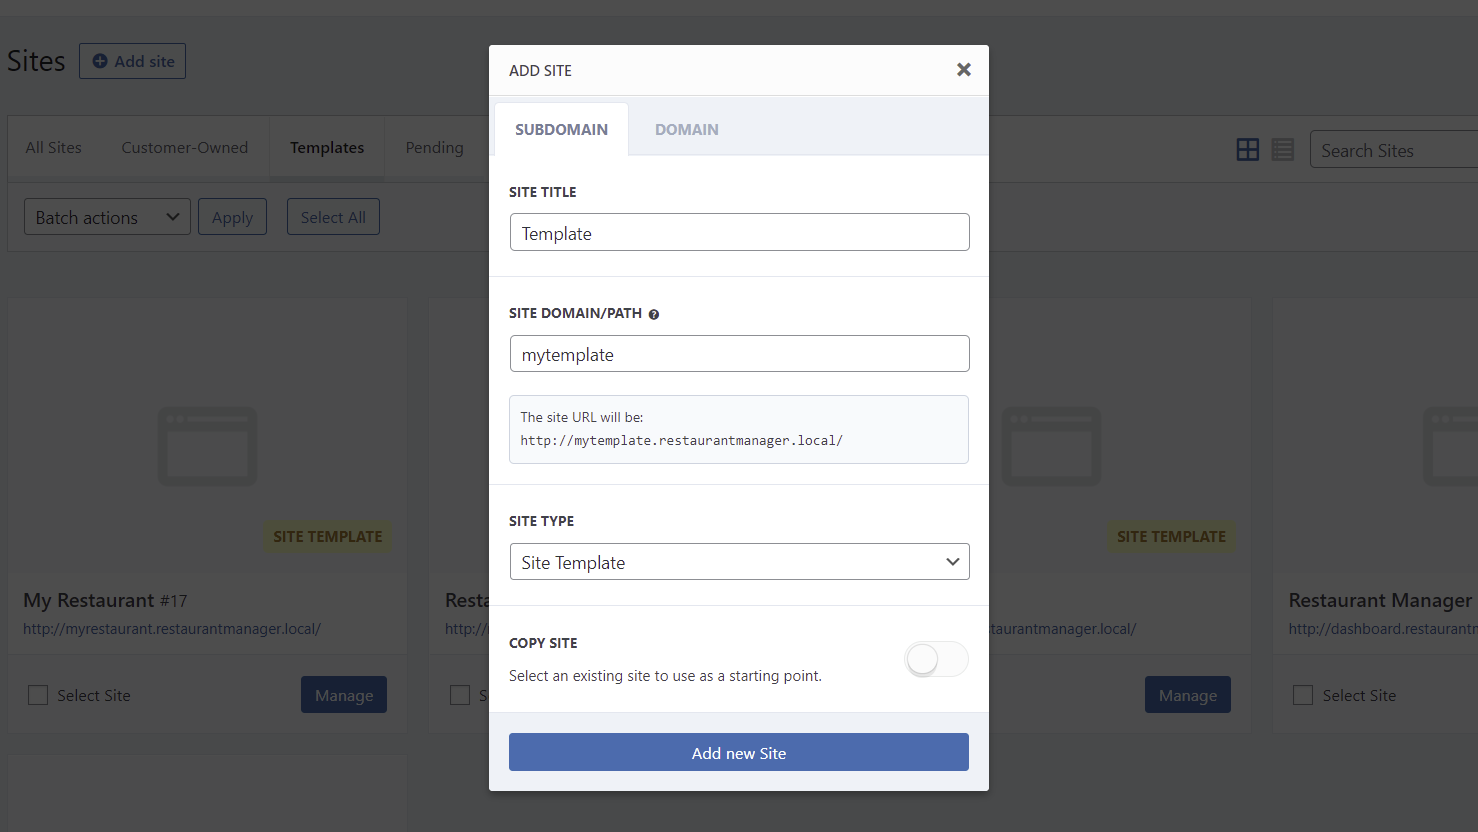
Now enter these values to create your new template site:
- Site title
- Site domain/path
- Site Type: Site Template
- Click Add new site.
Once you create your new site, click Dashboard to open the admin panel of your new site template.
2- Remove unnecessary pages and posts from the site template
There are some pages that restaurant managers won’t need to use, so we can remove them.
We just need to keep the following three pages on this site:
- Cart
- Checkout
- My account
You can remove the default Sample Page that comes with a new WordPress installation, and also remove the default WooCommerce Shop page, since we’ll create different menu style pages for our restaurant app using the WooCommerce Food plugin.
You can also remove the posts because our restaurant manager app won’t use any posts.
3- Import the theme settings for this site
We recommend you to go to Appearance > Themes and activate the Kadence theme.
We’ve set up the appearance settings so that you just import them and don’t have to work for hours to get a great appearance for your template site. 🙂
Once you download the .dat file containing the customizer settings for the Kadence theme, go to Appearance > Customize.
- Go to Export/Import (the Customizer Export/Import plugin must be active on this site)
- Choose the file
- Hit Import.
4- Create the food menu style pages
The WooCommerce Food plugin allows you to create different menu style pages using shortcodes.
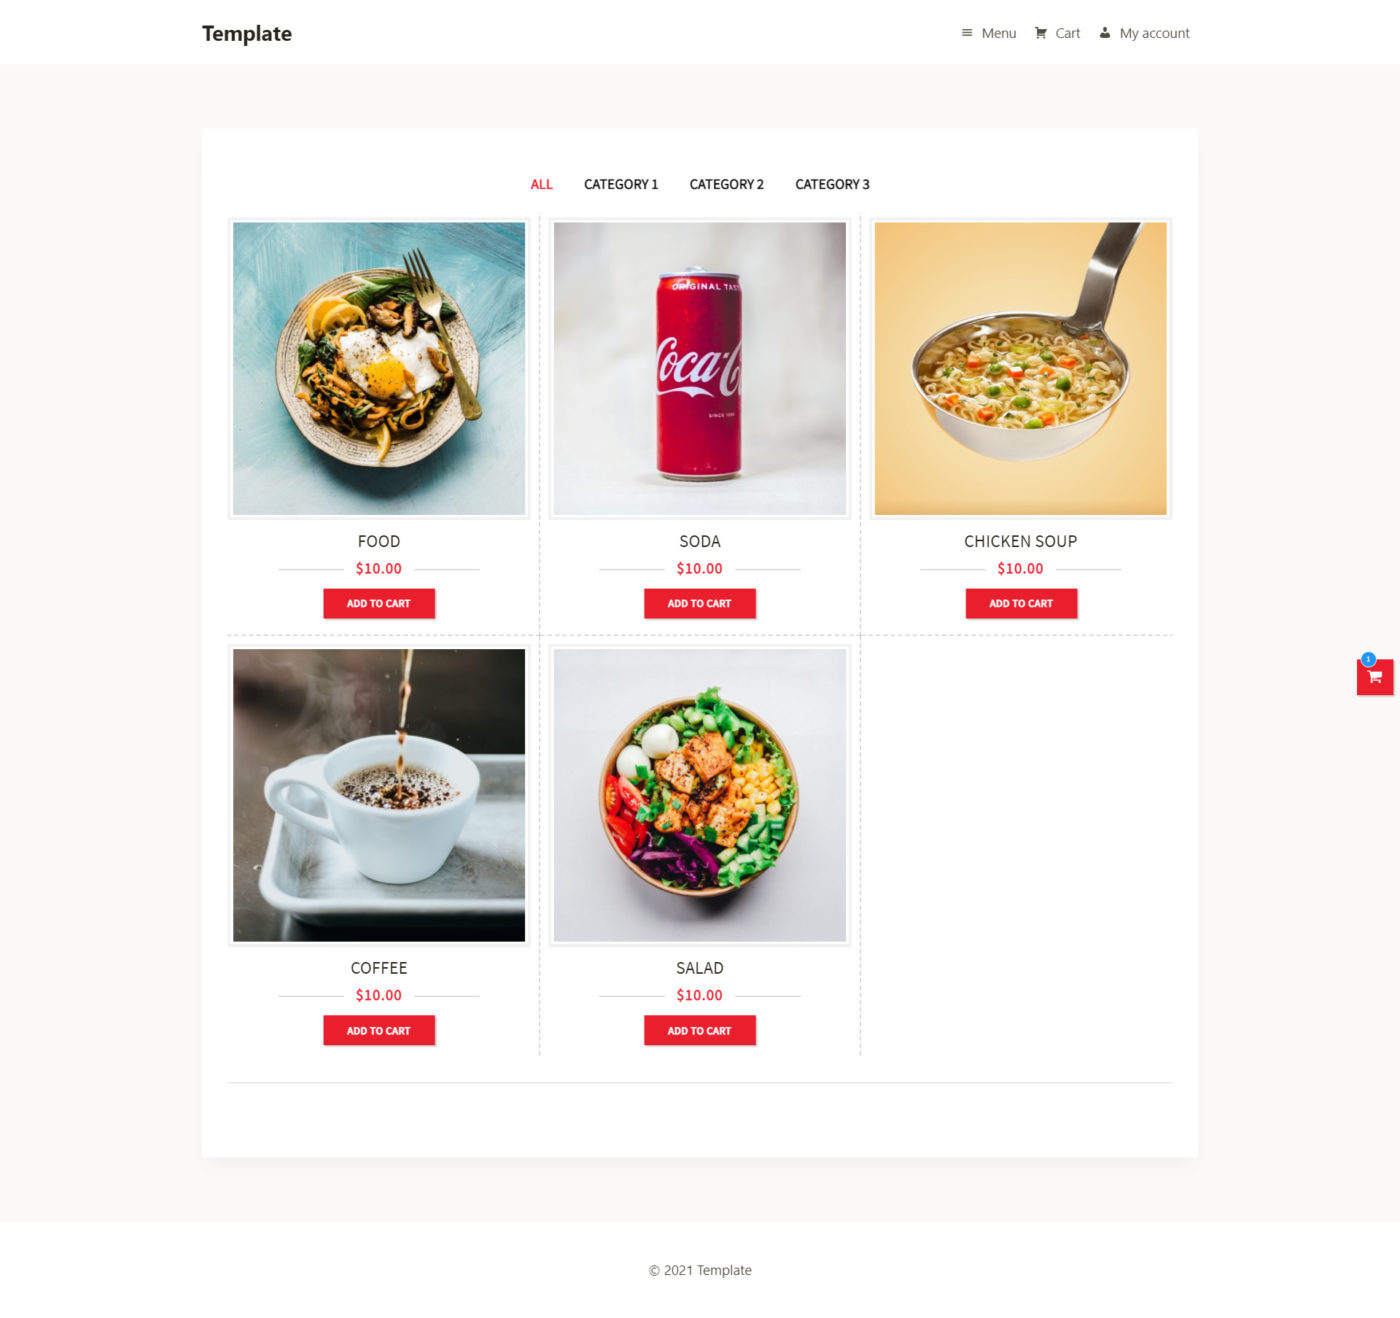
Here we want to show you how to create a page like this:
Just go to Pages > Add New, and enter the page title.
Now just enter the shortcode for the menu style you want to use.
Here are some examples of menu styles.
Grid menu style:
[ex_wf_grid column="3" posts_per_page="6" cat=" page_navi="loadmore" menu_filter="show" filter_style="icon"]
Table menu style:
[ex_wf_table style="1" count="" menu_filter ="" order_cat="" live_sort="" posts_per_page="" ids="" cat="" page_navi="" number_excerpt="" cart_enable ="" order="" orderby="" meta_key="" enable_search="yes"]
Simple table menu style:
[ex_wf_list style="1" count="10" menu_filter ="" order_cat="" menu_pos="" posts_per_page="" ids="" cat="" page_navi="" number_excerpt="" cart_enable ="" orderby="" meta_key="" enable_search="yes"]
Categories grid menu style:
[ex_wf_mngroup layout="" style="" column="" heading_style="" count="" posts_per_page="" cat="" order="" orderby="" meta_key="" meta_value="" number_excerpt="" page_navi="" order_cat="" cart_enable="" enable_search="" featured="" enable_modal="" class=""]
This is what the details of a menu item will look:
Important
You can find the full info about the WooCommerce Food shortcodes on this page.
5- Create and set up your template site’s navigation menu
Once you create the menu style pages, you need to create a navigation menu for your template site.
You need to tick the Primary Menu option for this nav menu.
These are the pages you need to add:
- Home (you can change this element’s name into “Menu”)
- Cart
- Checkout
- My Account
Also, you need to add icons to your menu items.
Once you’re done, hit Save Menu to apply the changes.
6- Make this an available template for your membership plans
Once you create your site template, you can make it available for any WP Ultimo plan. Just open your WP Ultimo plan and go to Site Templates and select the availability of your new template:
Here you can see the Cart page of the template site:
This is what the Checkout page looks like:
And this is the My Account page for your customers.
In the next lesson of this course, we will show you how to create a home page for your platform.
In this lesson, we’ll show you how to create a template site for your restaurant management platform.
WP Ultimo allows us to create template sites that can be cloned when a user creates a new site on our network. Therefore, this will help your customers a lot because they will be able to set up their restaurant sites with a few clicks.
Just follow these simple steps to create and set up a template site on your network.
1- Add a new template site to your network
We need to start by adding a new template site to our Multisite Network:
Go to Network Admin > Sites.
Go to Site Templates and hit Add New.
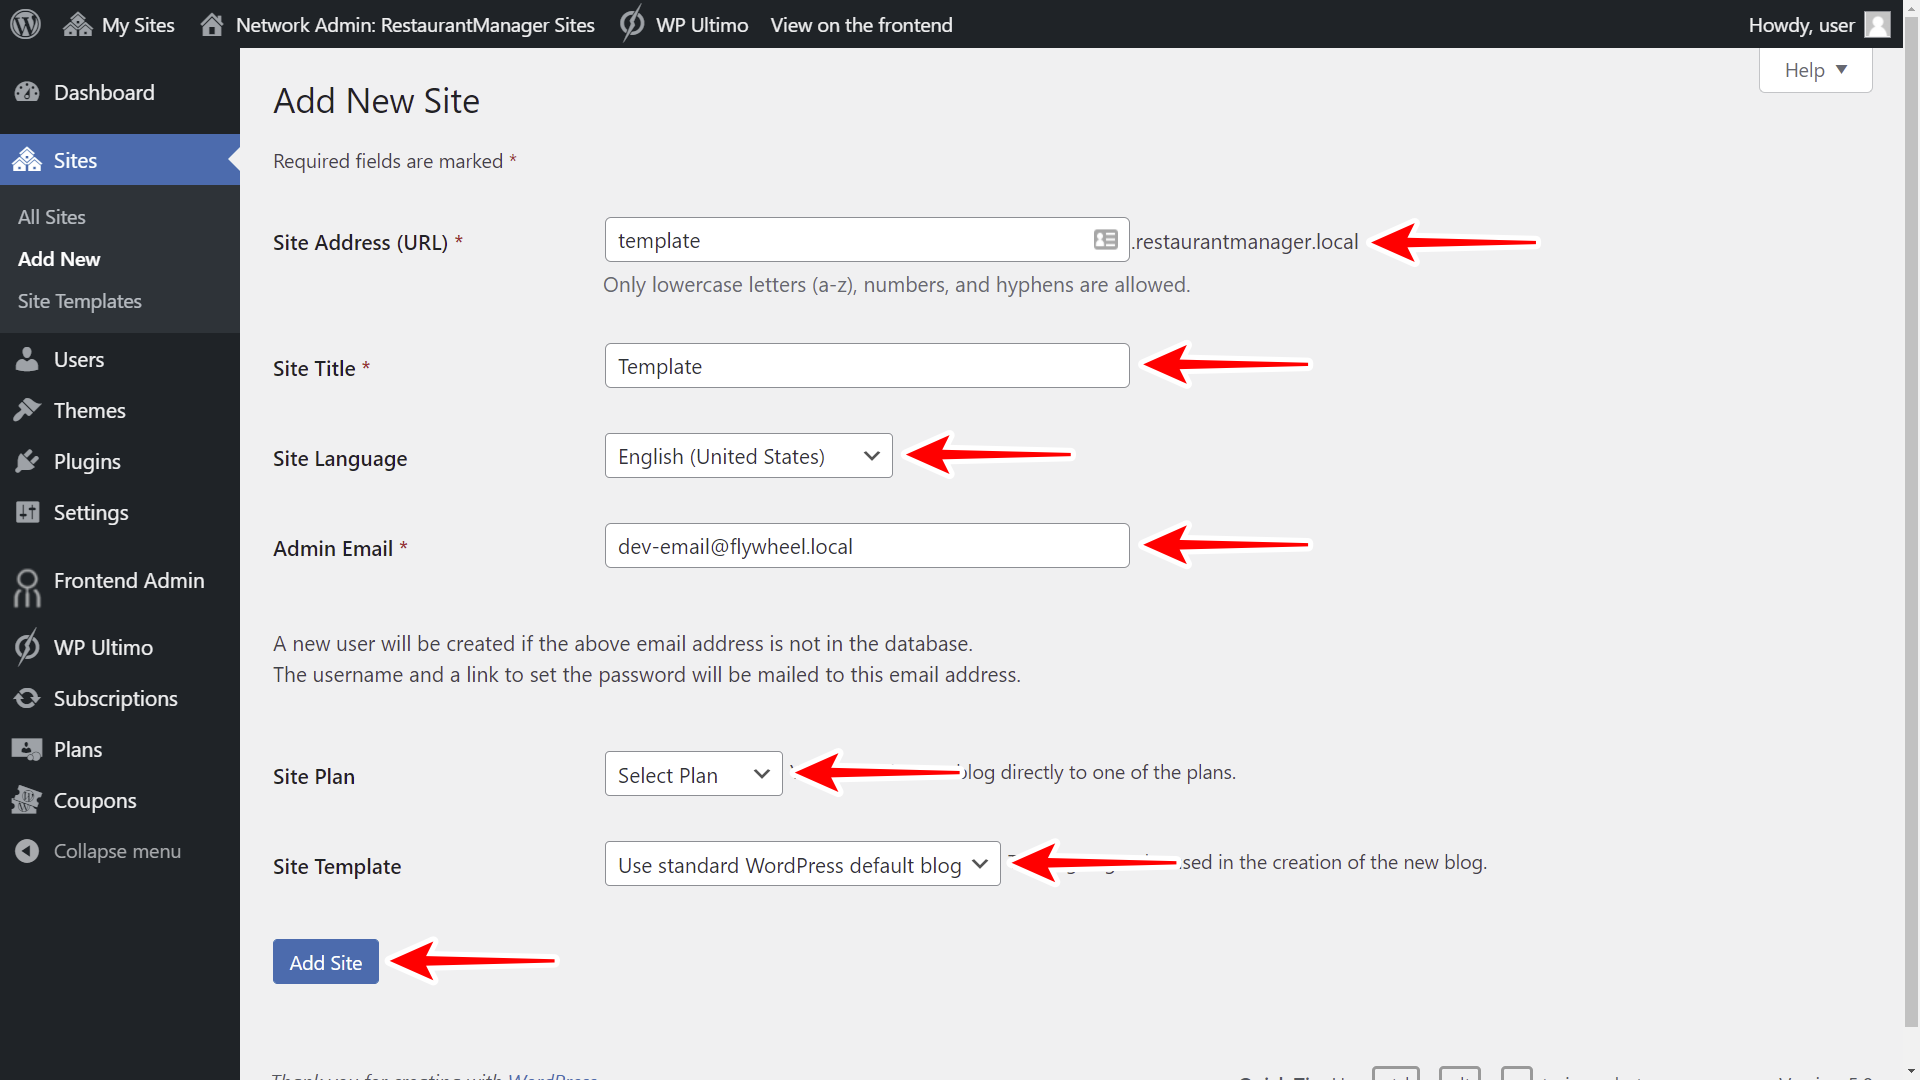
You need to add the following info to create a new template site on your multisite network:
- Site Address (URL): You can add something like “template.myapp.com”
- Site Title: We’ll call it Template.
- Site Language: Choose the site’s language from the dropdown.
- Admin Email: Write the admin email on this field.
- Site Plan: Don’t assign any plan to this template site.
- Site template: Use standard WordPress default blog
- Hit Add Site.
2- Remove unnecessary pages and posts from the site template
There are some pages that restaurant managers won’t need to use, so we can remove them.
We just need to keep the following three pages on this site:
- Cart
- Checkout
- My account
You can remove the default Sample Page that comes with a new WordPress installation, and also remove the default WooCommerce Shop page, since we’ll create different menu style pages for our restaurant app using the WooCommerce Food plugin.
You can also remove the posts because our restaurant manager app won’t use any posts.
3- Import the theme settings for this site
We recommend you to go to Appearance > Themes and activate the Kadence theme.
We’ve set up the appearance settings so that you just import them and don’t have to work for hours to get a great appearance for your template site. 🙂
Once you download the .dat file containing the customizer settings for the Kadence theme, go to Appearance > Customize.
- Go to Export/Import (the Customizer Export/Import plugin must be active on this site)
- Choose the file
- Hit Import.
4- Create the food menu style pages
The WooCommerce Food plugin allows you to create different menu style pages using shortcodes.
Here we want to show you how to create a page like this:
Just go to Pages > Add New, and enter the page title.
Now just enter the shortcode for the menu style you want to use.
Here are some examples of menu styles.
Grid menu style:
[ex_wf_grid column="3" posts_per_page="6" cat=" page_navi="loadmore" menu_filter="show" filter_style="icon"]
Table menu style:
[ex_wf_table style="1" count="" menu_filter ="" order_cat="" live_sort="" posts_per_page="" ids="" cat="" page_navi="" number_excerpt="" cart_enable ="" order="" orderby="" meta_key="" enable_search="yes"]
Simple table menu style:
[ex_wf_list style="1" count="10" menu_filter ="" order_cat="" menu_pos="" posts_per_page="" ids="" cat="" page_navi="" number_excerpt="" cart_enable ="" orderby="" meta_key="" enable_search="yes"]
Categories grid menu style:
[ex_wf_mngroup layout="" style="" column="" heading_style="" count="" posts_per_page="" cat="" order="" orderby="" meta_key="" meta_value="" number_excerpt="" page_navi="" order_cat="" cart_enable="" enable_search="" featured="" enable_modal="" class=""]
This is what the details of a menu item will look:
Important
You can find the full info about the WooCommerce Food shortcodes on this page.
5- Create and set up your template site’s navigation menu
Once you create the menu style pages, you need to create a navigation menu for your template site.
You need to tick the Primary Menu option for this nav menu.
These are the pages you need to add:
- Home (you can change this element’s name into “Menu”)
- Cart
- Checkout
- My Account
Also, you need to add icons to your menu items.
Once you’re done, hit Save Menu to apply the changes.
7- Set up the new site as a WP Ultimo template
Now it’s time to set up this site as a WP Ultimo template site.
Go to Network Admin > WP Ultimo > Settings > Network Settings.
- Allow Template Selection: Yes
- Allow Template Selection Top-bar: Yes (Optional)
- Allowed templates: Mark the Template site as an allowed template.
- Finally, Save changes.
Other pages on the template site
Here you can see the Cart page of the template site:
This is what the Checkout page looks like:
And this is the My Account page for your customers.
In the next lesson of this course, we will show you how to create a home page for your platform.
TIP
If you have a premium license of WP Frontend Admin, you can download the full backup of our restaurants platform, so you can import it on your site and everything shown in this course will be already configured for you. It will save you a lot of time.


