Important. This post focuses on configuring a global frontend dashboard site for WordPress Multisite. However, you can configure a beautiful dashboard on a normal site as well.
We show you how to set up the dashboard templates we offer with the Standard and Platform plans for the OceanWP theme.
Besides installing WP Frontend Admin, you need to:
- Download, install and activate the OceanWP theme on the dashboard site.
- Download, install and activate the Ocean Extra plugin on the dashboard site.
- Download, install and activate the WP Menu Icons plugin on the dashboard site.
- Download, install and activate the Shortcode in Menus plugin on the dashboard site.
1- How to import the dashboard template
To import the OceanWP dashboard templates, you need to follow these simple steps:
- Download the template file and unzip it on your computer.
- Open your frontend dashboard site.
- Go to Theme Panel > Import/Export.
- Click Choose File.
- Select the .dat file from your computer.
- Click Import Settings.
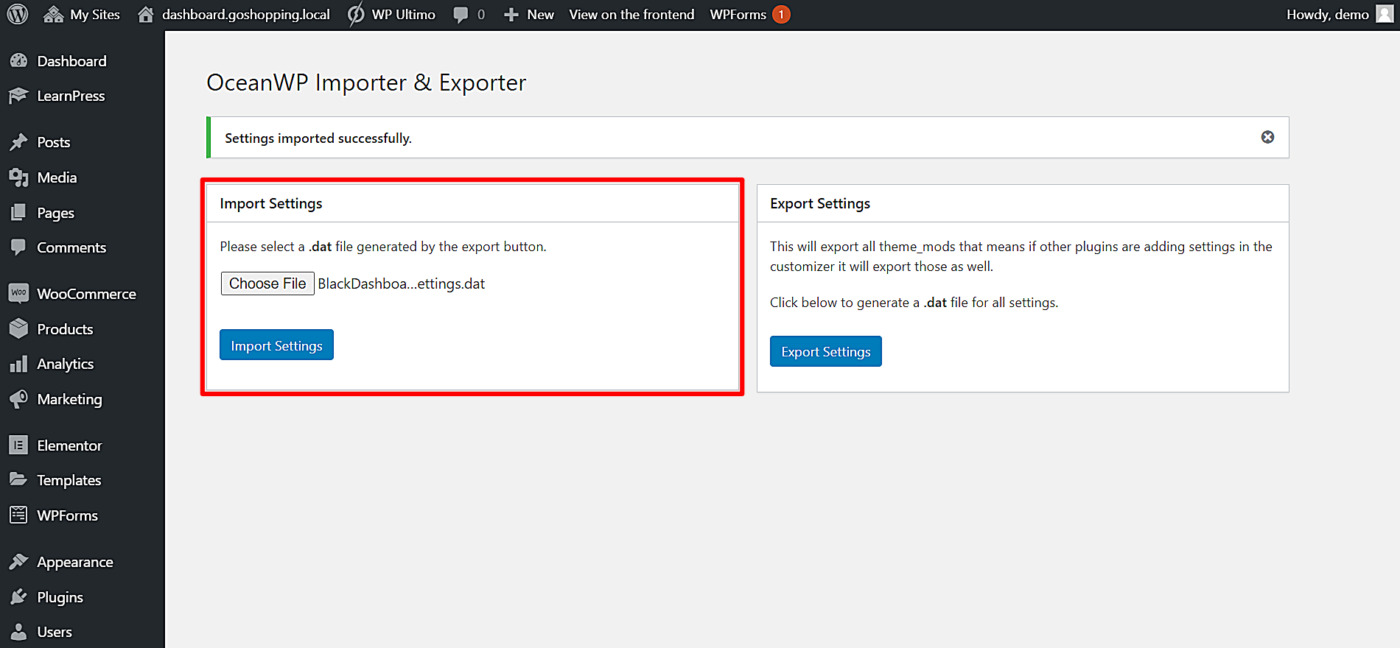
Once the settings are imported, you’ll see a message telling you something like, “Settings imported successfully“.
2- How to Select the dashboard logo
IMPORTANT: You can configure the dashboard as you want, using your own colors, logo, typography, etc. You need to do this using the OceanWP theme’s customizer.
After importing your preferred template, you need to select the dashboard logo if the dashboard design includes a logo. Just follow these simple steps:
- Go to Appearance > Customizer.
- Once the customizer opens, go to Header > Logo.
- Select the logo from your computer or from your site.
- Click Publish on the customizer to apply the changes.
![]()
![]()
3- How to create the dashboard menu
After selecting the logo, you need to create the dashboard menu, where you’ll add the frontend dashboard pages later on.
- Go to Appearance > Menus
- Enter the Menu Name.
- Click Create Menu.

The menu will be empty by now because later on we’ll add the frontend dashboard pages.
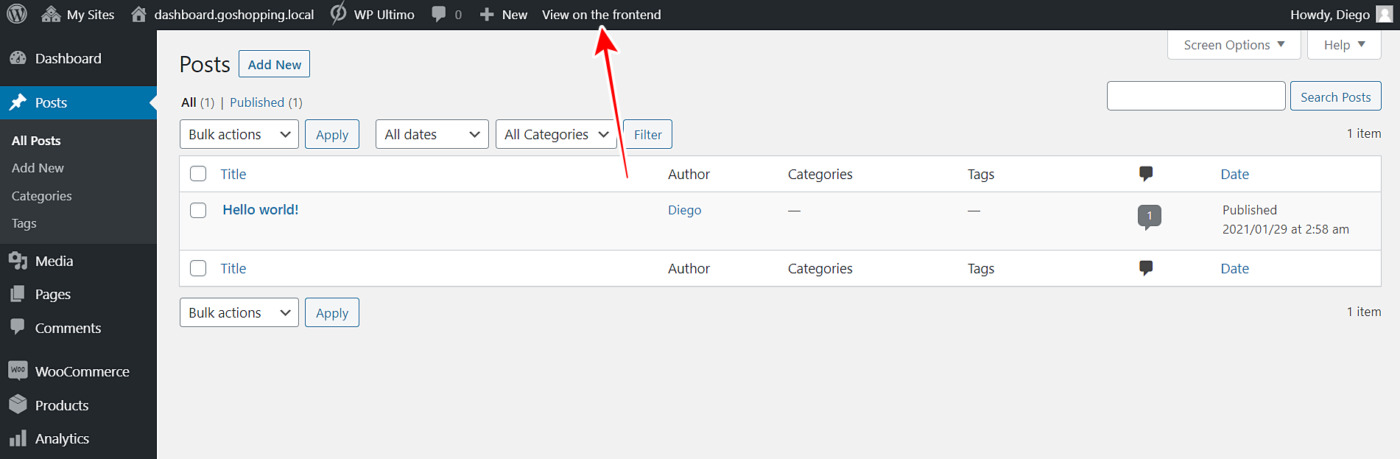
4- How to create frontend dashboard pages
After selecting the logo and menu, you can proceed to create the dashboard pages with WP Frontend Admin. It’s really simple, and you have at least two options to display admin content on the frontend:
Automatic way
Go to the admin page you want to display on the frontend and click View on the frontend in the top toolbar.
Manual way
Create a new page and enter the following shortcode as the page content:
[vg_display_admin_page page_url="wp-admin URL"]
Just replace wp-admin URL with the URL of the page you want to display in the frontend. For example:
[vg_display_admin_page page_url="http://site.com/wp-admin/edit.php"]
After that, click Preview changes to display the admin content in the frontend.

Once you hit Preview Changes, you’ll see the admin content displayed on the frontend.
However, you may not see the WP Frontend Admin’s Quick Settings panel because the dashboard menu (when it’s side menu), will cover the panel.

Therefore, we’ll use a quick solution; we’ll move the side menu to the right side.
- Go to Appearance > Customize.
- Now go to the Header settings.
- Open the General settings of the header.
- Go to Position and select Right.
- Finally, hit Publish.
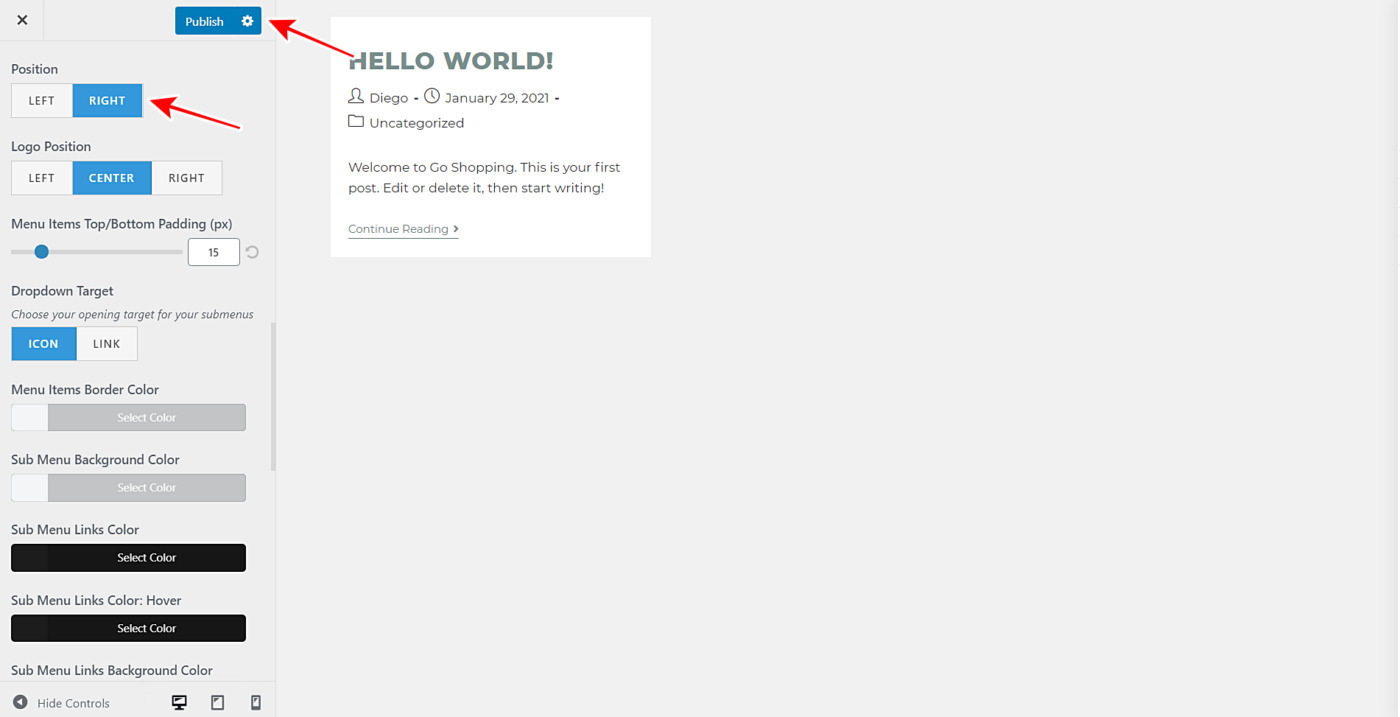
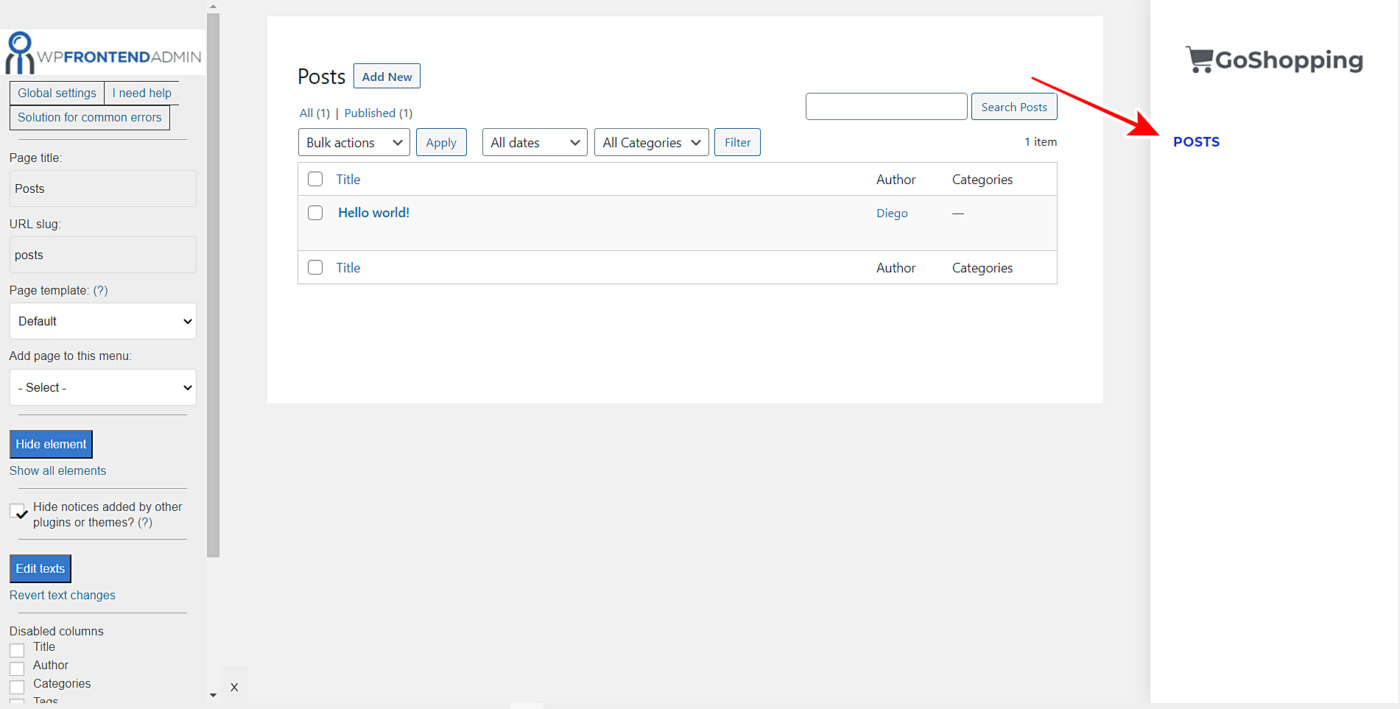
Now go back to the frontend page you were creating and reload the page. This is how it will look with the side menu on the right side.

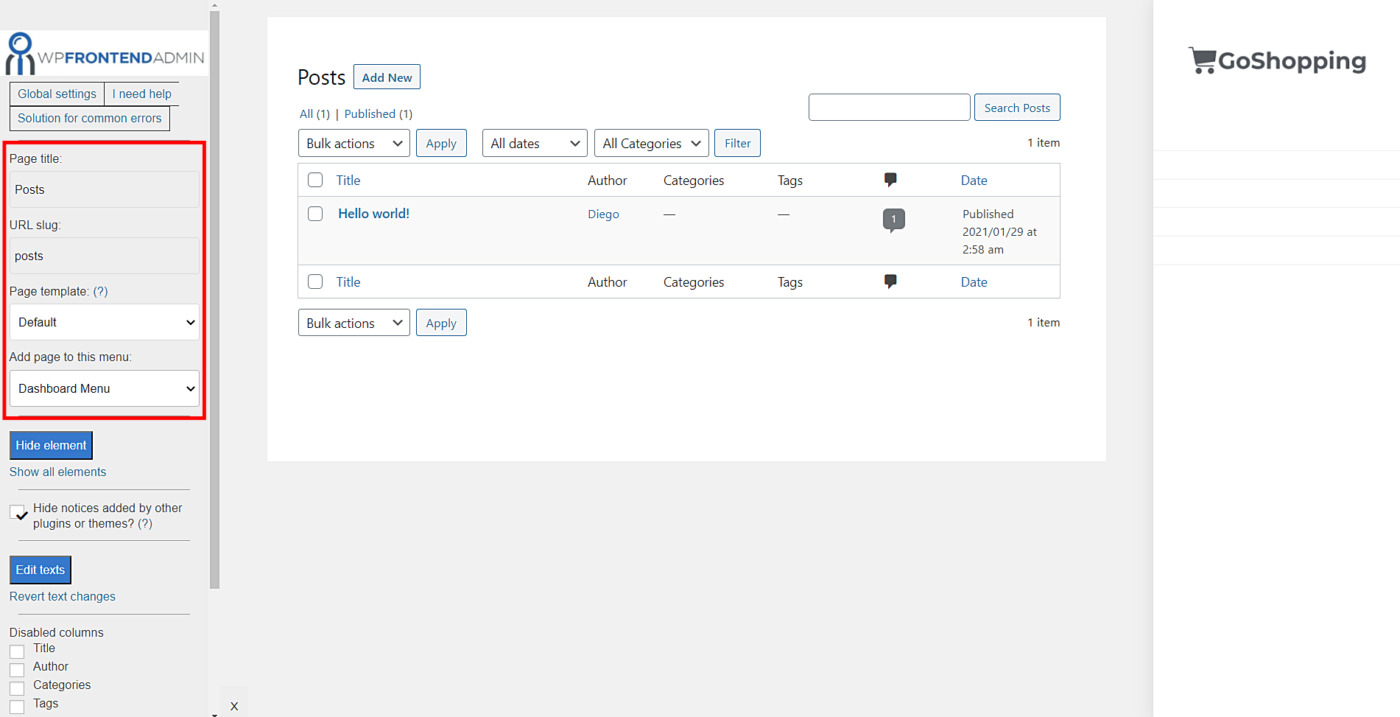
Now you’re ready to continue configuring your frontend page. You can select the page’s general information using the following fields:
- Page title: Enter the page title here. It may be inherited if you displayed the admin content using the Manual way.
- URL Slug: Enter a friendly slug here.
- Page template: Default
- Add page to this menu: Select the menu you created in Step 3 of this tutorial.
Now you can hide any unnecessary elements to simplify the page and make it look clean and elegant.
- Click Hide element.
- Click the elements you want to hide one by one.
- Optional. You can revert all the changes by clicking Show all elements below the Hide element button.
Also, you can Hide notices added by other plugins or themes to avoid future automatic unnecessary elements on your dashboard pages.

After that, you can edit the admin texts to customize the page even more.
- Click Edit texts.
- Change all the texts you want.
- Click Stop editing texts.

If the admin content you’re displaying in this frontent page is a list of posts of any post type, you can disable unnecessary columns by ticking the columns you want to hide.
Also, you can decide if you want the users to see their posts only, or if they can see the posts from other users of the same site. If you choose to show the user’s own posts only, tick the The users shoud see the posts created by the only checkbox.
Once you’ve made these changes, you can publish the page by hitting Save.

Now you’ll see that the page has been added to the dashboard menu.
Important:
- The Hide element button allows you to simplify any page. For example, if you’re showing the Posts admin page on the frontend, you can then open the Add New post form and remove all the non-essential fields and metaboxes.
- You can Edit texts in other pages as well. For example, you can edit texts on the Add New post form.
- You need to repeat the same steps to create the other frontend admin pages.
- After creating all the dashboard pages, you need to revert the temporary change applied to the dashboard menu. Go to the customizer and change the menu position from the right to the left.
5- How to add icons to your dashboard menu
Once you’ve added all the dashboard pages, you can add beautiful icons to the menu items.
First, go to Appearance > Menus.
Now, select a menu item and open the menu settings.
![]()
![]()
Now you need to select the menu icon and hit Save.
![]()
![]()
Important:
- There are some dashboard templates that don’t require menu icons.
- There are some dashboard templates that need to have the menu item labels hidden. In this case, you can select the menu item’s logo and select Hide Label = Yes.
- You can also edit the menu icons’ size using the Size field in the menu icon settings.

6- How to add “View User Site” and “Log Out” buttons to dashboard menus
WP Frontend Admin allows you to easily add the View User Site and Log Out buttons to your dashboard menus.
- Go to Appearance > Menus.
- Add a new Custom Link.
- Enter the shortcode in the URL field.
- Enter the menu item label in Link Text.
- Click Add to Menu.
- Do that with both the View User Site and the Log Oug buttons.

Here are the two shortcodes you need to use:
- View My Site: [wp_frontend_admin_my_site_url]
- Log Out: [vg_display_logout_url]
Here’s how our dashboard looks once it’s been configured:


