1- What is a global front-end dashboard
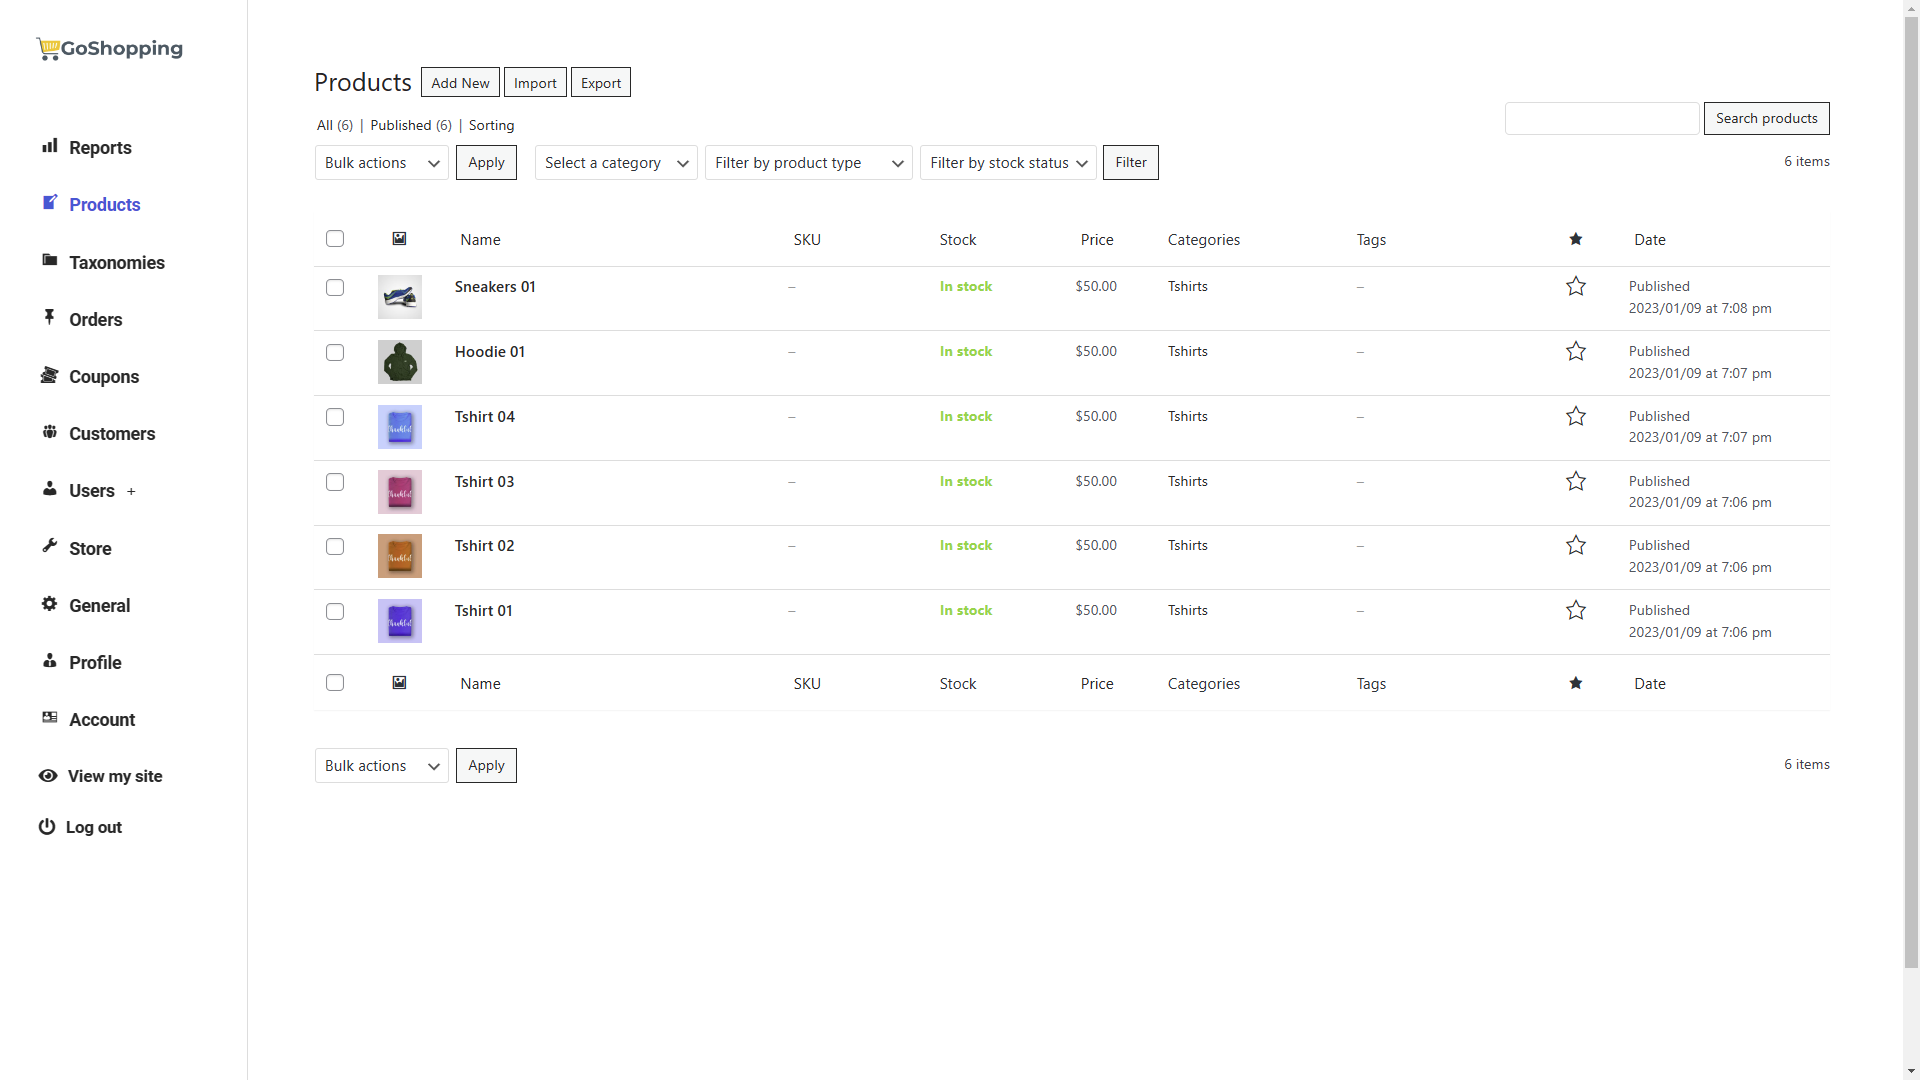
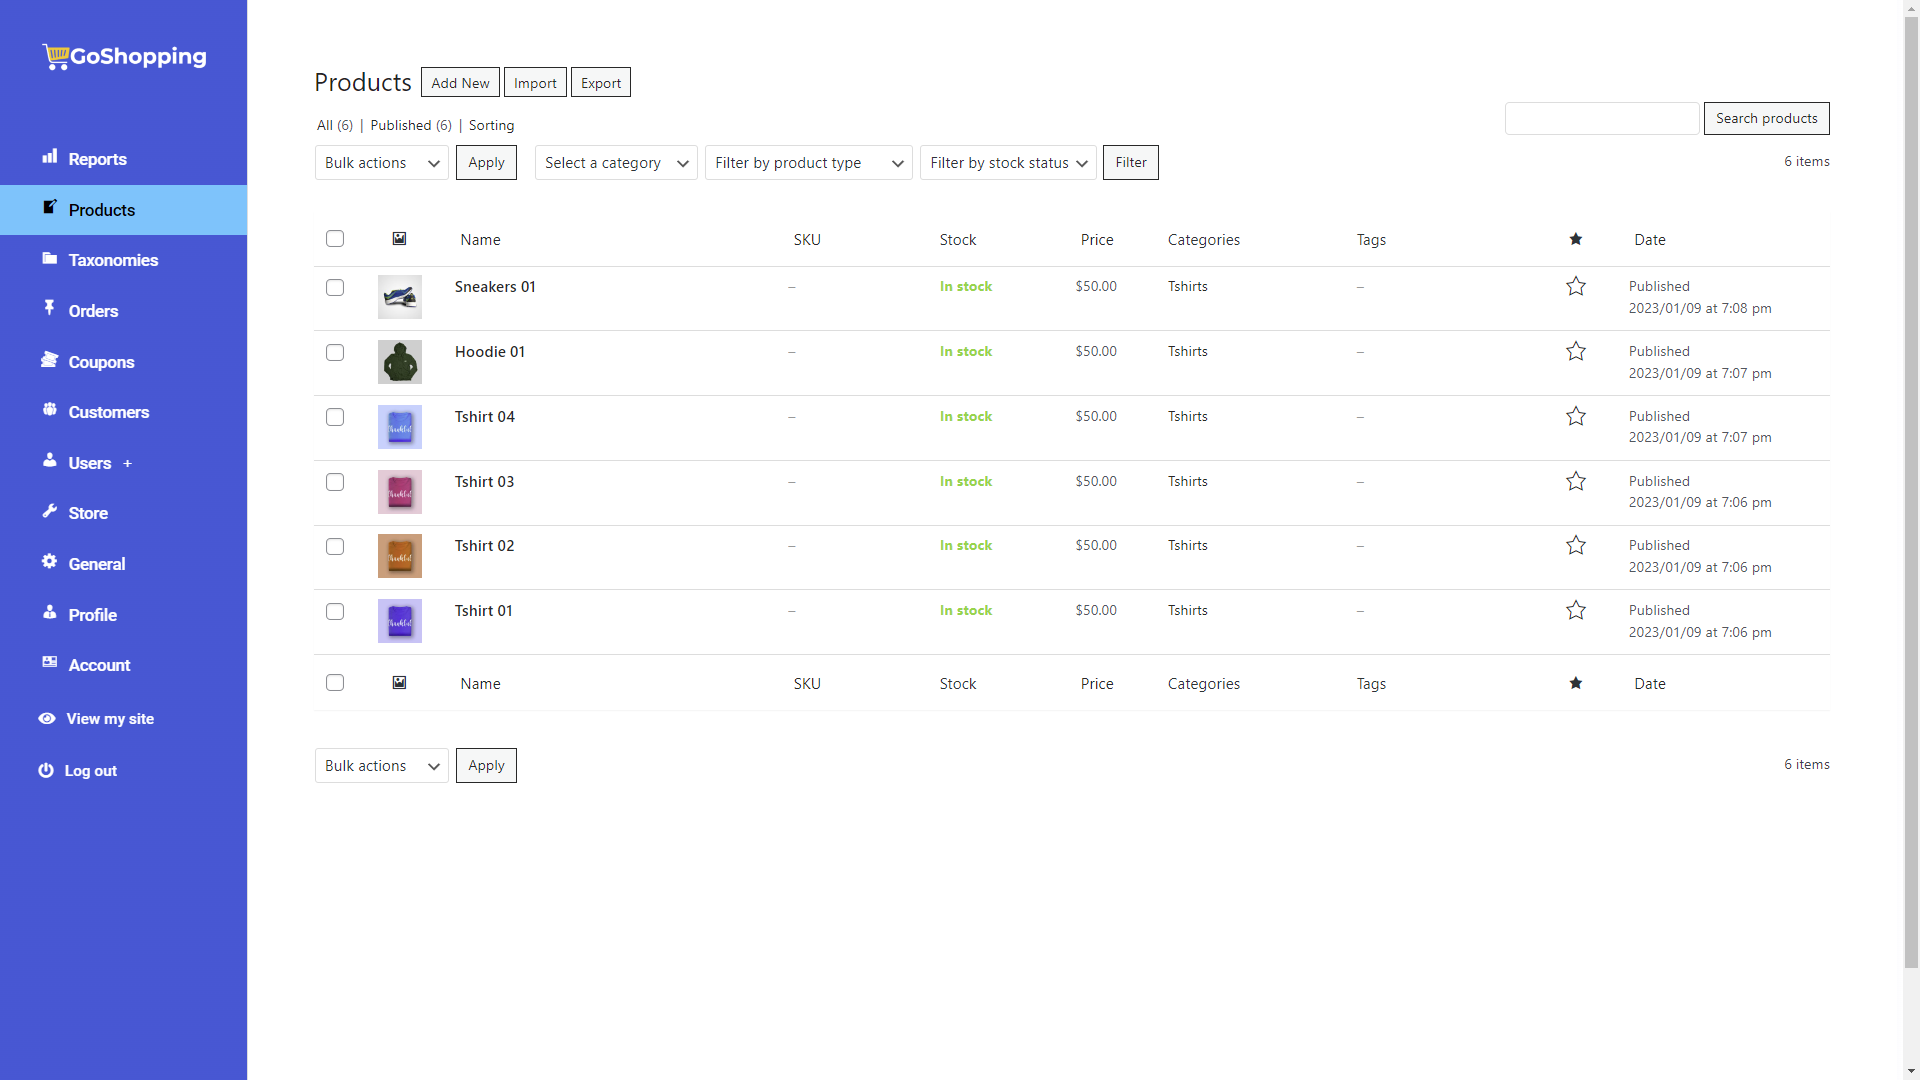
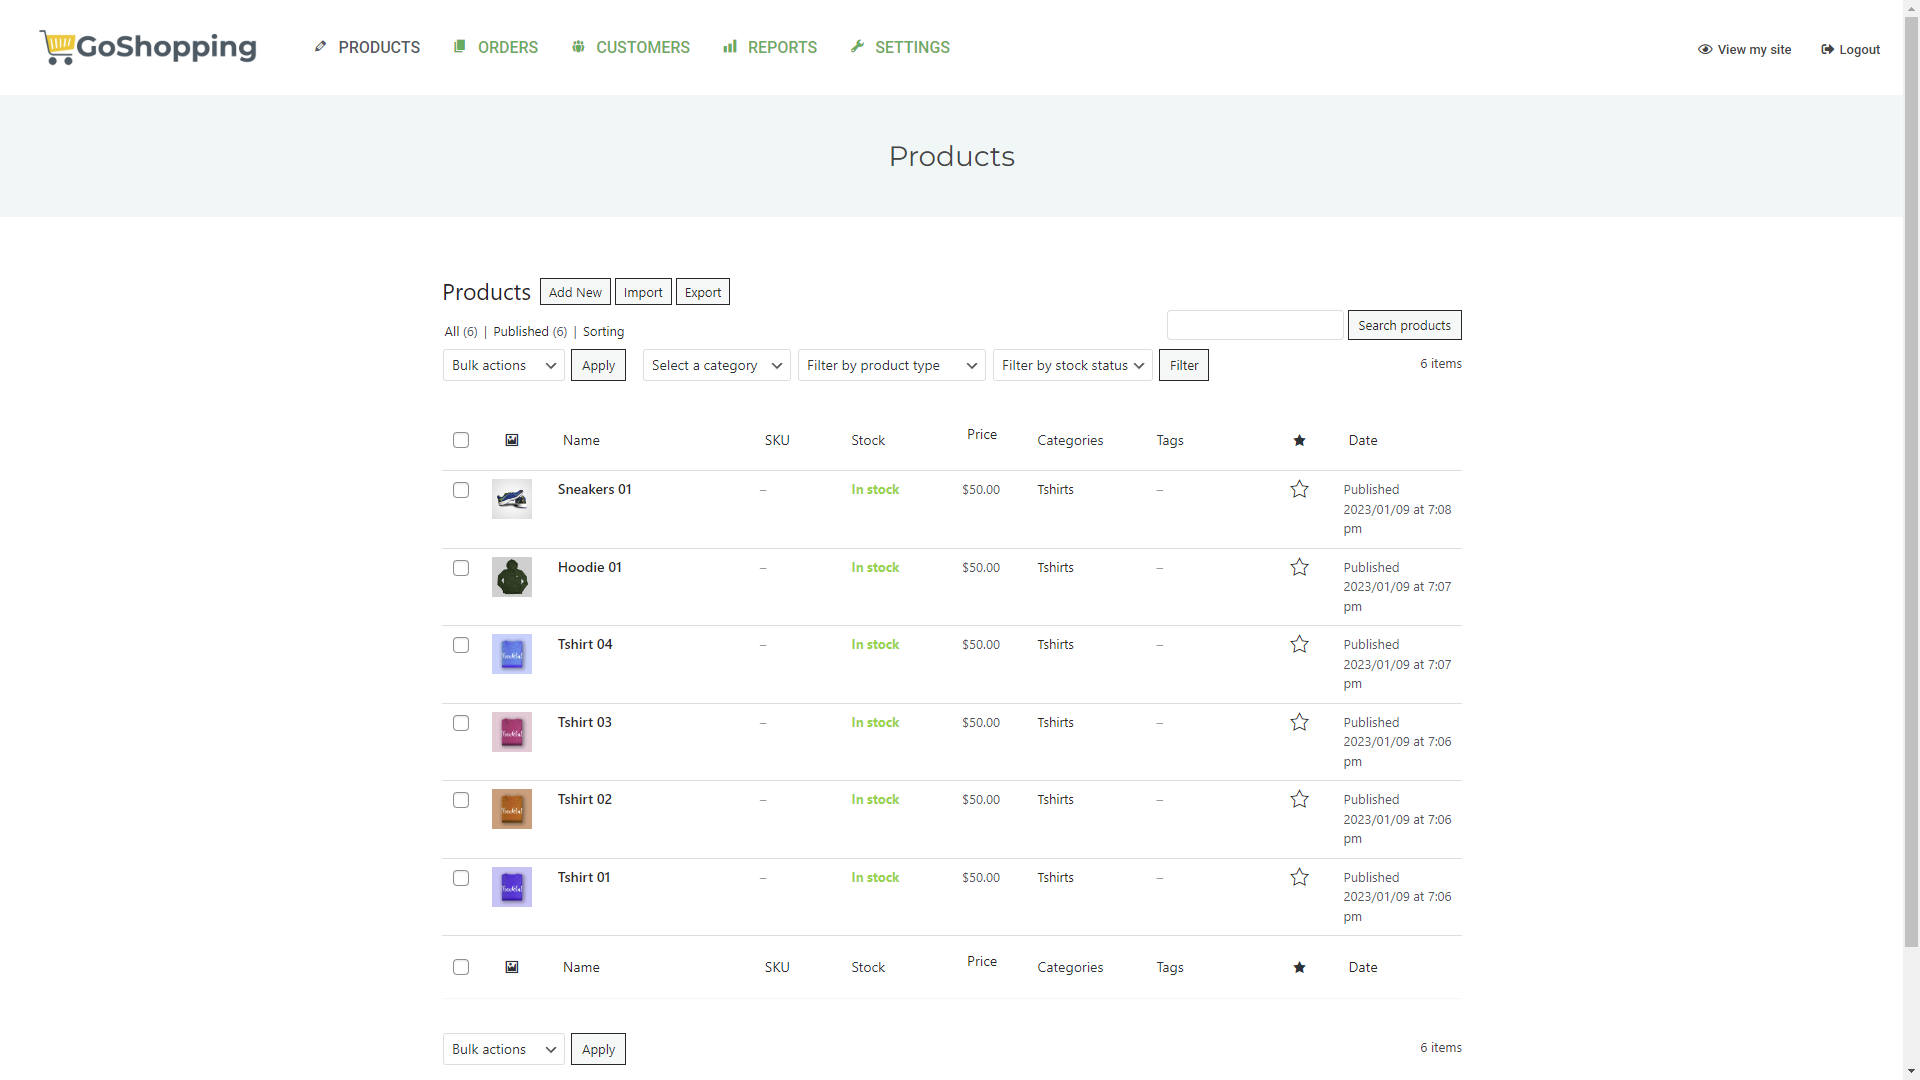
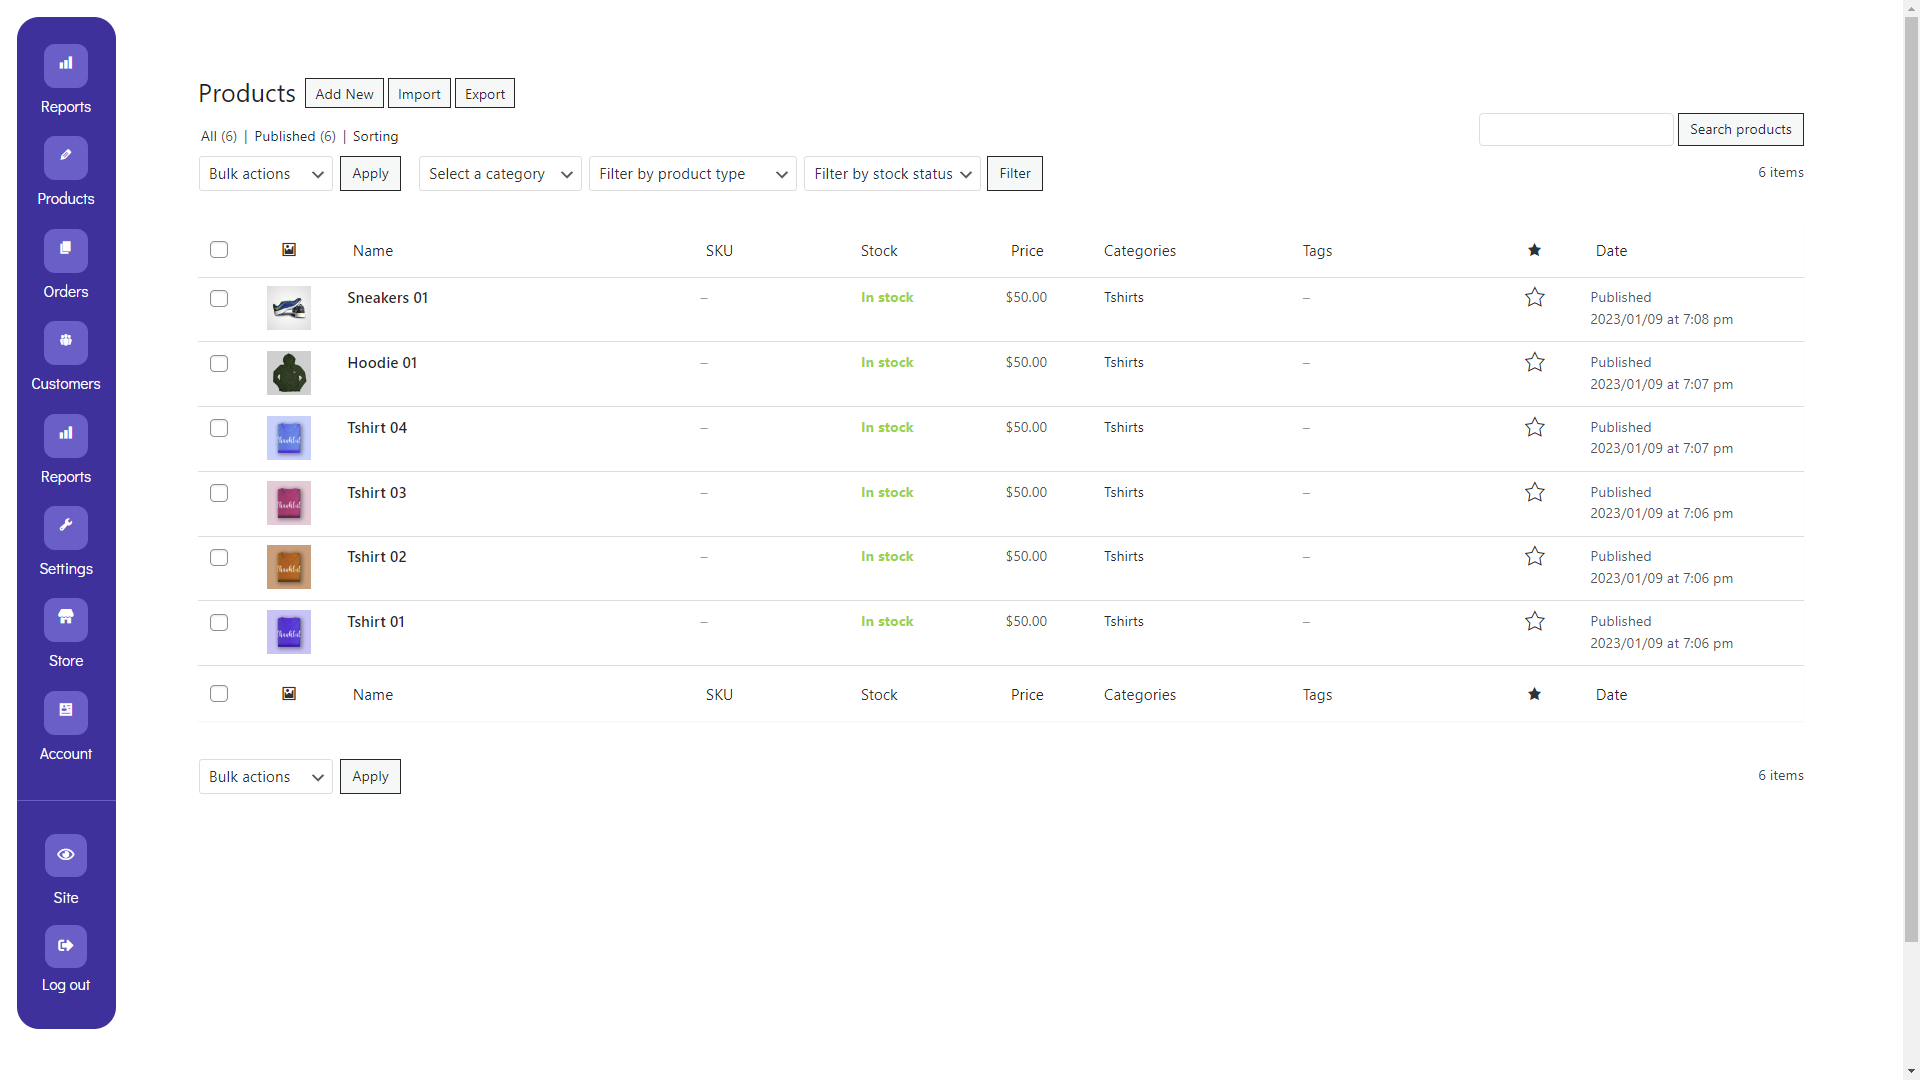
As you know, to manage a normal WordPress site (a tenant in the Wildcloud ecosystem), we must use the wp-admin dashboard.
This is what users would normally see when managing their online stores on your platform:

However, this is not the best option, especially if we are creating a customized platform to sell sites and online stores that is similar to other options like Shopify, Wix, etc. We need our own user interface.
This is where the concept of a global front-end dashboard becomes necessary.
A global frontend dashboard is a normal WordPress site (a tenant in the Wildcloud ecosystem) where you configure a custom dashboard for your entire platform.
WP Frontend Admin allows you to display any wp-admin page on the frontend to create custom dashboards, web apps based on WordPress plugins, etc.
In the case of multisite networks or Wildcloud applications, WP Frontend Admin allows you to use a specific site as the global dashboard from which all your clients will be able to manage their own sites. When they try to open the wp-admin dashboard of their own sites, they will be automatically redirected to the global dashboard site.
WP Frontend Admin is compatible with any WordPress theme or page builder, so you can design your frontend dashboards the way you want.
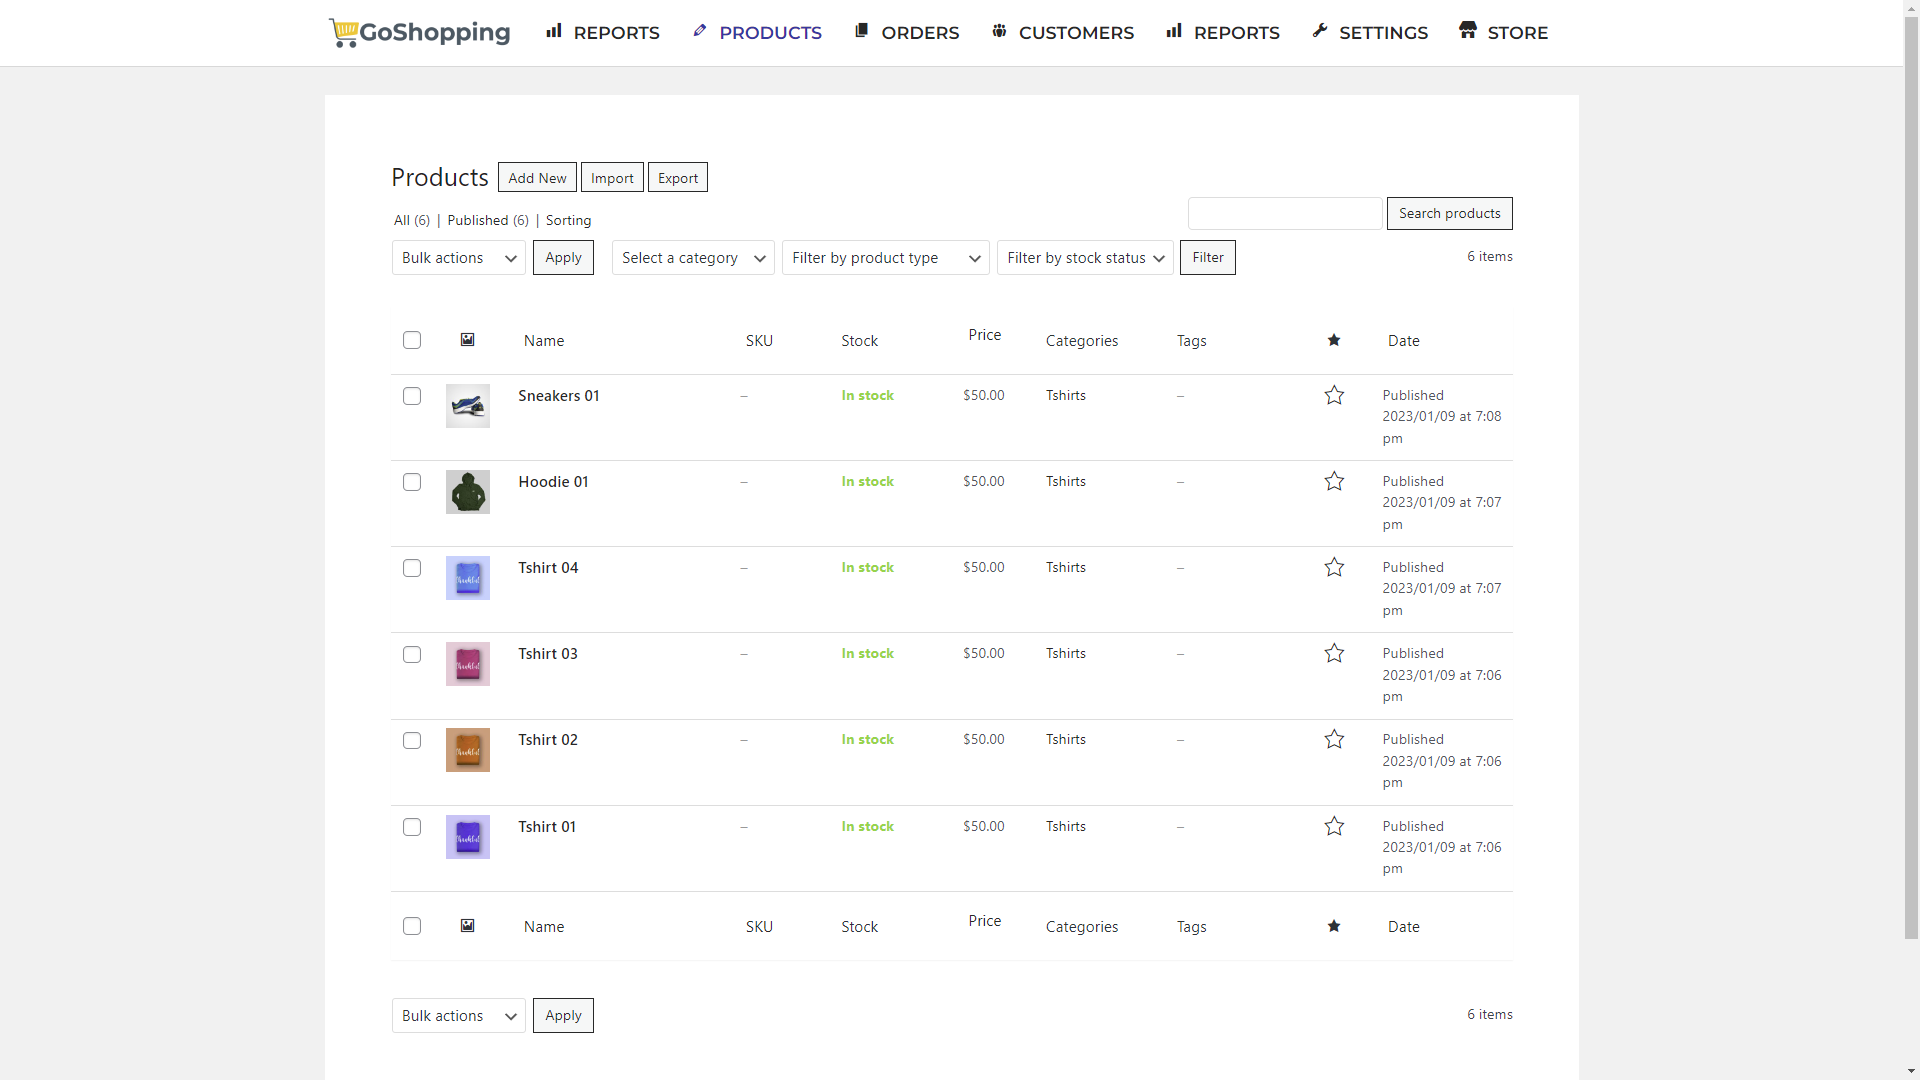
Here are some of the designs we have created with Elementor, which you can easily import with our Template Wizard, to speed up the process of creating frontend dashboard pages even more:


Creating a site for our frontend dashboard on Wildcloud
To build a global front-end dashboard for our multitenant ecommerce platform, we first need to create a new site on Wildcloud.
The client tenants/sites will be automatically connected to our front-end dashboard site so that, when clients try to open the wp-admin dashboard to manage their sites, they will be redirected to this site, which will contain all the necessary frontend admin pages.
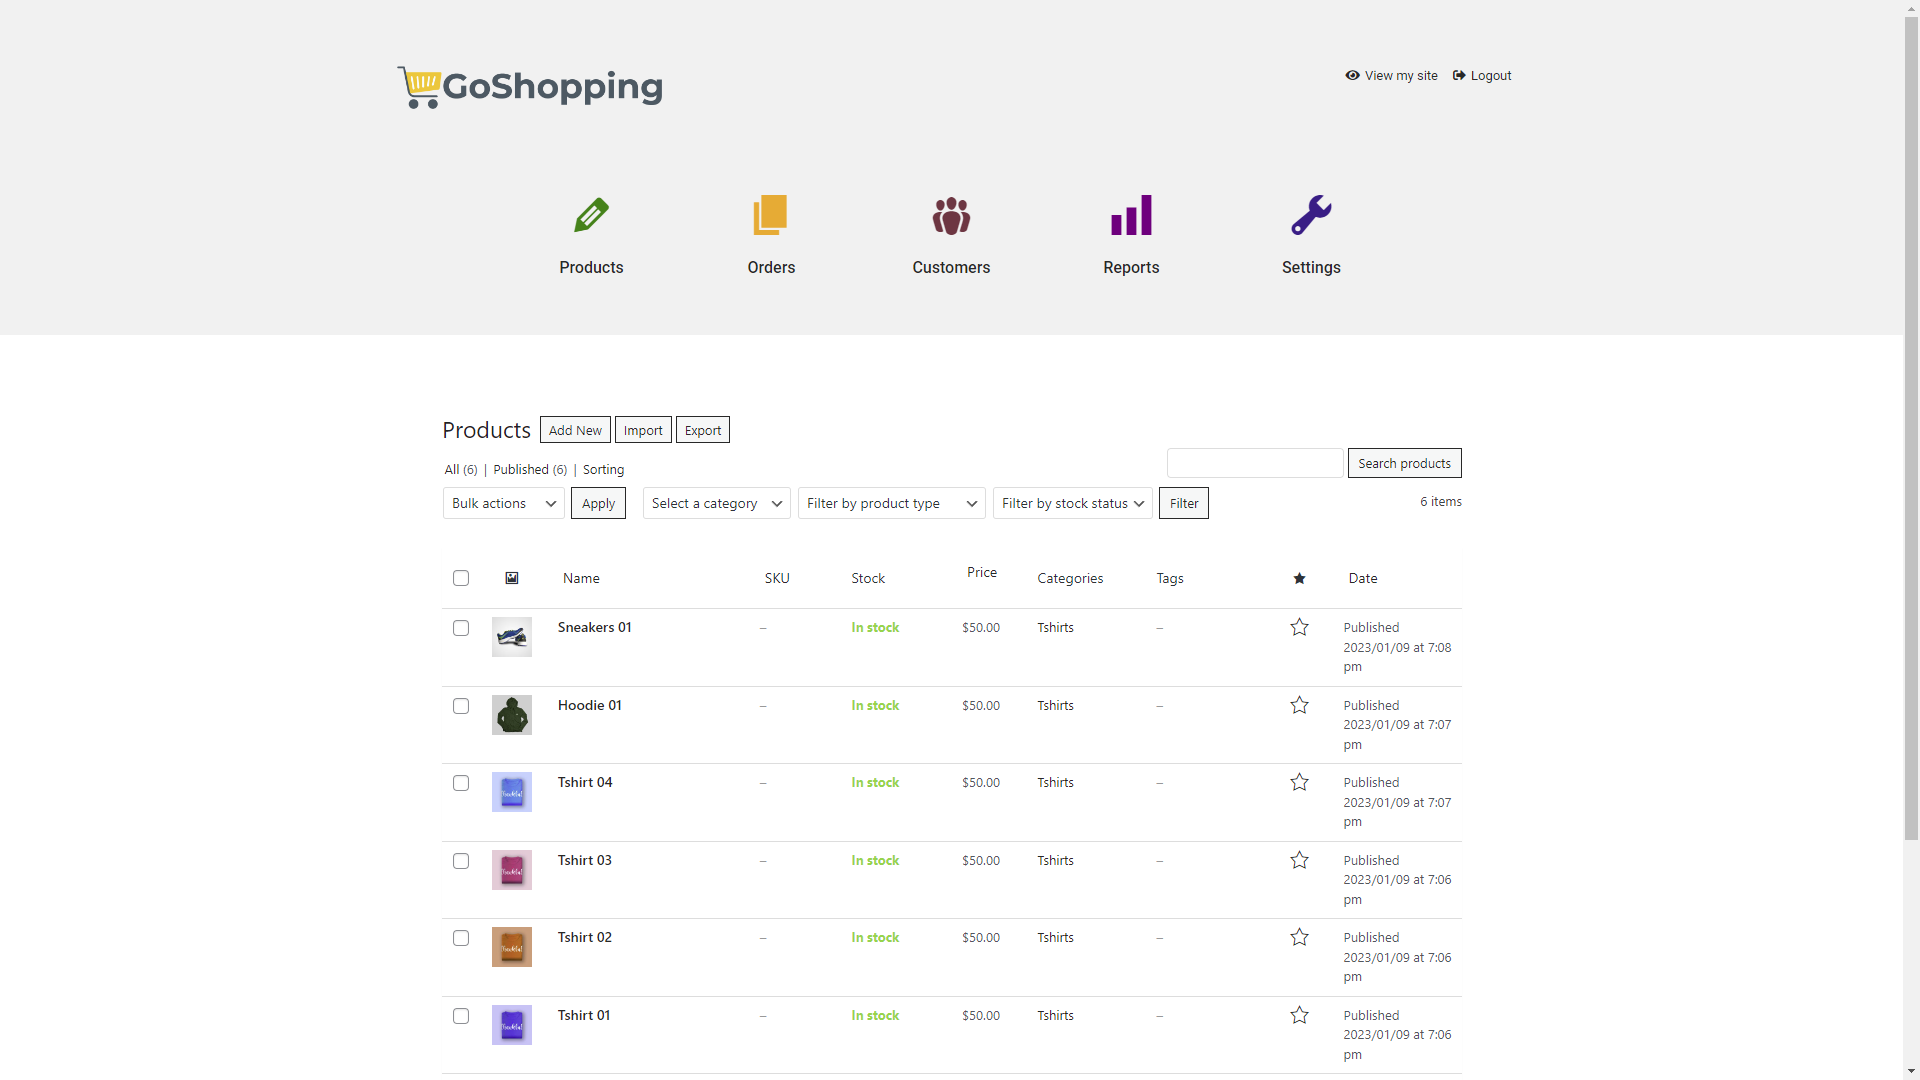
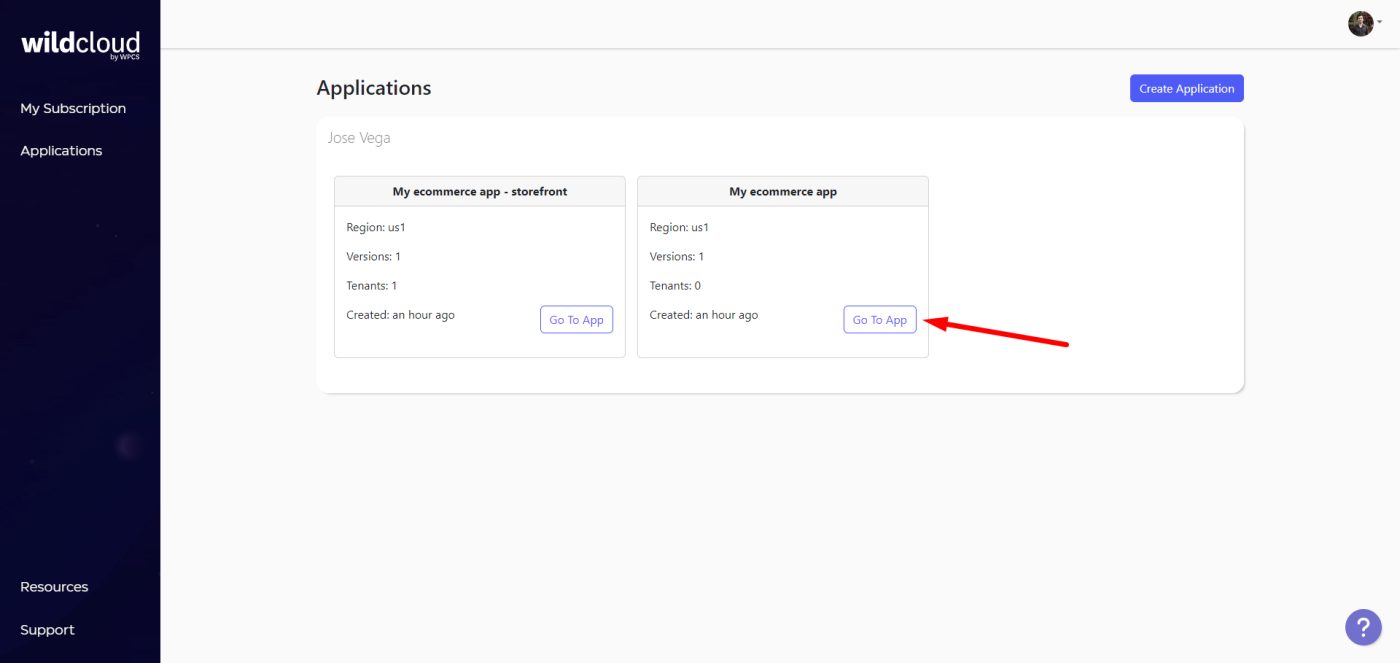
After logging into your Wildcloud account, you must open your platform application (not the storefront application).
Click Go To App.
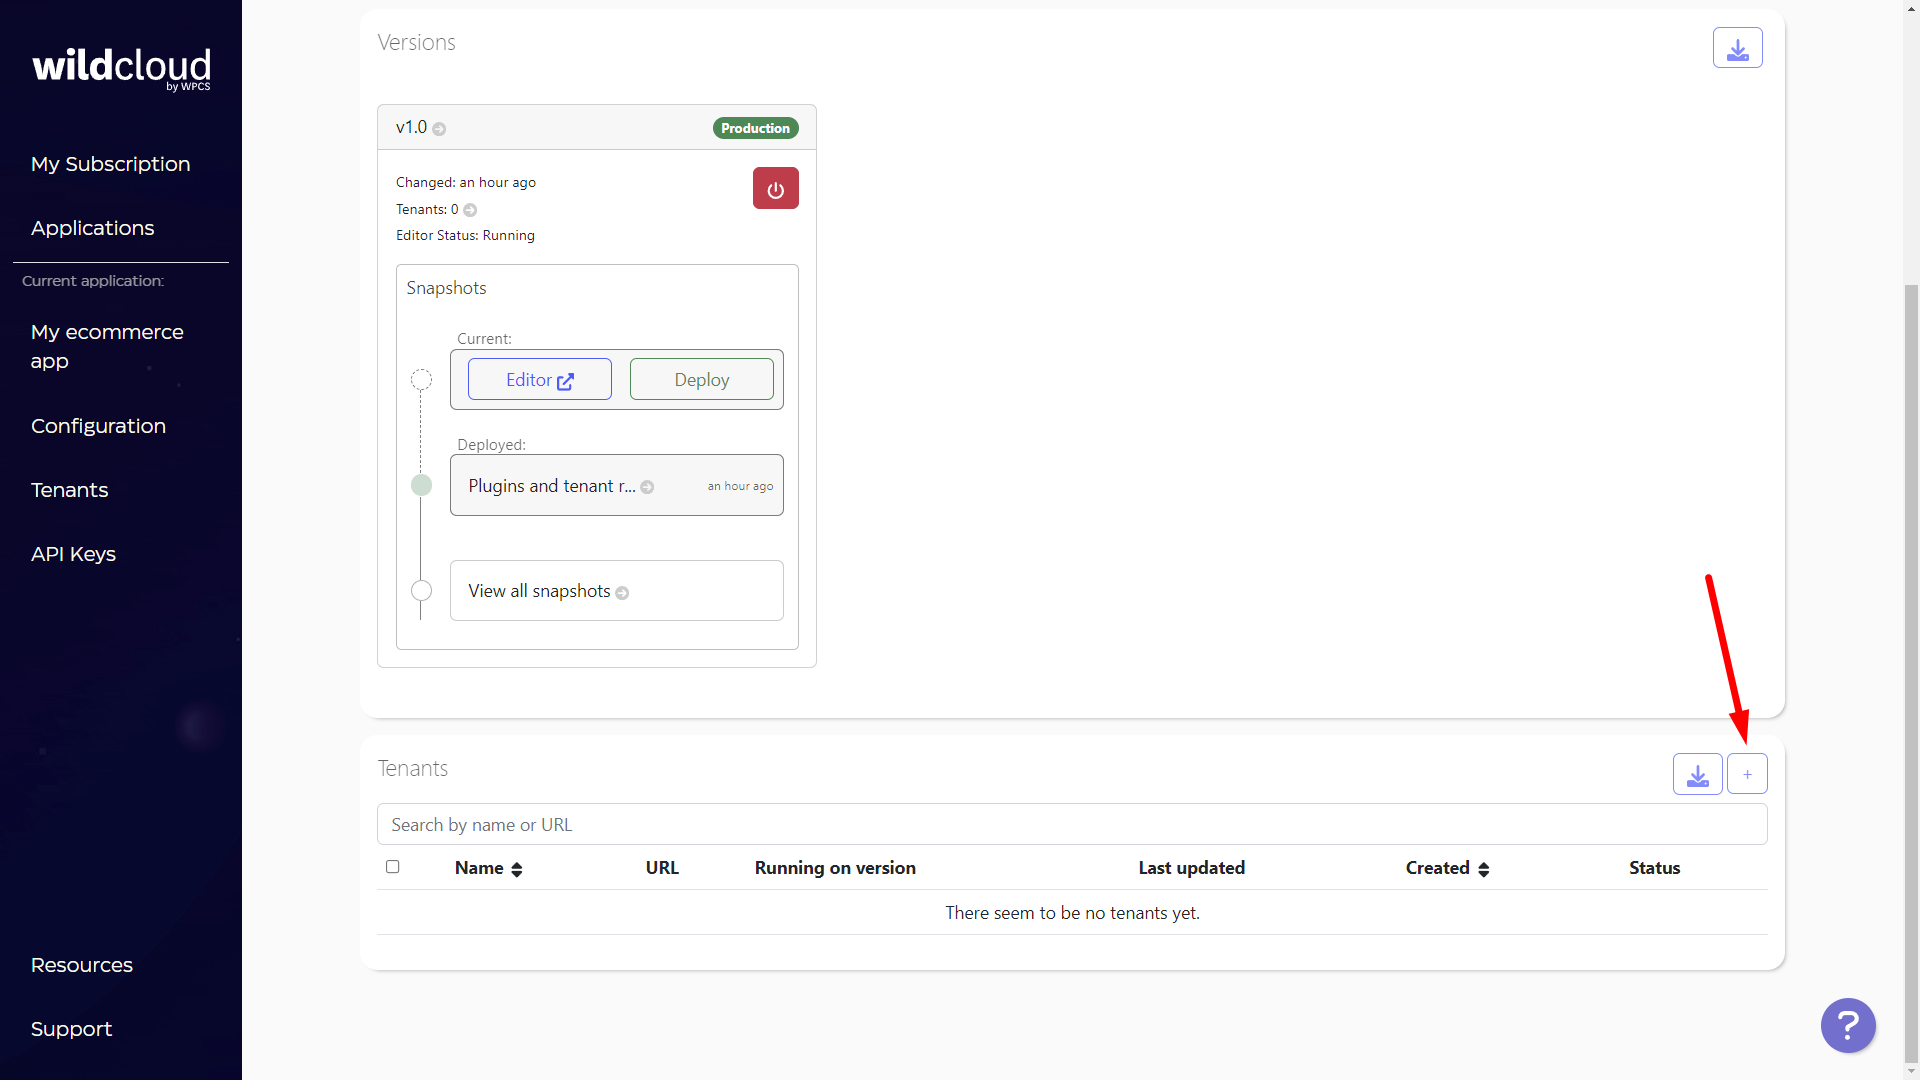
Once there, click on the Add tenant button.
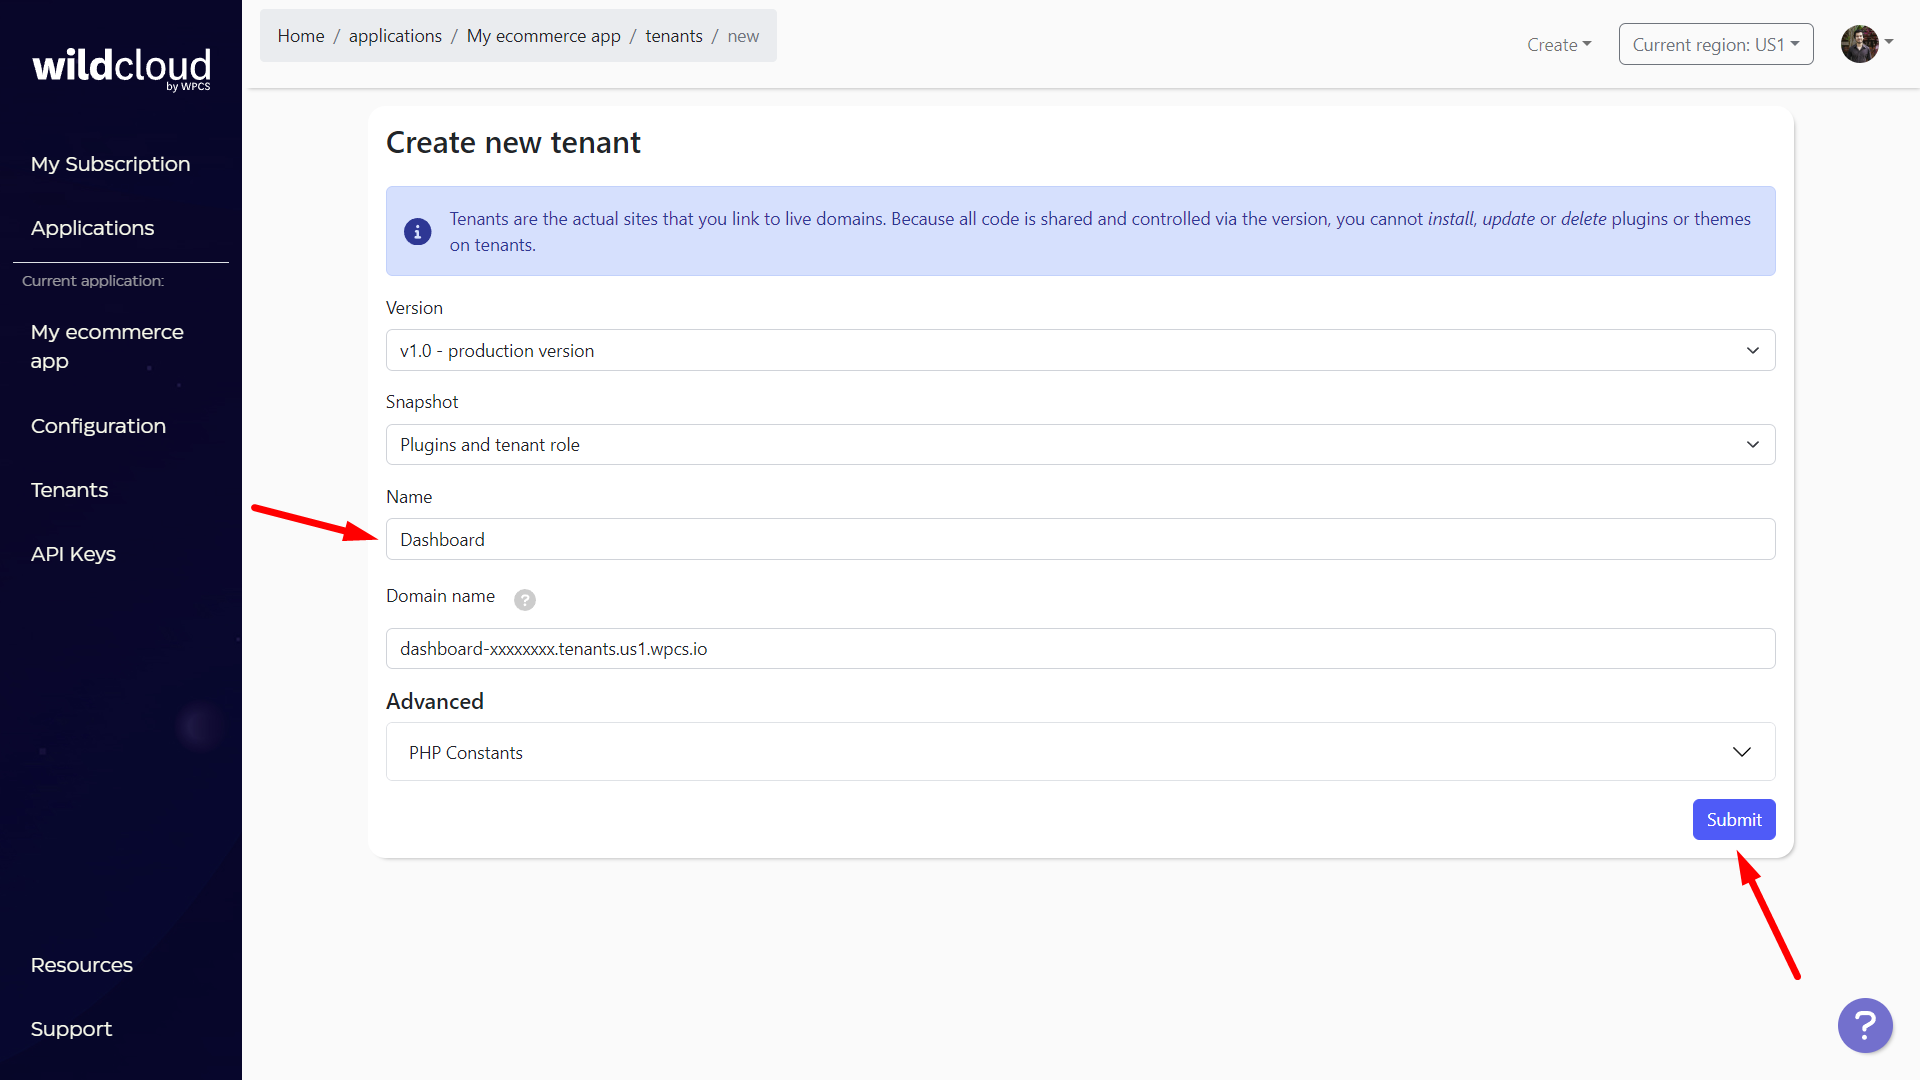
Now you need to add the client/tenant’s name, which at the same time will be the site’s subdomain prefix.
Note – You can add a custom domain or subdomain later.
Once you’re ready, click on Submit.
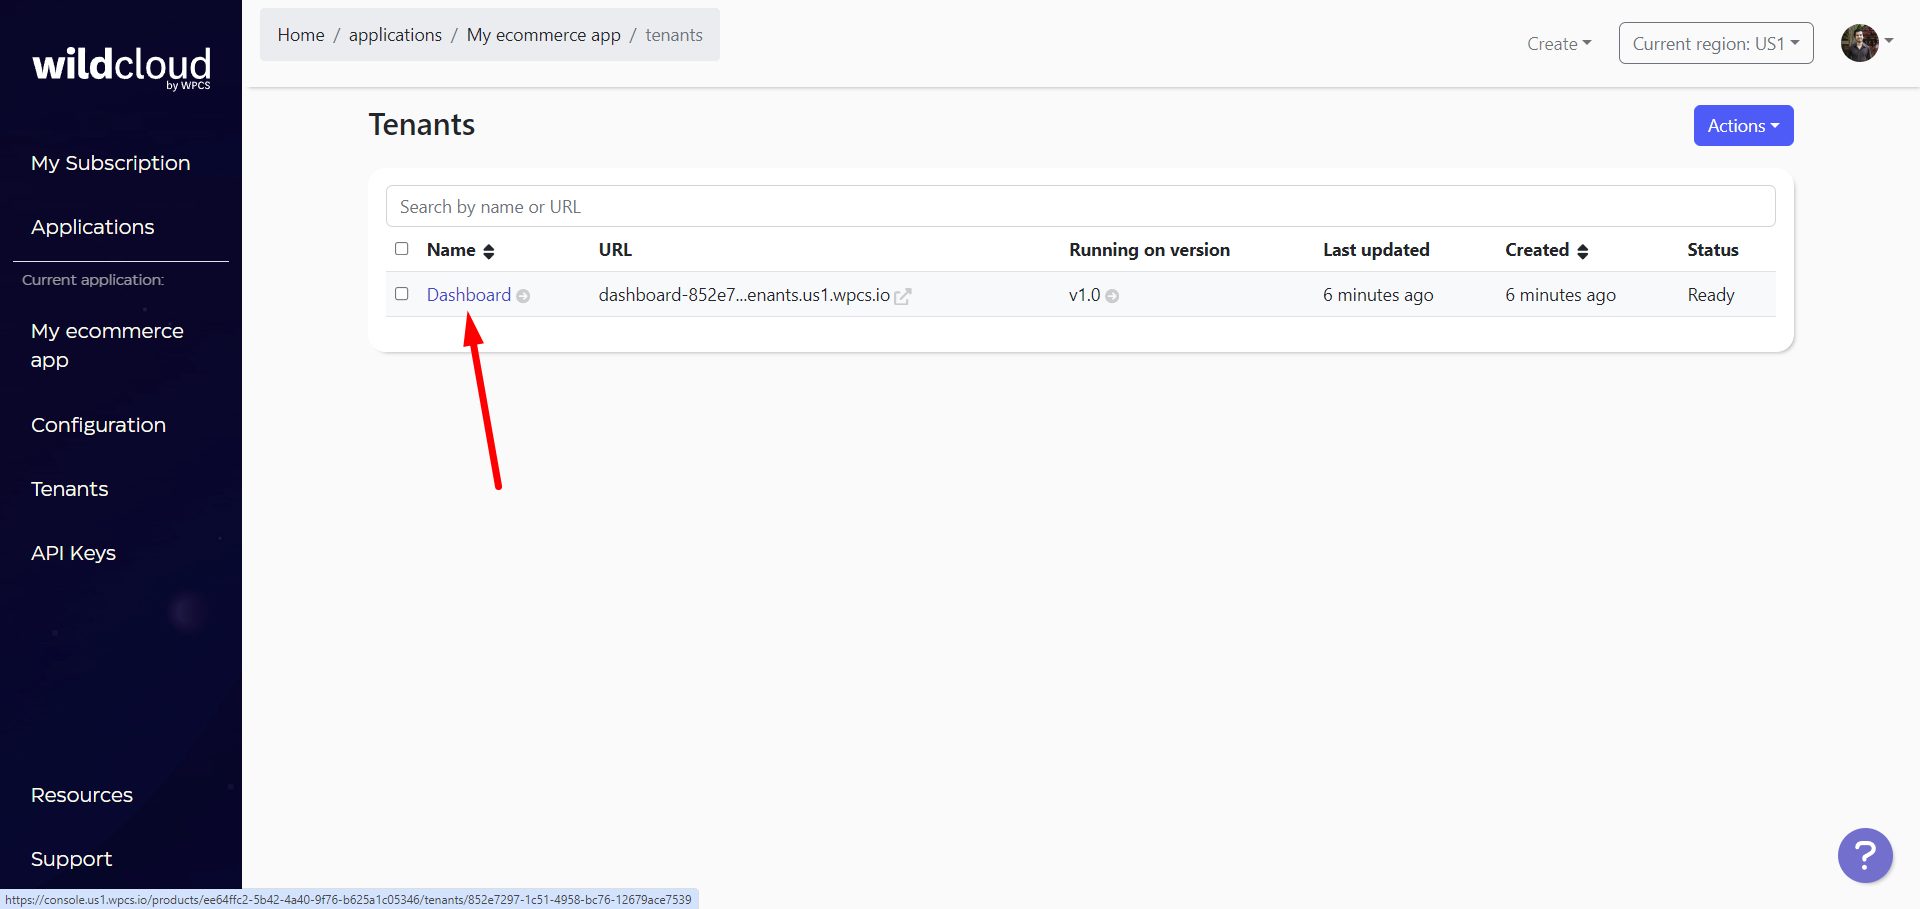
You’ll have to wait for some seconds/minutes until the status is Ready.
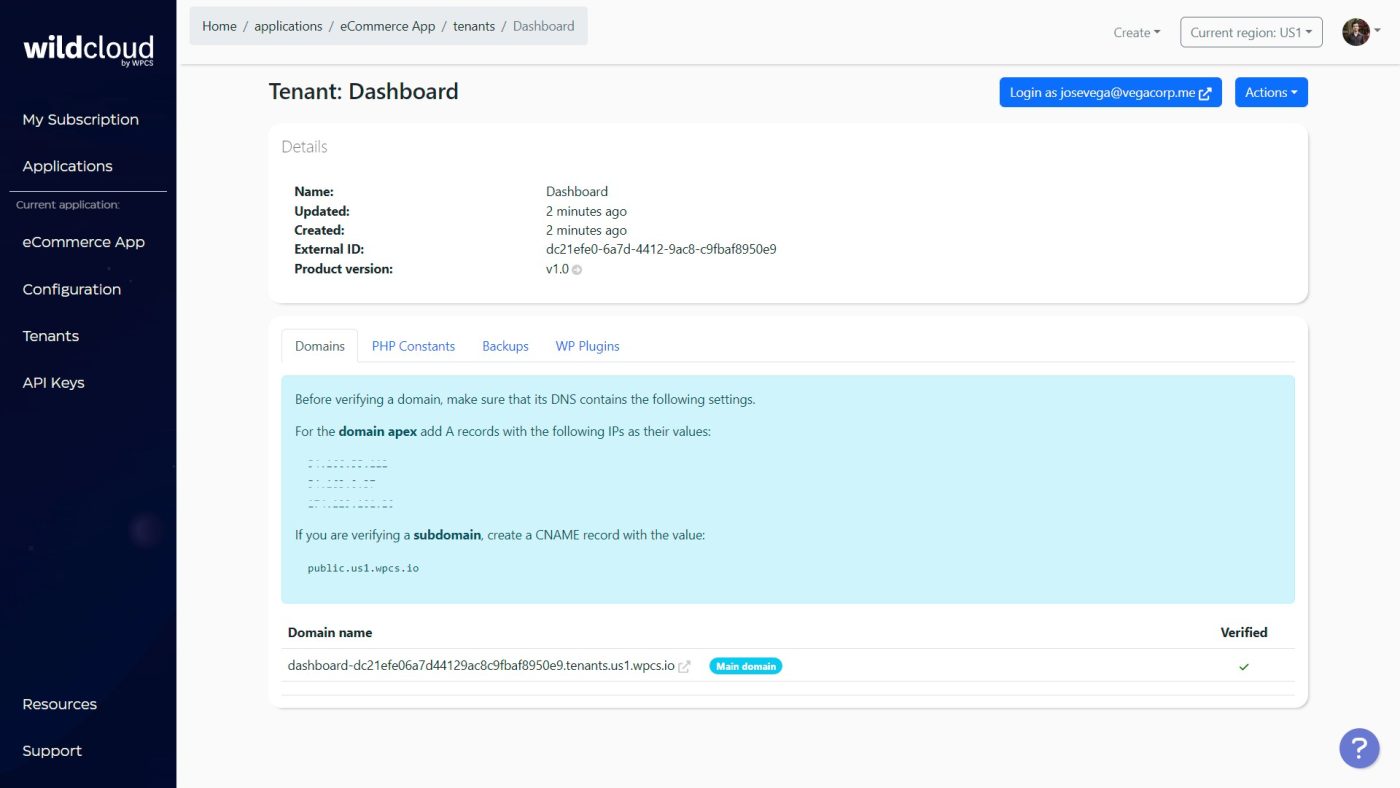
After creating the site, you can click on the site Name to see more options. Note – If you click on the URL, you’ll visit the site, but that’s not what you need for now.
If you want to add a custom domain to this site, just follow the instructions in the Domains tab. Then just select the new domain as Main Domain. However, we will use the default domain in this example.
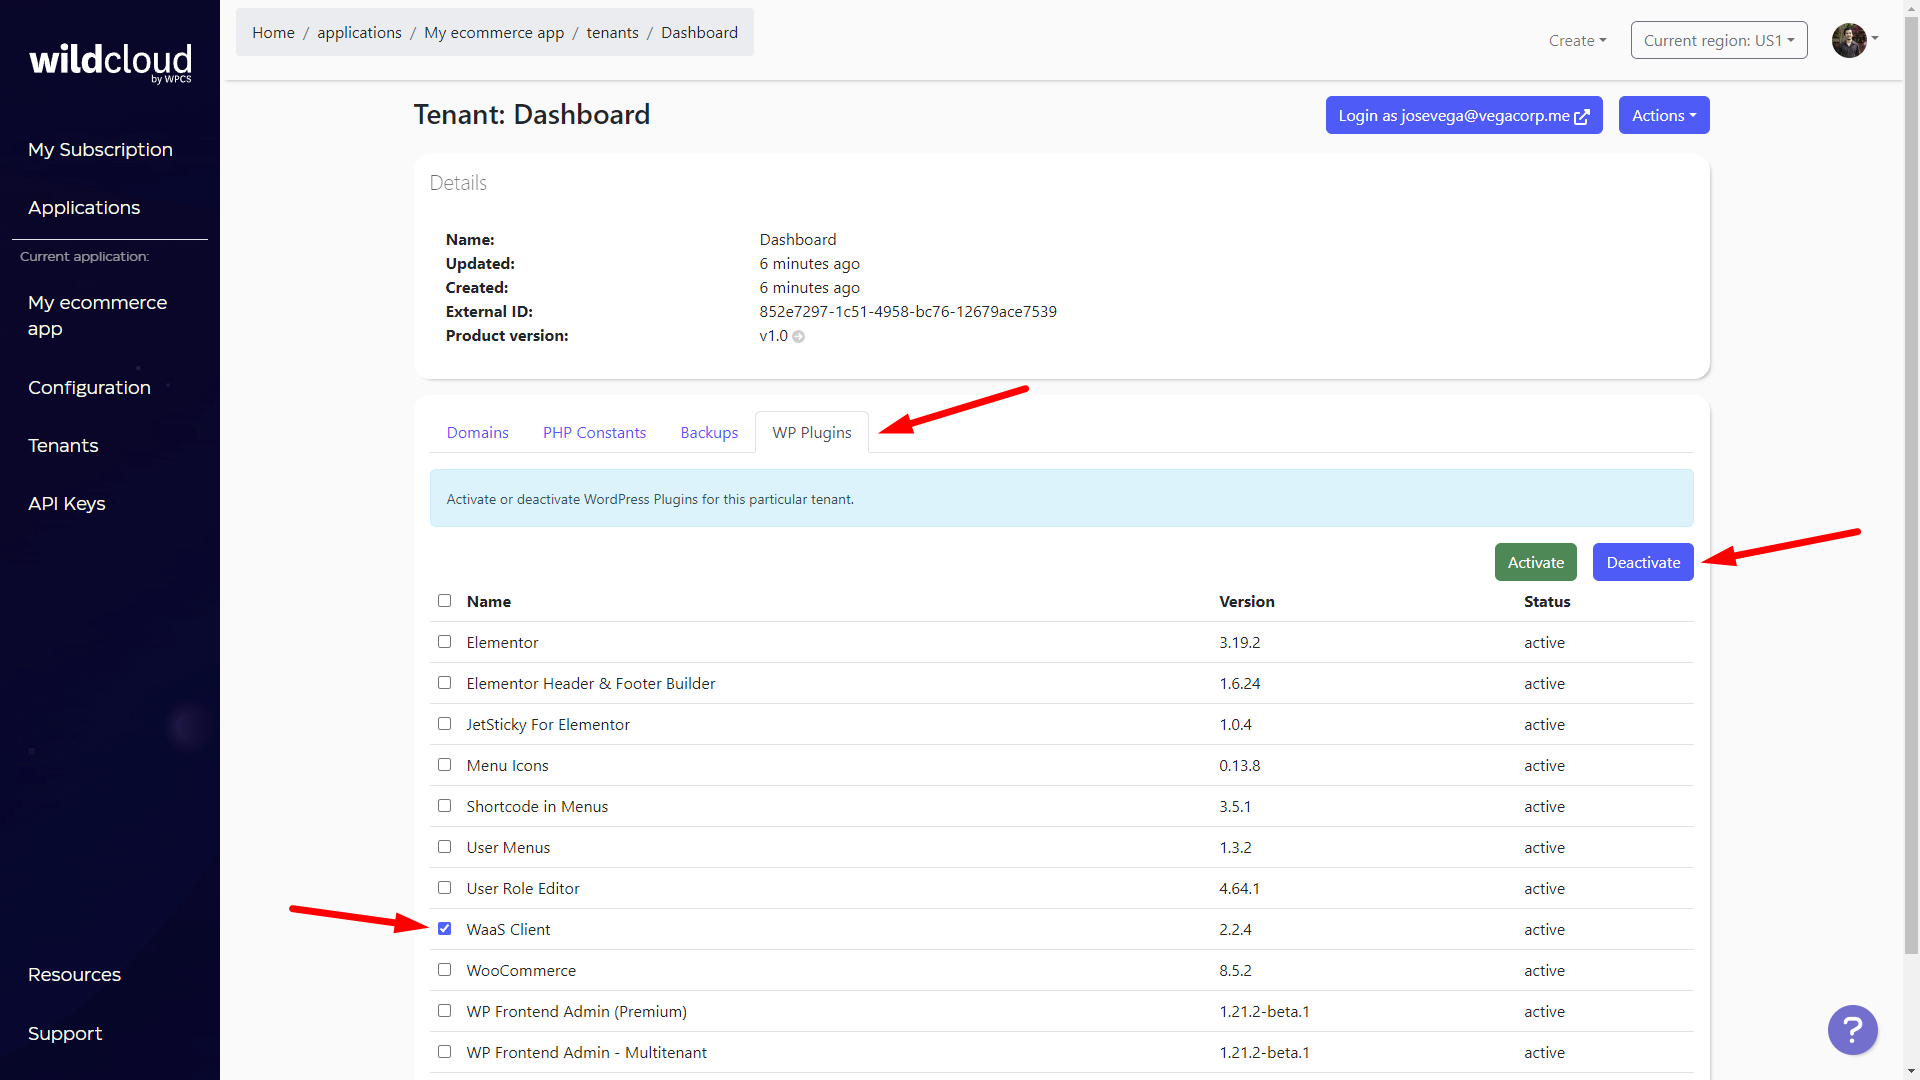
Important. For this site, we are going to deactivate the “WaaS Client” plugin since this site will not be a client site nor a site template for clients.
For this, go to the WP Plugins tab, select the WaaS Client plugin, and click on Deactivate.
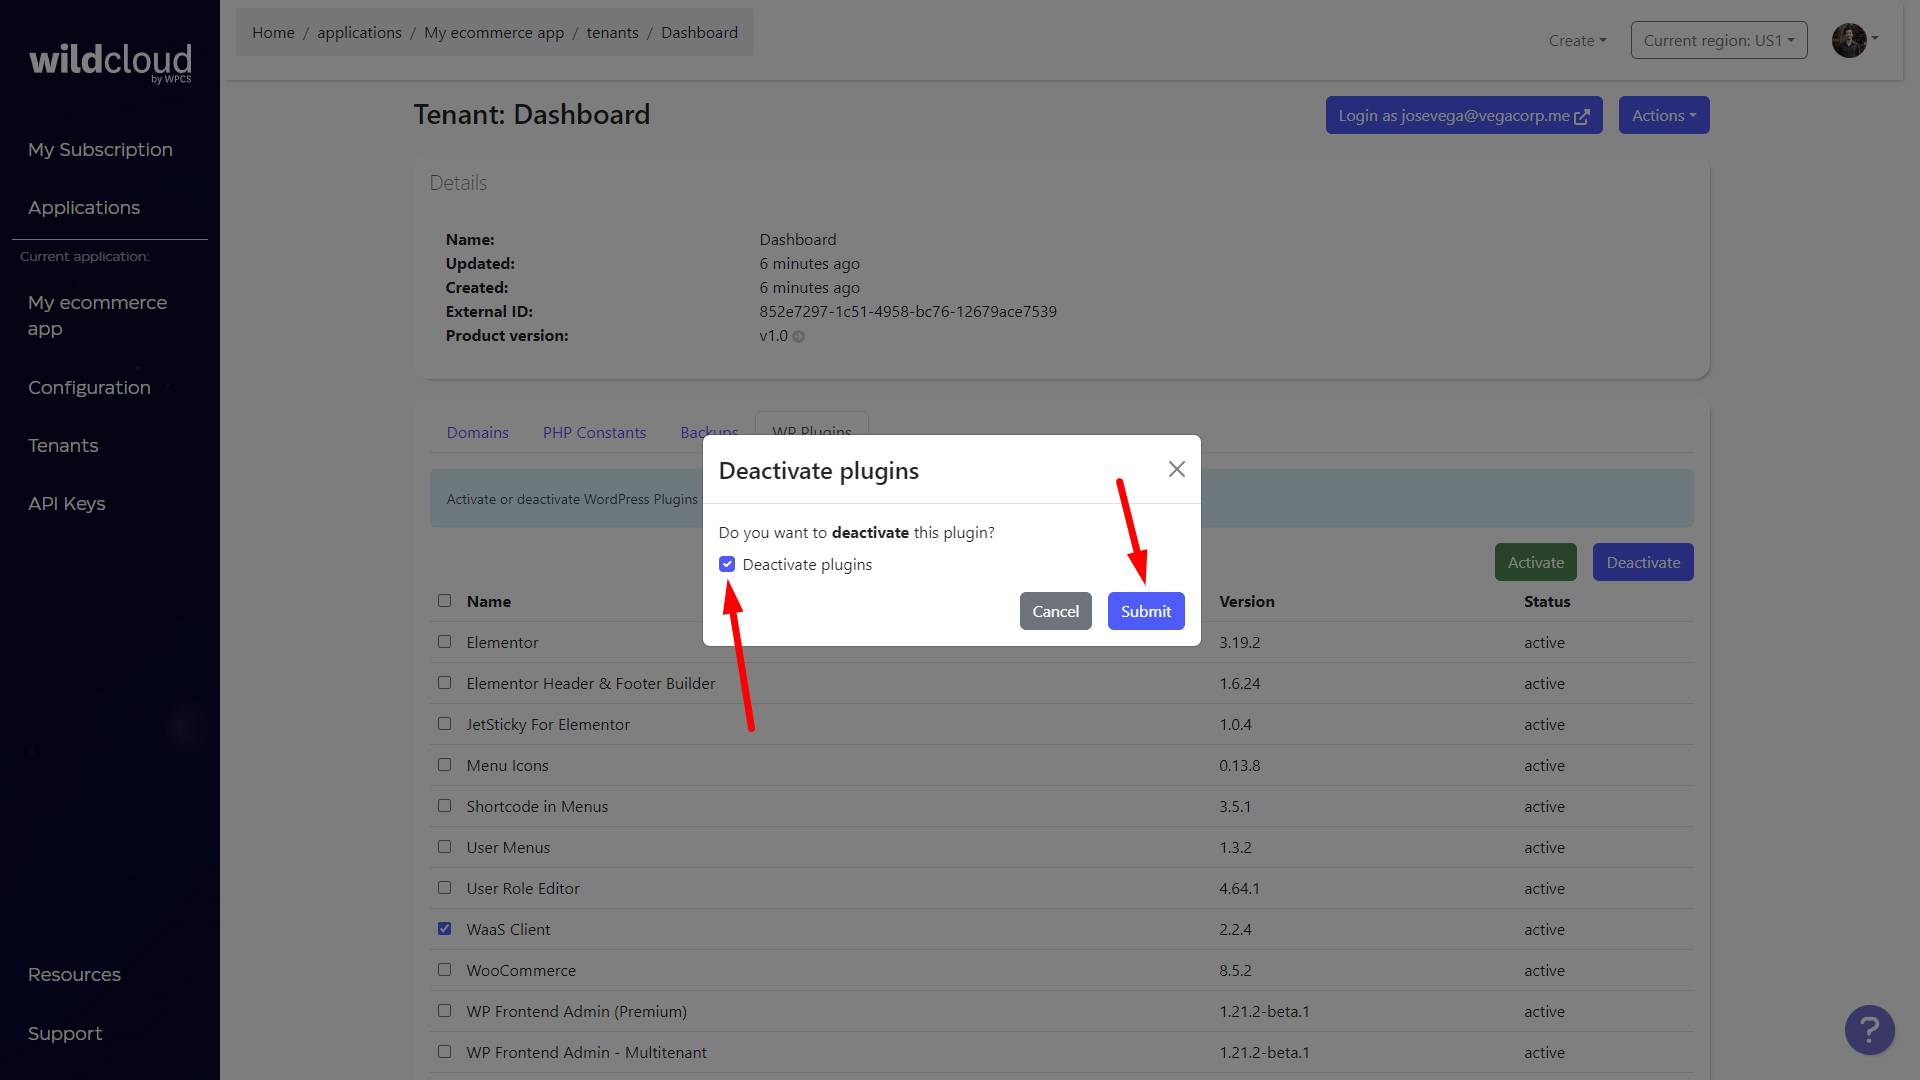
You’ll be asked to confirm the plugin deactivation, so tick the Deactivate plugins checkbox and click on Submit.
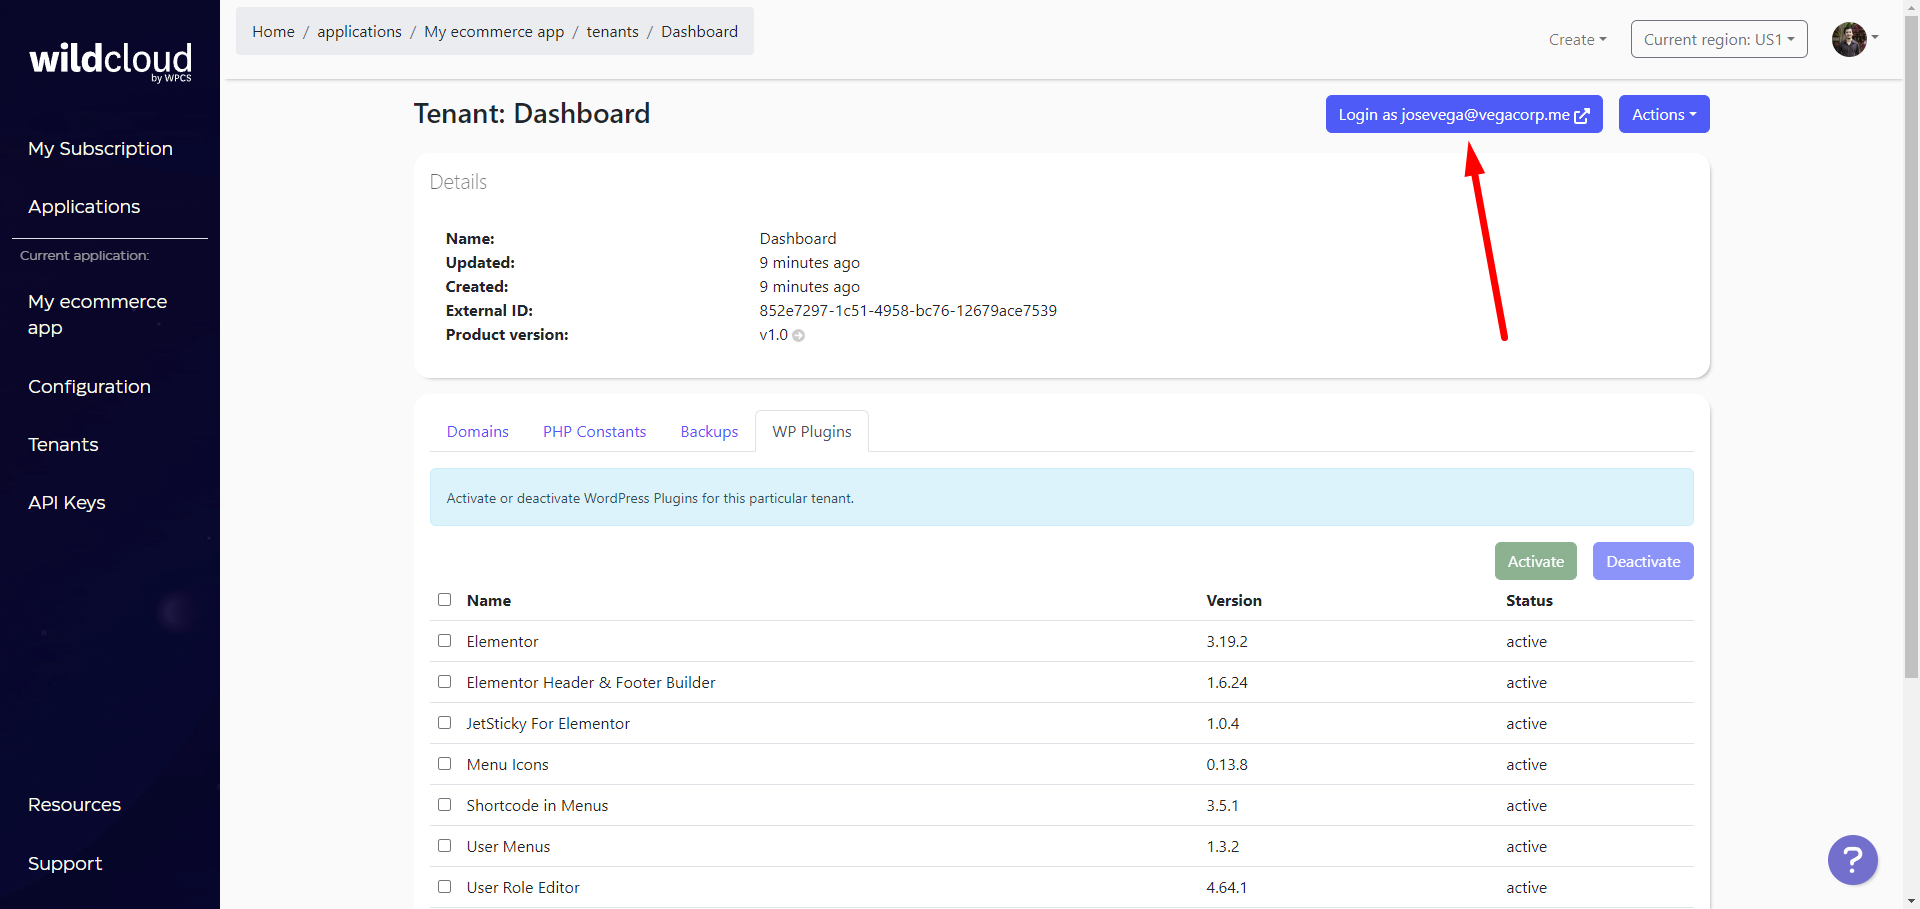
Now that we have created the site, we’re ready to start building our global front-end dashboard.
To log in to the dashboard site, click on the Login as [your username] button.
Building the front-end dashboard with WP Frontend Admin
In this section, we’ll look at some preliminary steps to building our front-end dashboard, as well as the process of building the front-end pages and selecting settings for our front-end dashboard site.
Preliminary steps
First, we will change the name of the site because Wildcloud adds a generic name to all the sites.
We will call this site “Dashboard”.
Let’s go to Settings > General, where we can change the Site Title and save the changes.

Second, we will remove all the sample content that is created when creating the site/tenant.
For example, let’s go to Pages and remove all the pages. We don’t need the WooCommerce pages on this site.

Third, we can set the site’s logo, since our frontend dashboard Elementor templates will automatically use this logo.
Go to Appearance > Customize, and change the site’s logo.
Note – In this example, we’re using the Kadence theme.

Fourth, we need to select this site as the global front-end dashboard site.
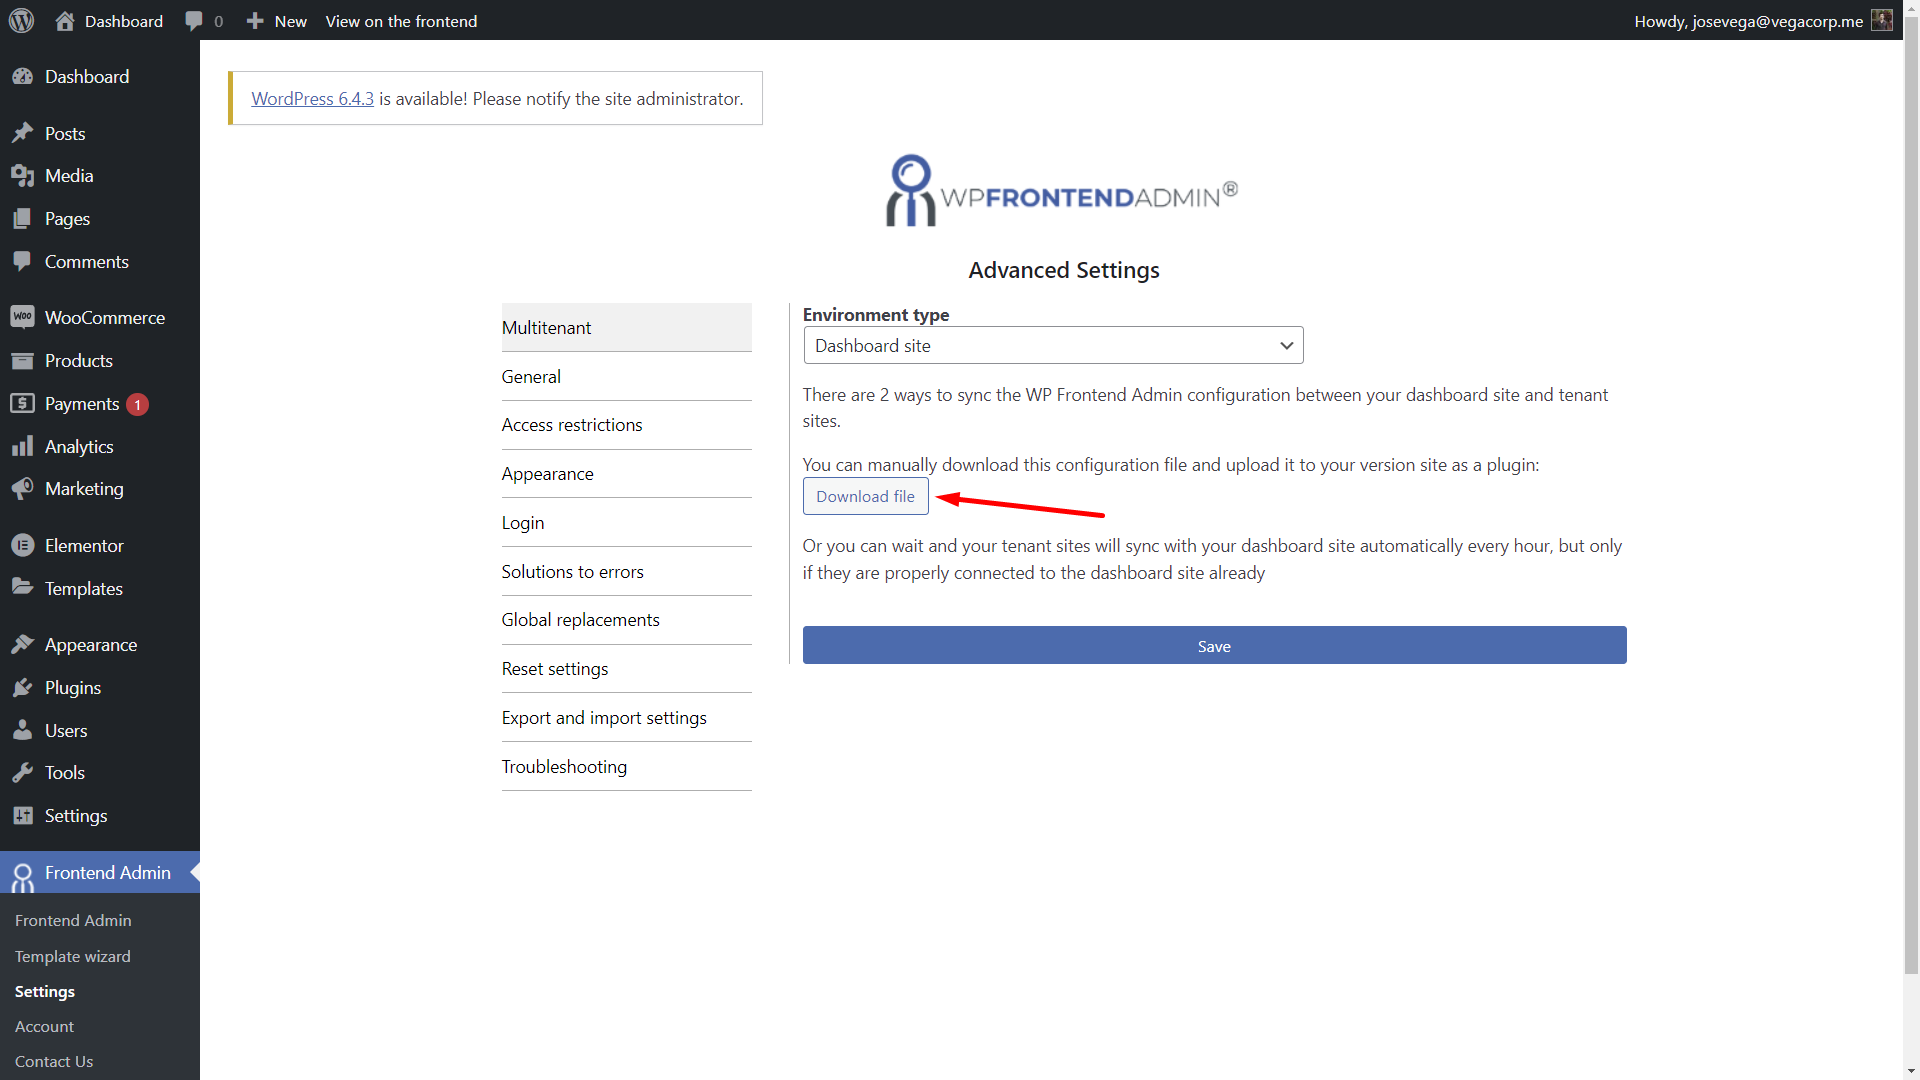
Go to Frontend Admin > Settings > Multitenant > Environment type, and select Dashboard site.
Once you do that, click on Save to apply the changes.

Creating the dashboard pages
To build your frontend dashboard pages, you have at least three options.
Option 1 – Build frontend dashboard pages without a page builder
You can create the pages without the need to use a page builder, using the appearance options of your active theme.
There are two ways of doing this:
First, you can use a shortcode.
- Create a new page
- Add this shortcode in the page content area: [vg_display_admin_page page_url=”wp-adminURL”]. You just have to replace the “wp-admin URL” text with the URL of the wp-admin page that you want to display on the frontend.
- Click on Preview page to display the admin page on the front-end.

Second, you can display admin pages on the frontend with one click.
Just go to the wp-admin page you want to display on the frontend and click on View on the frontend.
This will automatically create a page and insert our shortcode with the URL of the wp-admin page that you were viewing.

Option 2 – Build the frontend dashboard pages using any WordPress page builder
You can use any WordPress page builder to create your frontend dashboard pages.
You just have to:
- Create and design your page using your favorite page builder
- Add this shortcode: [vg_display_admin_page page_url=”wp-admin URL”] where you want to display the admin page’s content. You just have to replace the “wp-admin URL” text with the URL of the wp-admin page that you want to display on the frontend.
- Click on Preview page to display the admin page on the front-end.
Option 3 – Build a frontend dashboard using our template wizard and save a lot of hours
This is the easiest and fastest way to create frontend dashboards.
You’ll be able to build a frontend dashboard with just a few clicks.
And you won’t have to spend time designing every aspect of the site. Instead, you can use any of our importable Elementor templates.
Go to Frontend Admin > Template wizard.

Once there, you need to select the template you want to use to build your frontend dashboard. You can preview the templates here.

Now you need to select which pages you want to include in your front-end dashboard.
For this, you just need to tick the pages you want to add to the frontend dashboard.
Once you have selected the pages, you need to click on Next.
Clicking Next will start the process of:
- Importing the selected dashboard template
- Creating the pages
- Creating a navigation menu
- Adding the pages to the navigation menu
- Adding menu icons
- Adding “View my site” and “Log out” buttons to the navigation menu.
The entire process could take many hours manually, but this wizard does all that automatically!

Important:
The global front-end dashboard must have all the pages that users of our ecommerce platform will need to manage their own sites/tenants. So include all the settings pages and features that your clients will need to manage their own sites.
An important thing to keep in mind is that the pages that our clients can access will depend on two things:
- The capabilities or permissions of the user role assigned to them when creating a site on our platform.
- The plugins enabled for the tenant role assigned to the site at the moment of creating a site on our platform.
Once the pages have been created, you can click on Go to pages.

If you want to customize your admin page content, you can open any page in the front end and start using the Quick settings panel to edit the page.
What can you do with the Quick Settings panel?
- Select or change the page title, URL slug, page template and select the navigation menu to which you want to add the page.
- Hide any elements like texts, buttons, fields, etc. Just click on Hide element and click on the element you want to remove.
- Edit texts like button texts, field names, etc.
- Disable columns, especially in pages that show lists like products, orders, posts, etc.

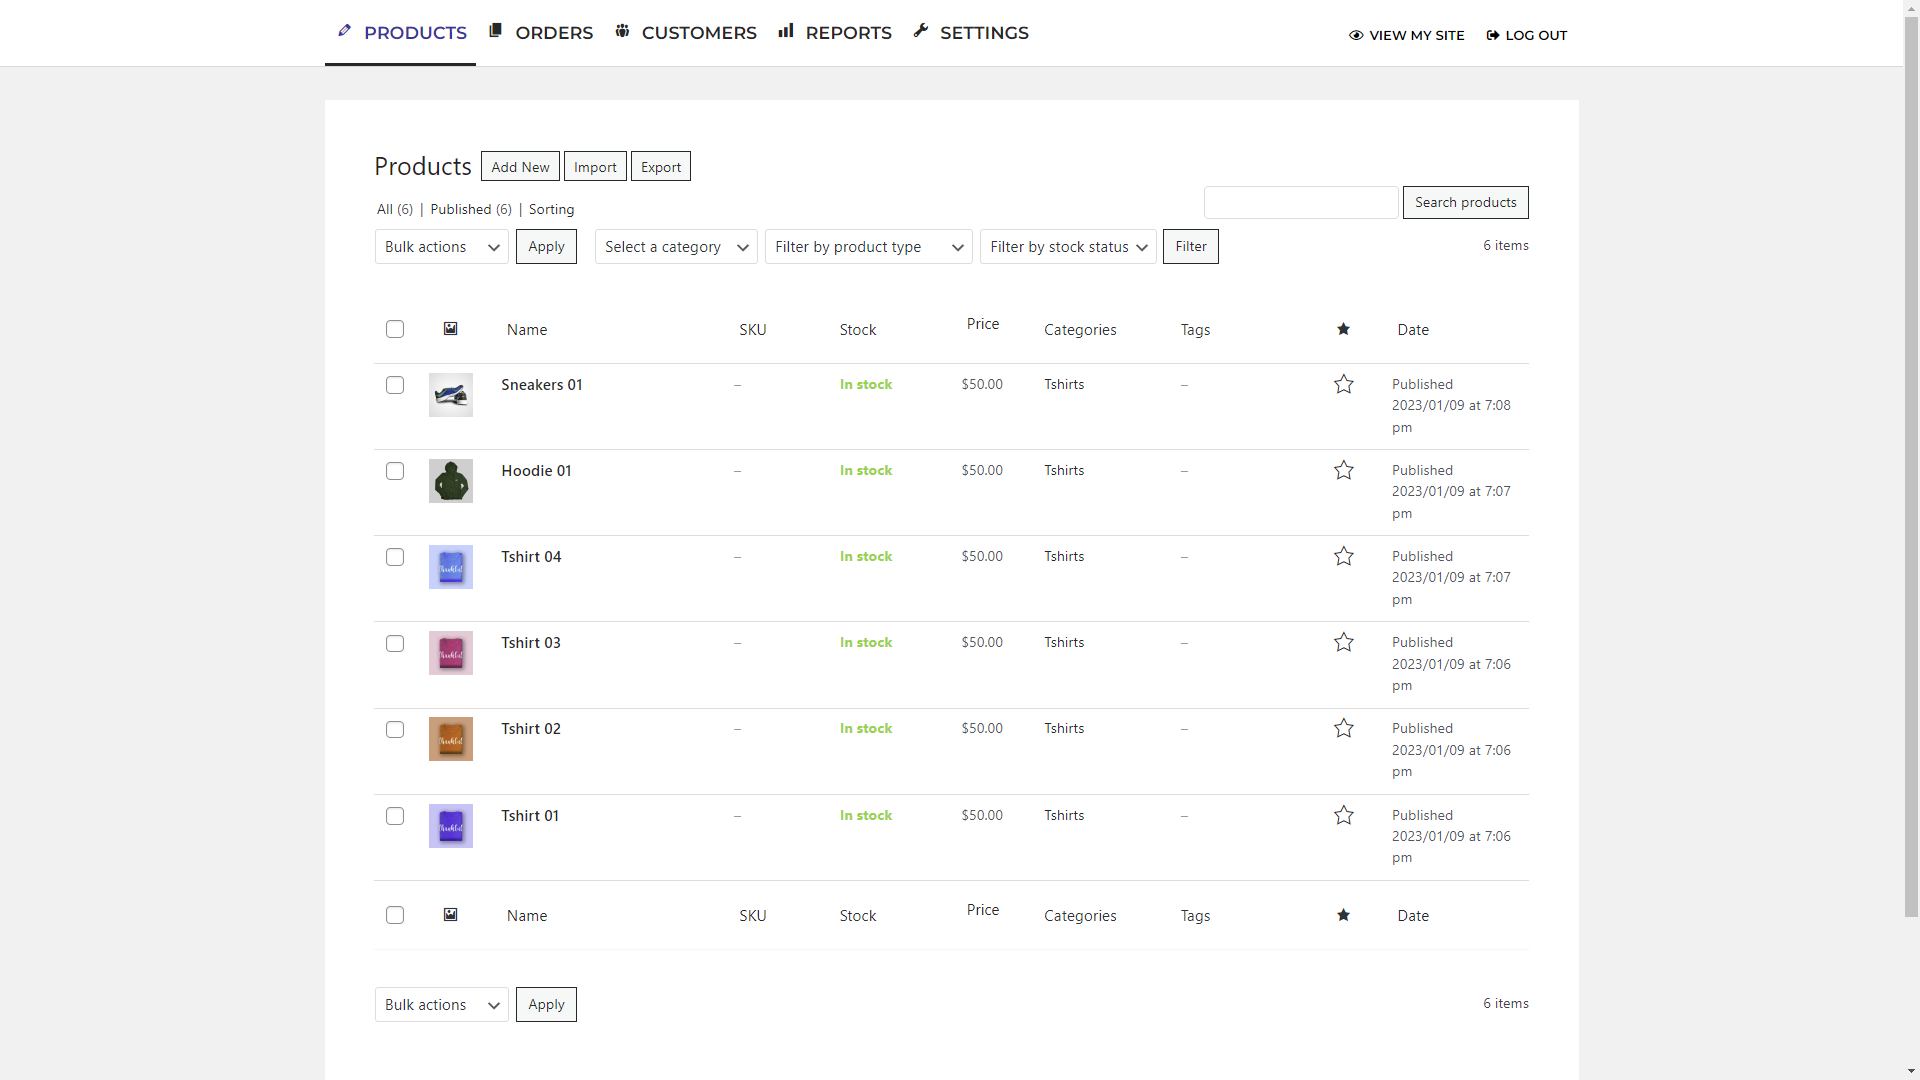
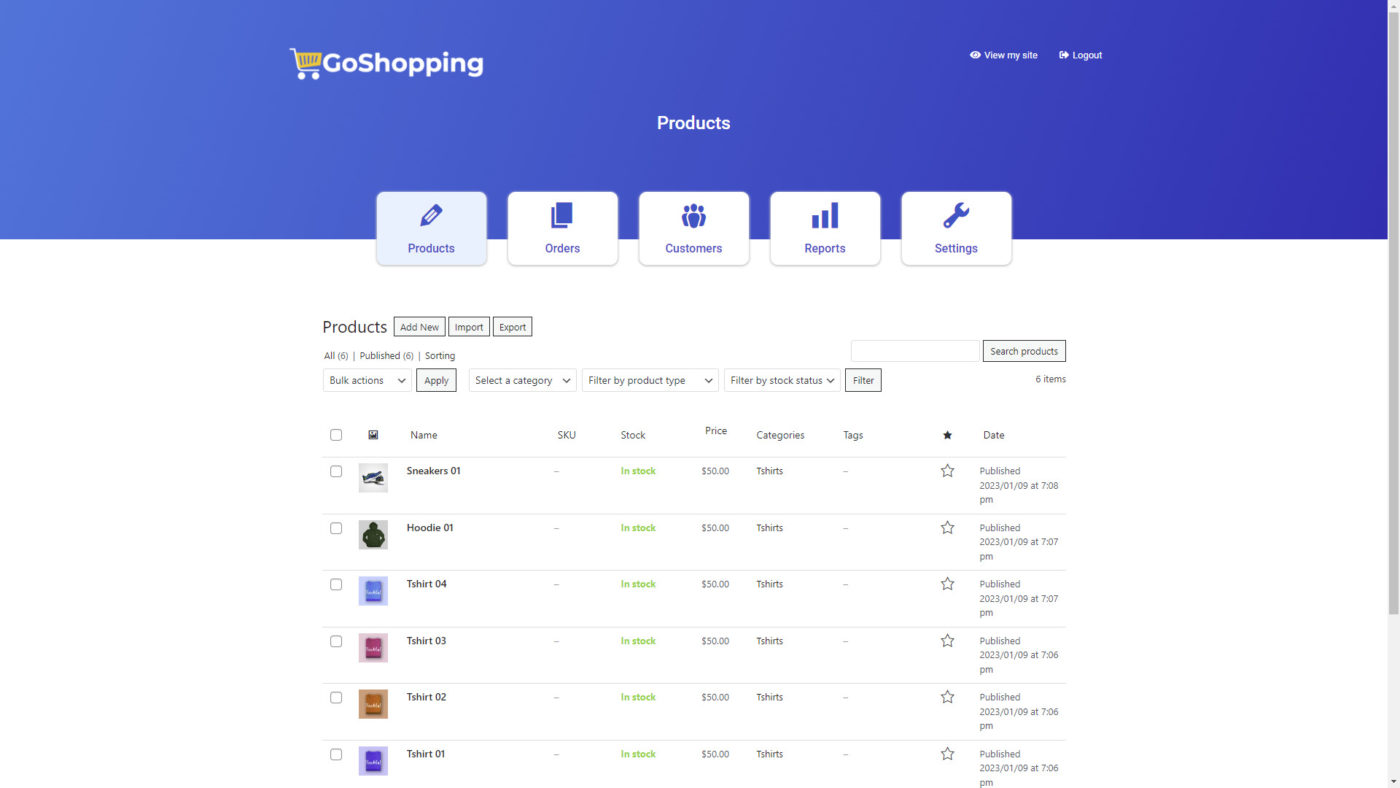
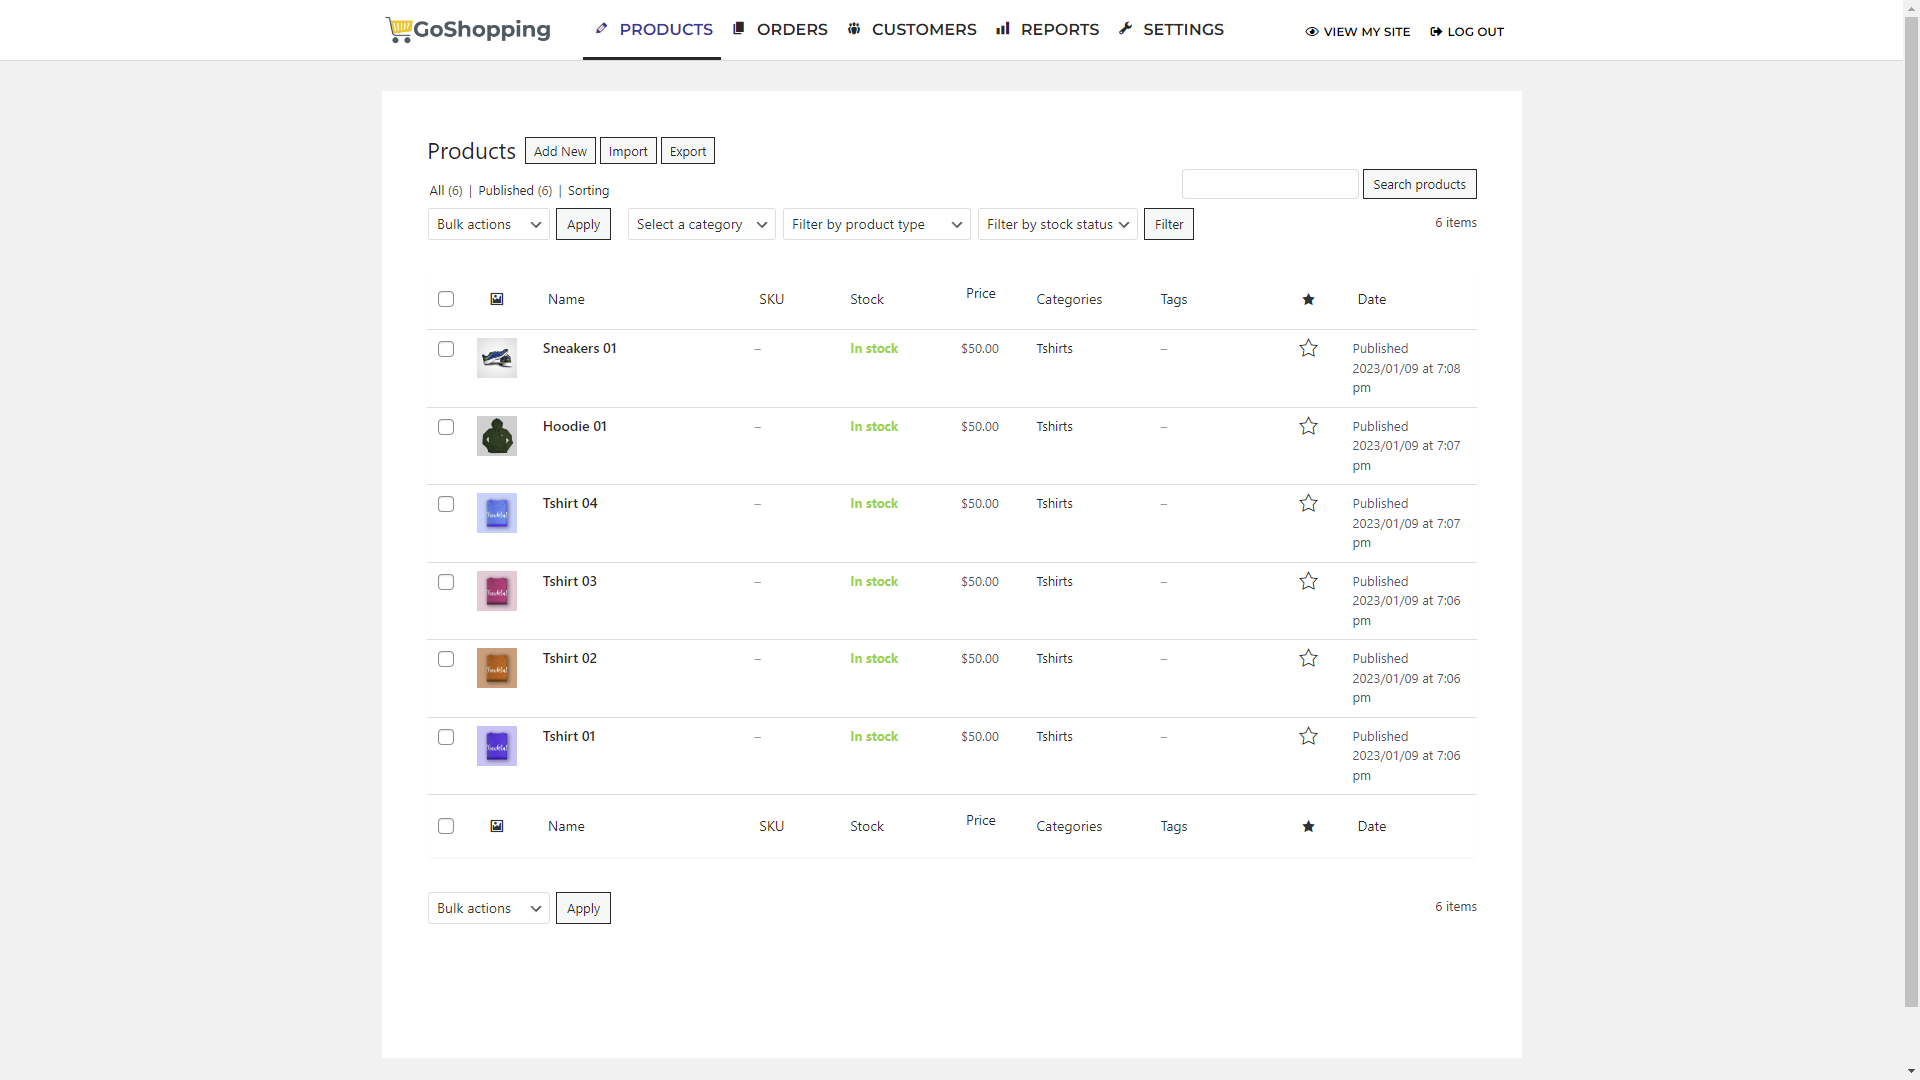
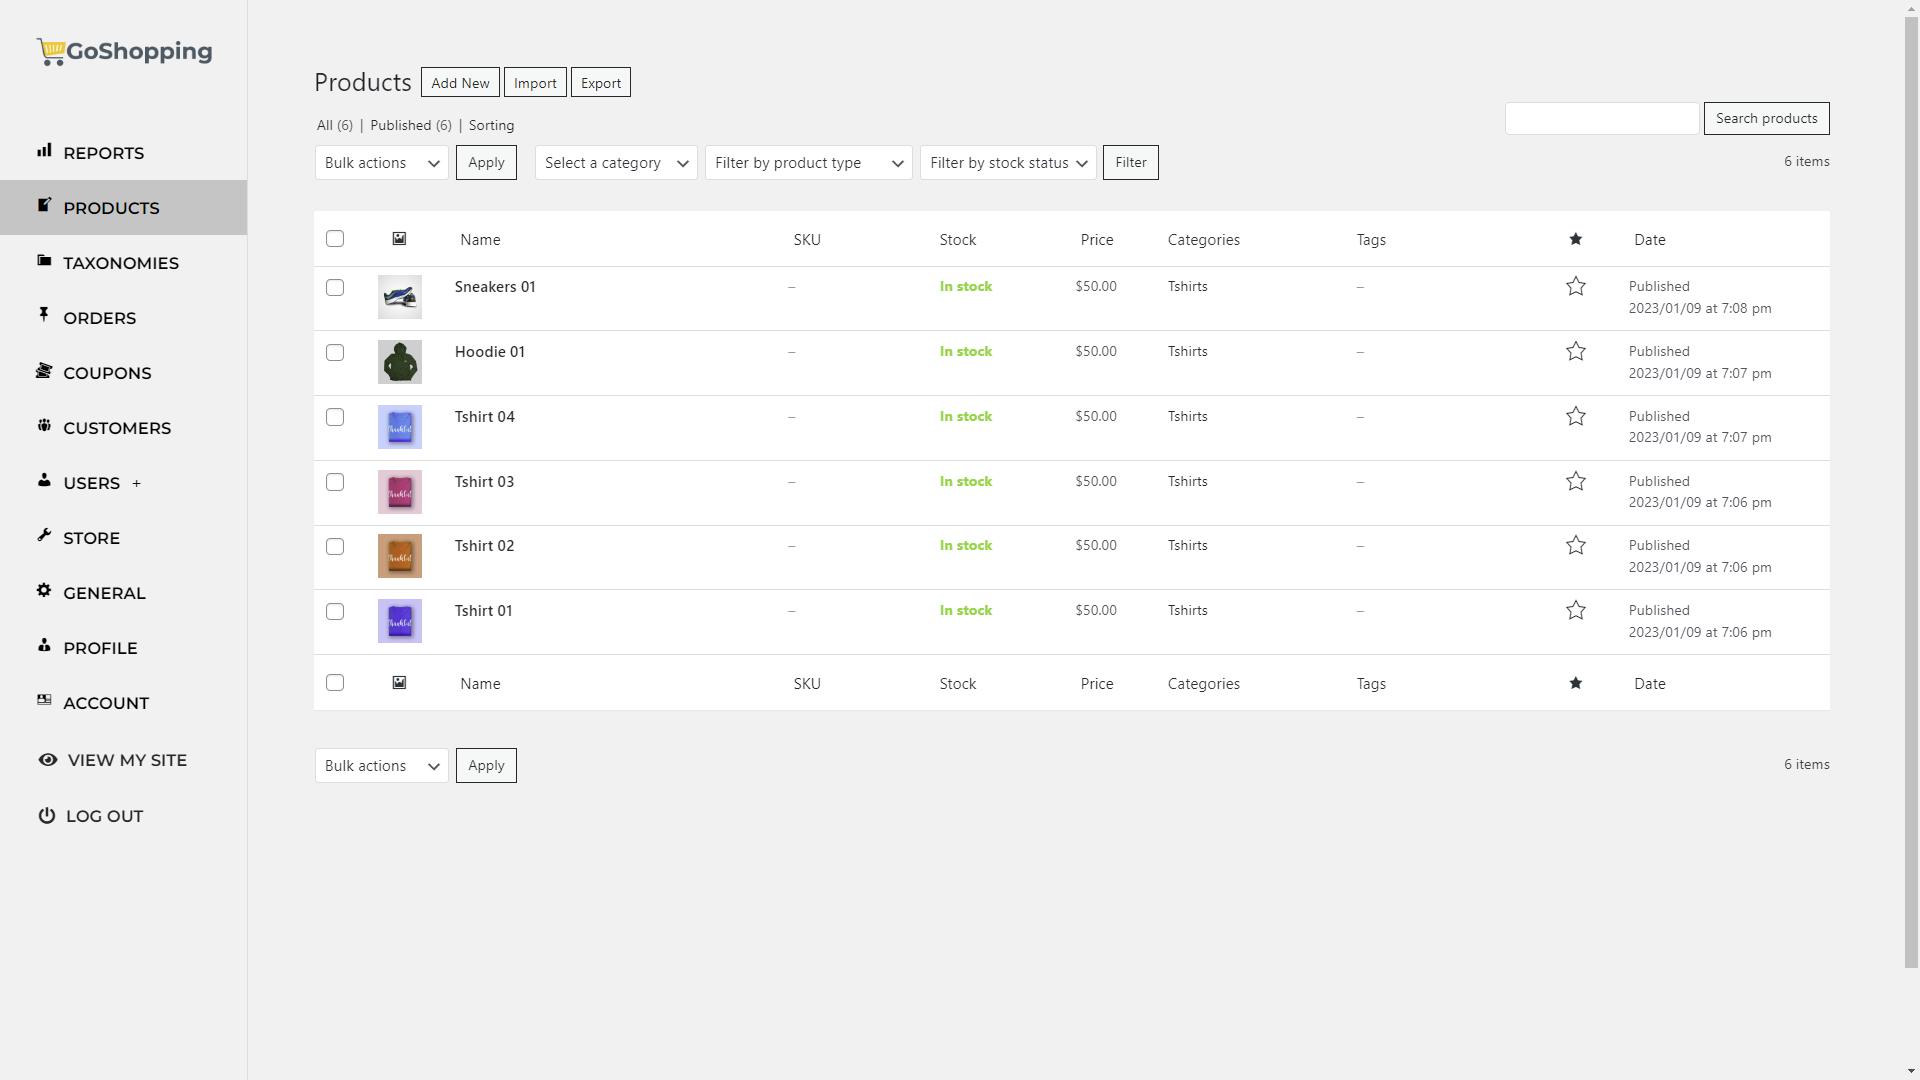
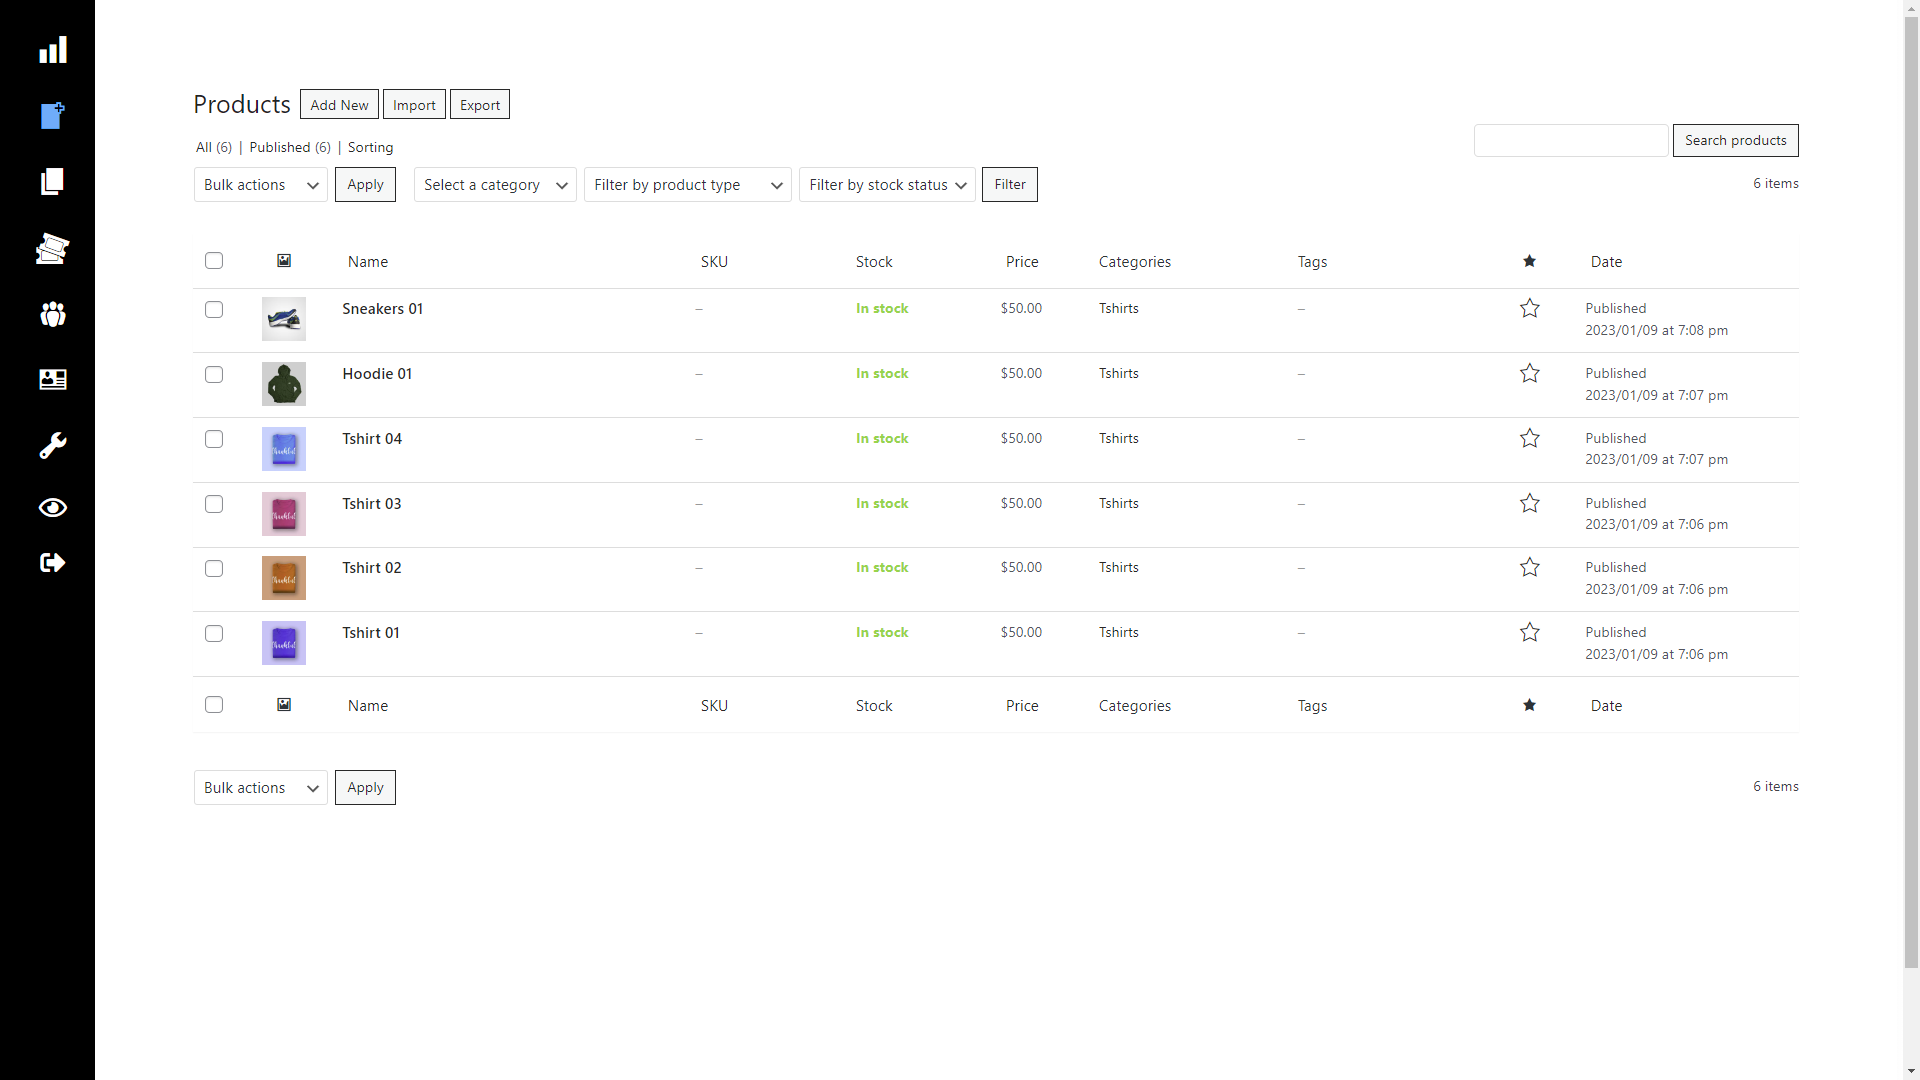
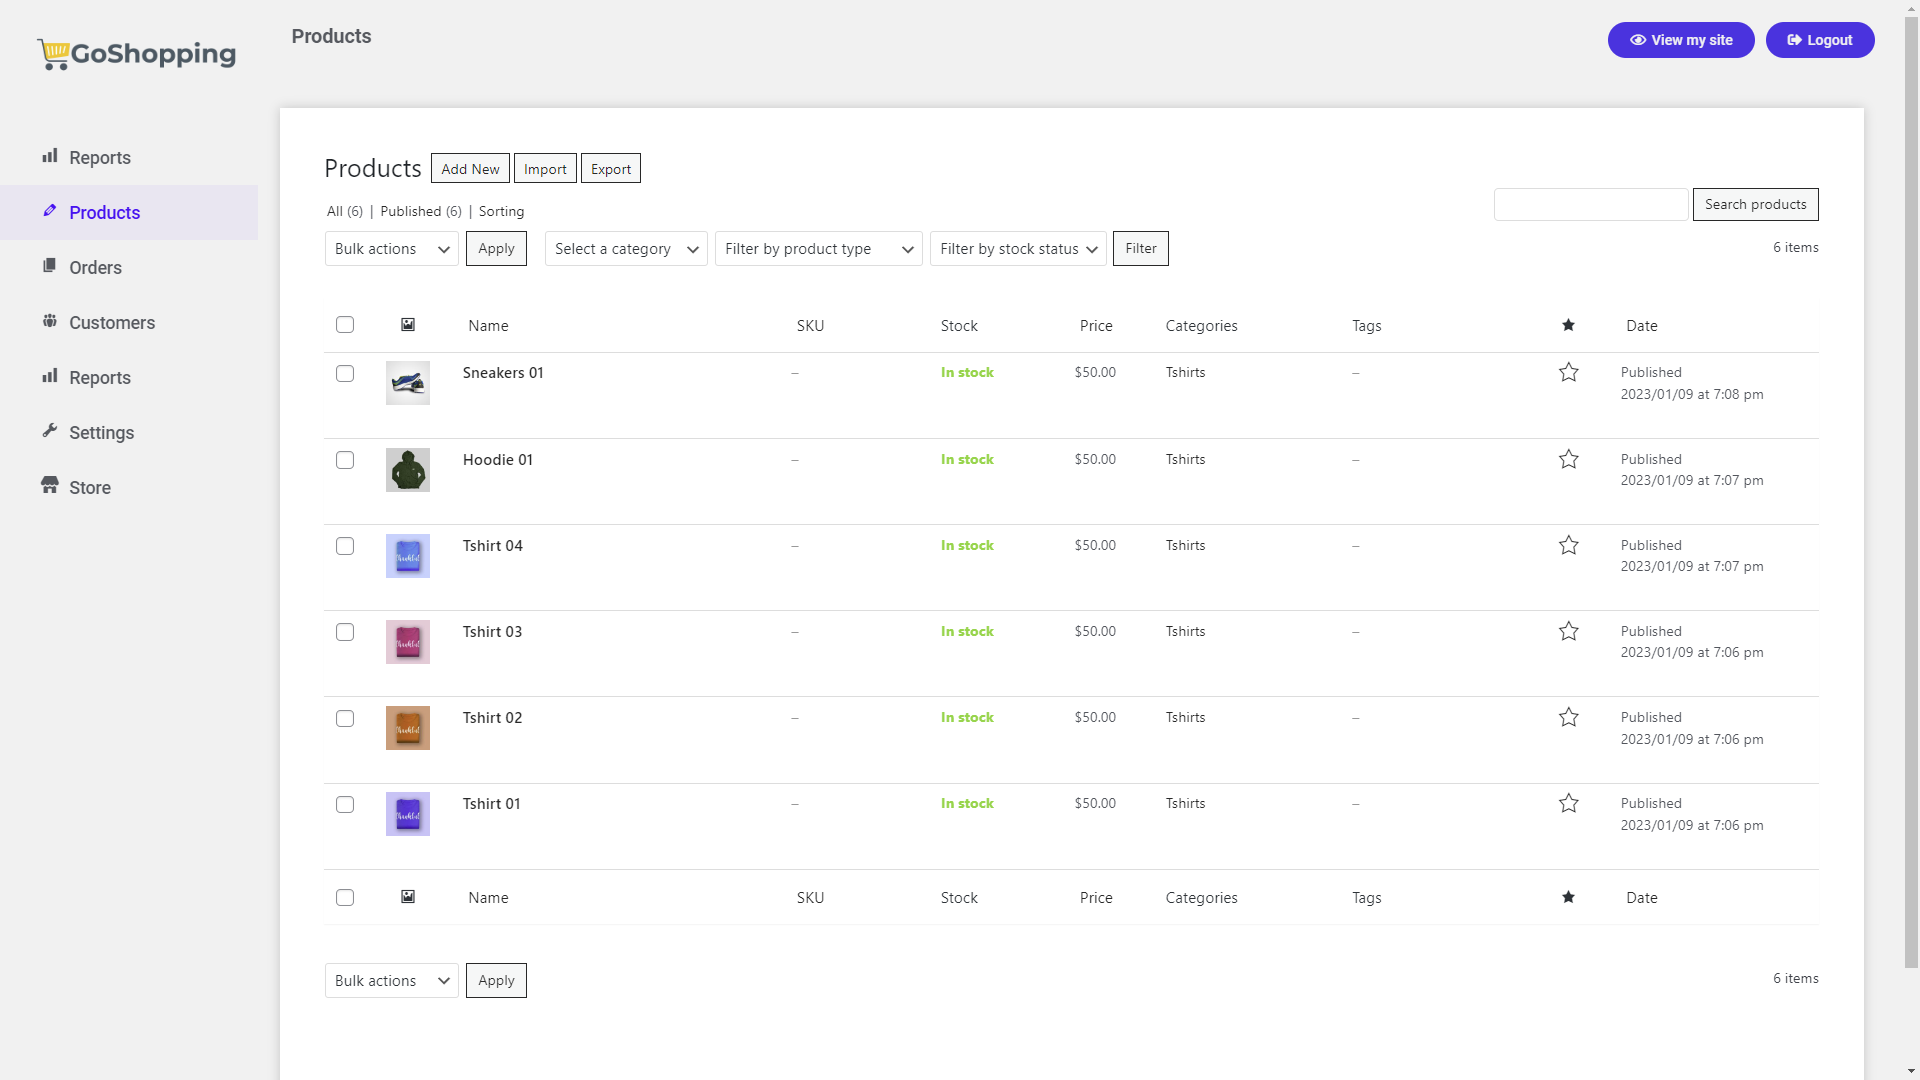
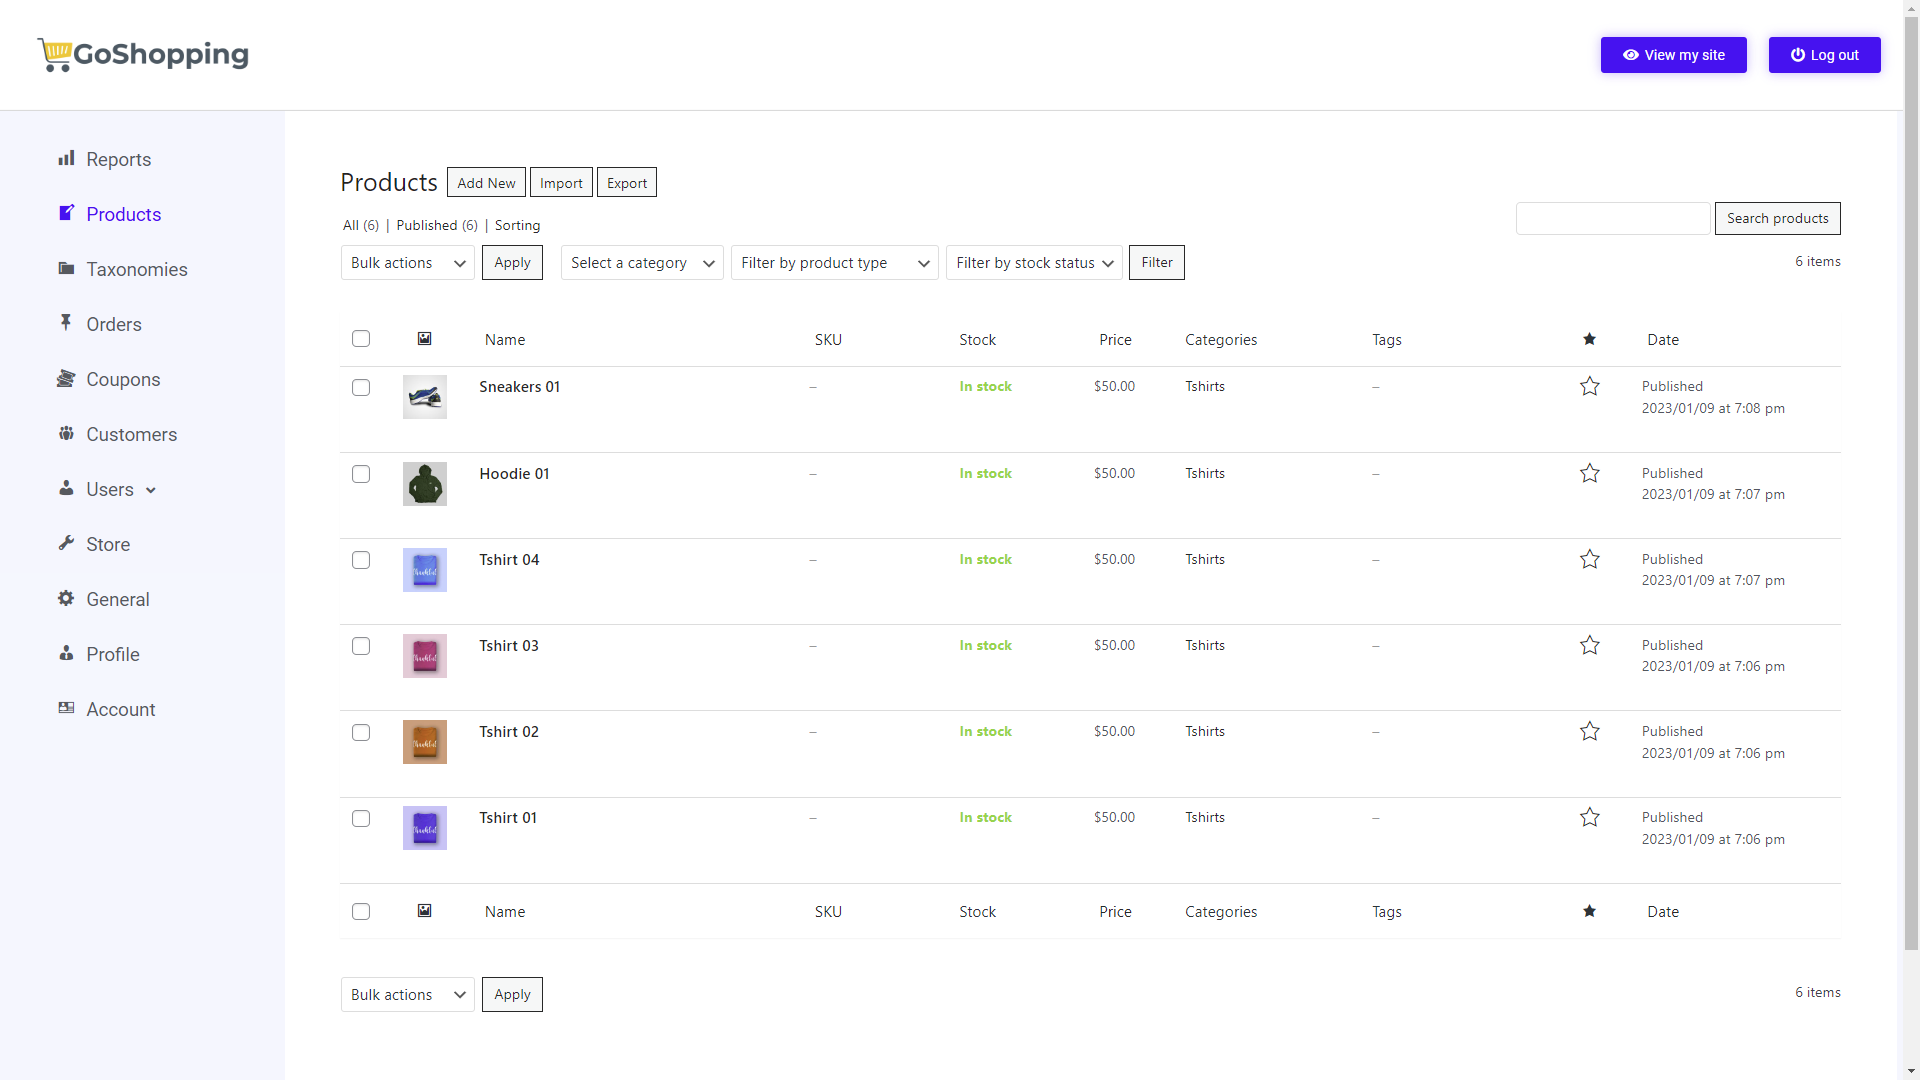
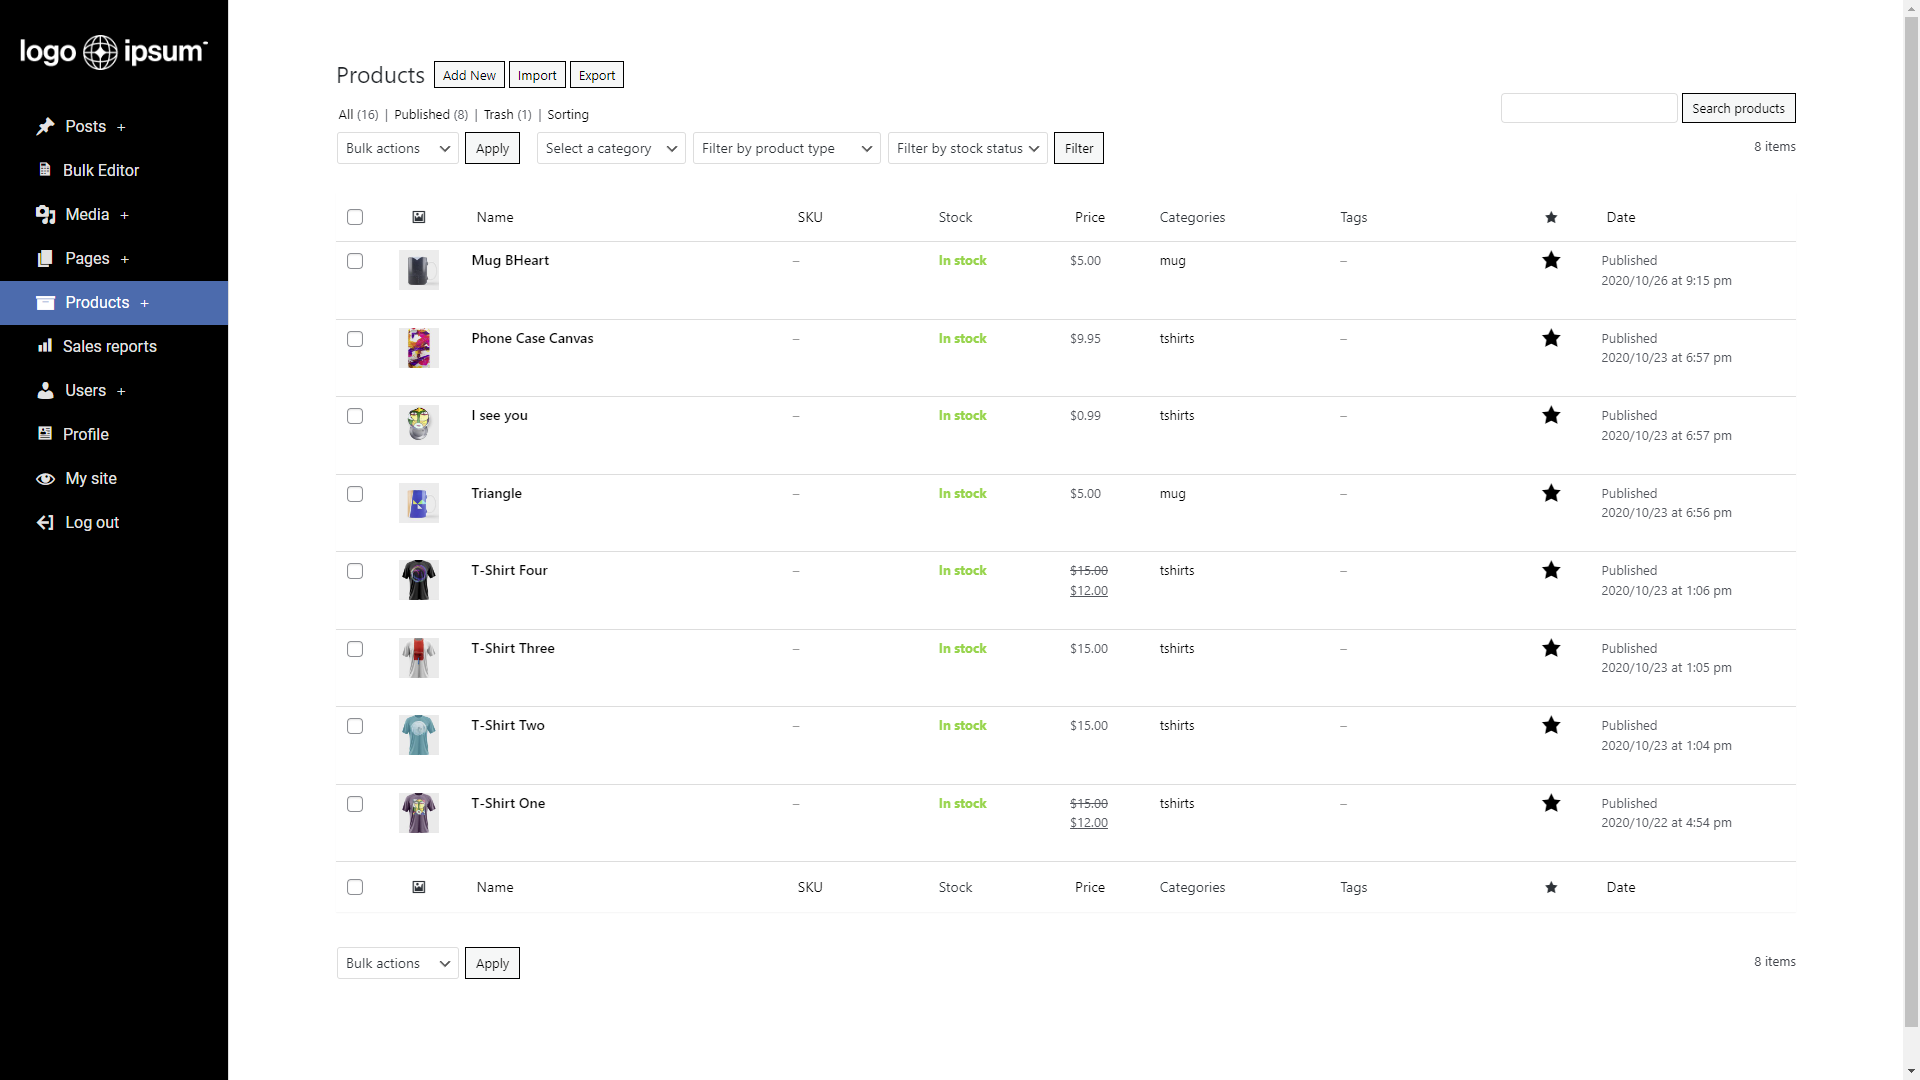
Once you’re done editing the dashboard pages, this is what your global front-end dashboard could look like:

As you can see, it’s a clean interface (which depends on the dashboard template that you selected). It’s completely different from the normal wp-admin dashboard.
We can also select the home page of our frontend dashboard site. We recommend you to change it to one of the dashboard pages.
For example, we will select the “Products” page because that’s the page we want our users to open when they visit the frontend dashboard site.
Go to Settings > Reading and select the page in Your homepage displays > A static page > Homepage.

Selecting the front-end dashboard settings
Now we need to select the frontend dashboard settings.
Go to Frontend Admin > Settings > General.

Once there, you can start selecting all the settings you want.
For example, we will select these settings:
- Add “Edit” link after post content = No
- Disable the quick settings = Not needed
- Disable the wp-admin notices when viewing on the frontend = Yes
- Redirect users to this page after publishing a post = Redirect to the list of posts
- Redirect users to this page after creating a post with pending review status = Redirect to the list of posts
- Disable the message indicating why a page didn’t load = No
- Auto select this user role when we are creating users in the frontend = Customer
- Hide pages containing our shortcode = Yes
- Default post/page editor for all the post types = Regular WordPress editor
- Hide WooCommerce pages = Yes
Second, let’s select the access restrictions settings.
Go to Frontend Admin > Settings > Access restrictions.

Once there, you can start selecting all the settings you want.
For example, we will select these settings:
- Enable the wp-admin access restrictions = No, for now.
- Access restriction: What wp-admin pages can be viewed on the frontend = Click on the “Allow pages that contain our shortcode currently” link.
- Access restriction: Who can access the wp-admin dashboard = install plugins
- Access restriction: Frontend dashboard URL = Paste the URL of your frontend dashboard site, or the URL of the frontend dashboard page you want your users to be redirected to when accessing the frontend dashboard.
- Message to display when a page did not load for a technical error = We will leave it empty
- Blacklisted Page URL (optional) = We will leave it empty
- Wrong Permissions Page URL (optional) = We will leave it empty
- Wrong Permissions Message (optional) = We will leave it empty
- These user roles will use the frontend dashboard = shop_manager
- Hide pages when a required plugin is deactivated = Yes
- Hide pages when a required theme is deactivated = Yes
Third, let’s select the appearance settings.
Go to Frontend Admin > Settings > Appearance.

Once there, you can start selecting all the settings you want.
For example, we will select these settings:
- Admin CSS = We’ll leave it empty
- Hide admin bar on the frontend = This is unnecessary
- Maximum content width in regular mode = We’ll leave it empty
- Loading animation style = Wave (or any style you want)
- Custom GIF image URL = We’ll leave it empty
- Loading animation color = We’ll select #1e73be (or any color you want)
- Admin JS = We’ll leave it empty
- Show floating edit buttons in the frontend = No
- Admin footer html = We’ll leave it empty
- Show the wp screen options in the frontend = No
- Use the wp screen options configured by one user for all users = We’ll leave it empty
- Clean Admin Look : Primary color for admin content = This is auto selected according to the dashboard template we imported. You can still change it if you want.
- Clean Admin Look : Hover color for links and buttons = This is auto selected according to the dashboard template we imported. You can still change it if you want.
Propagating frontend dashboard settings to all sites of our Wildcloud application
In order for these settings to propagate to all sites in our Wildcloud application, we need to apply them to the version of our application.
For this, WP Frontend Admin automatically generates a configuration .zip file that we can install as a plugin on our application version.
Important – We won’t have to do the same thing every time we apply changes to the dashboard site, since the configuration file will be automatically updated and used by all sites/tenants of our application. This file is used one time only.
This is one of the great advantages of the Wildcloud ecosystem, since all sites share the same codebase (plugins, themes, language files). And yet, the database of each site is not shared.
After saving the changes to our WP Frontend Admin settings, we need to move to the Multitenant tab and click on Download file.
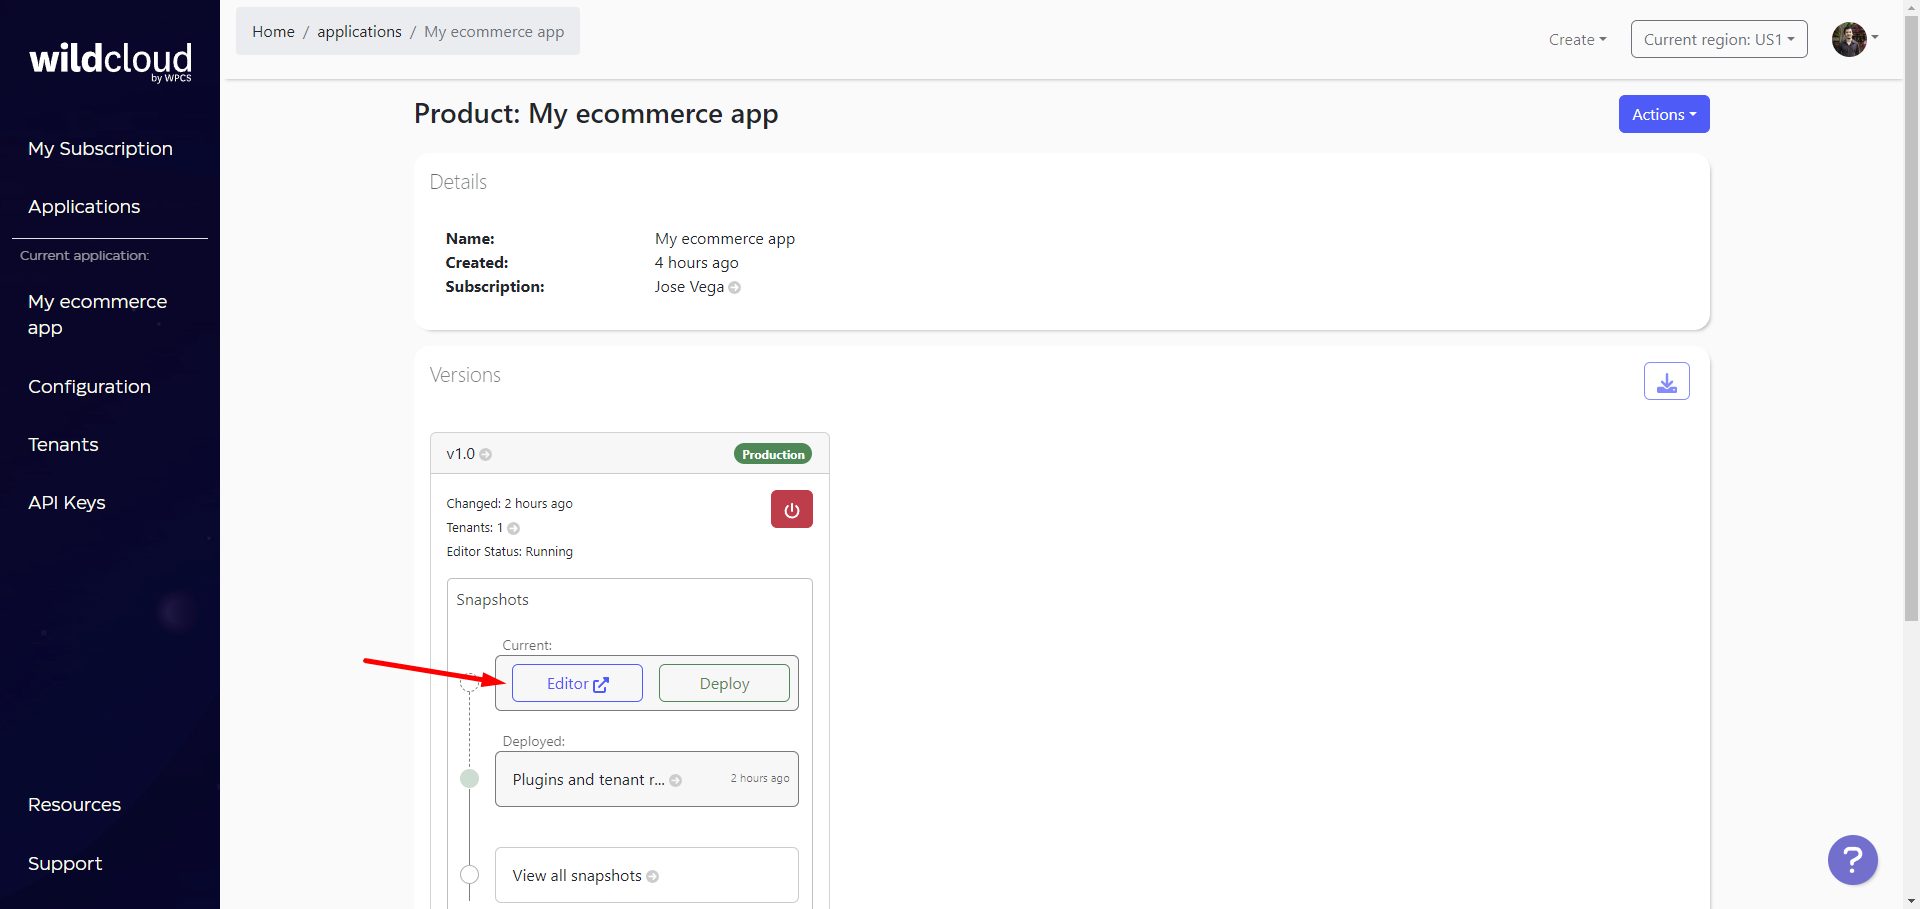
Now we can close the dashboard site and open our application’s version Editor.
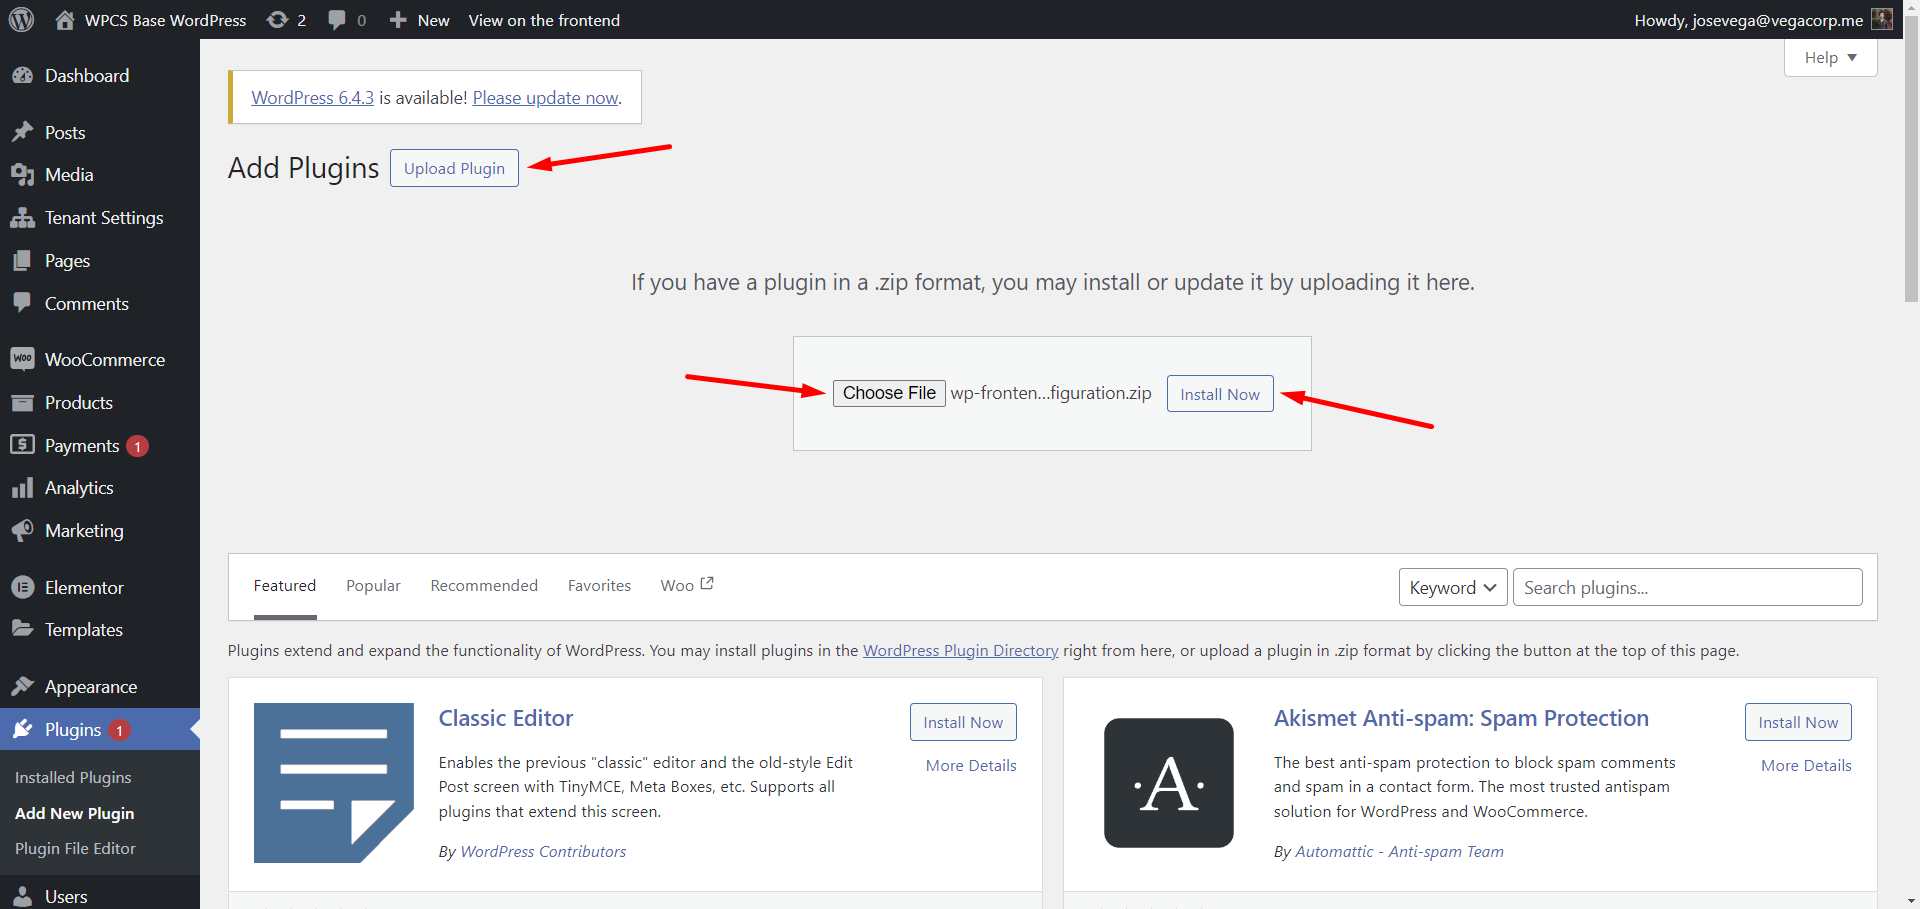
Once we’re in the wp-admin dashboard of our application’s version, let’s upload the zip file as a plugin.
- Go to Plugins > Add New Plugin.
- Click on Upload plugin.
- Click on Choose file and locate the “wp-frontend-admin-configuration.zip” file.
- Click on Install Now.
Important. You don’t need to activate this plugin, it will work as the configuration file regardless if it’s activated or deactivated.
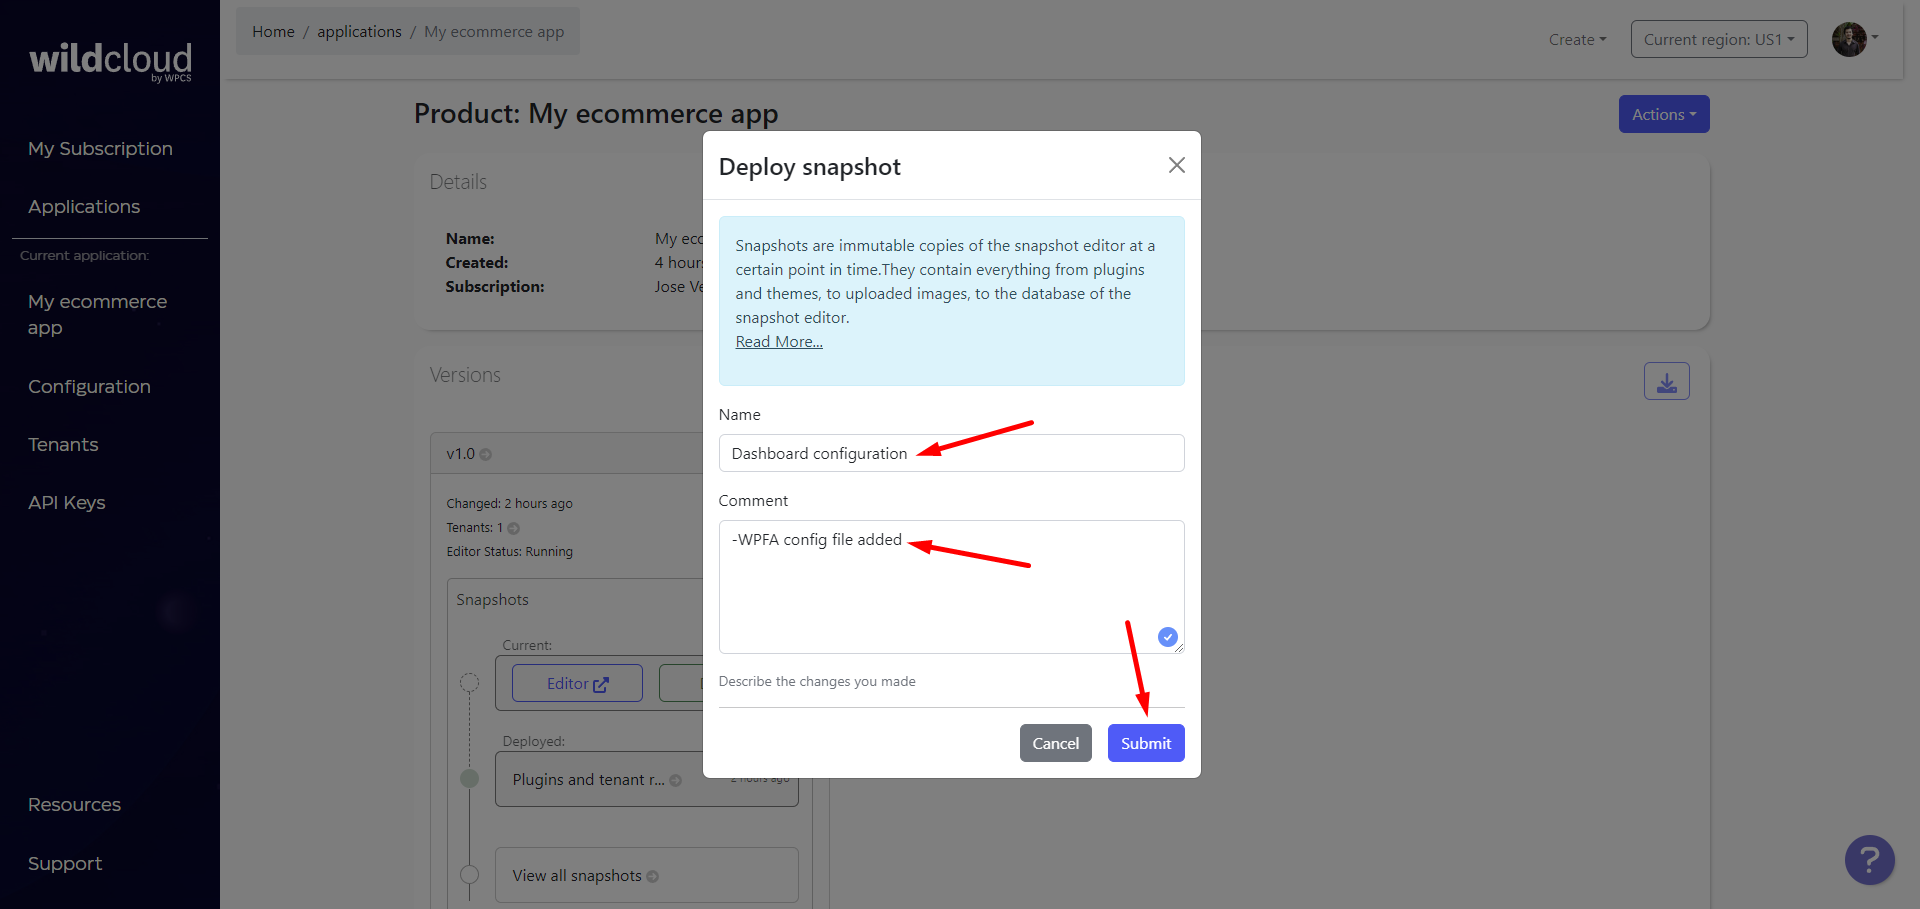
After installing the configuration file as a plugin, you need to deploy the version so that all sites/tenants share the file.
On your production version, click on Deploy.
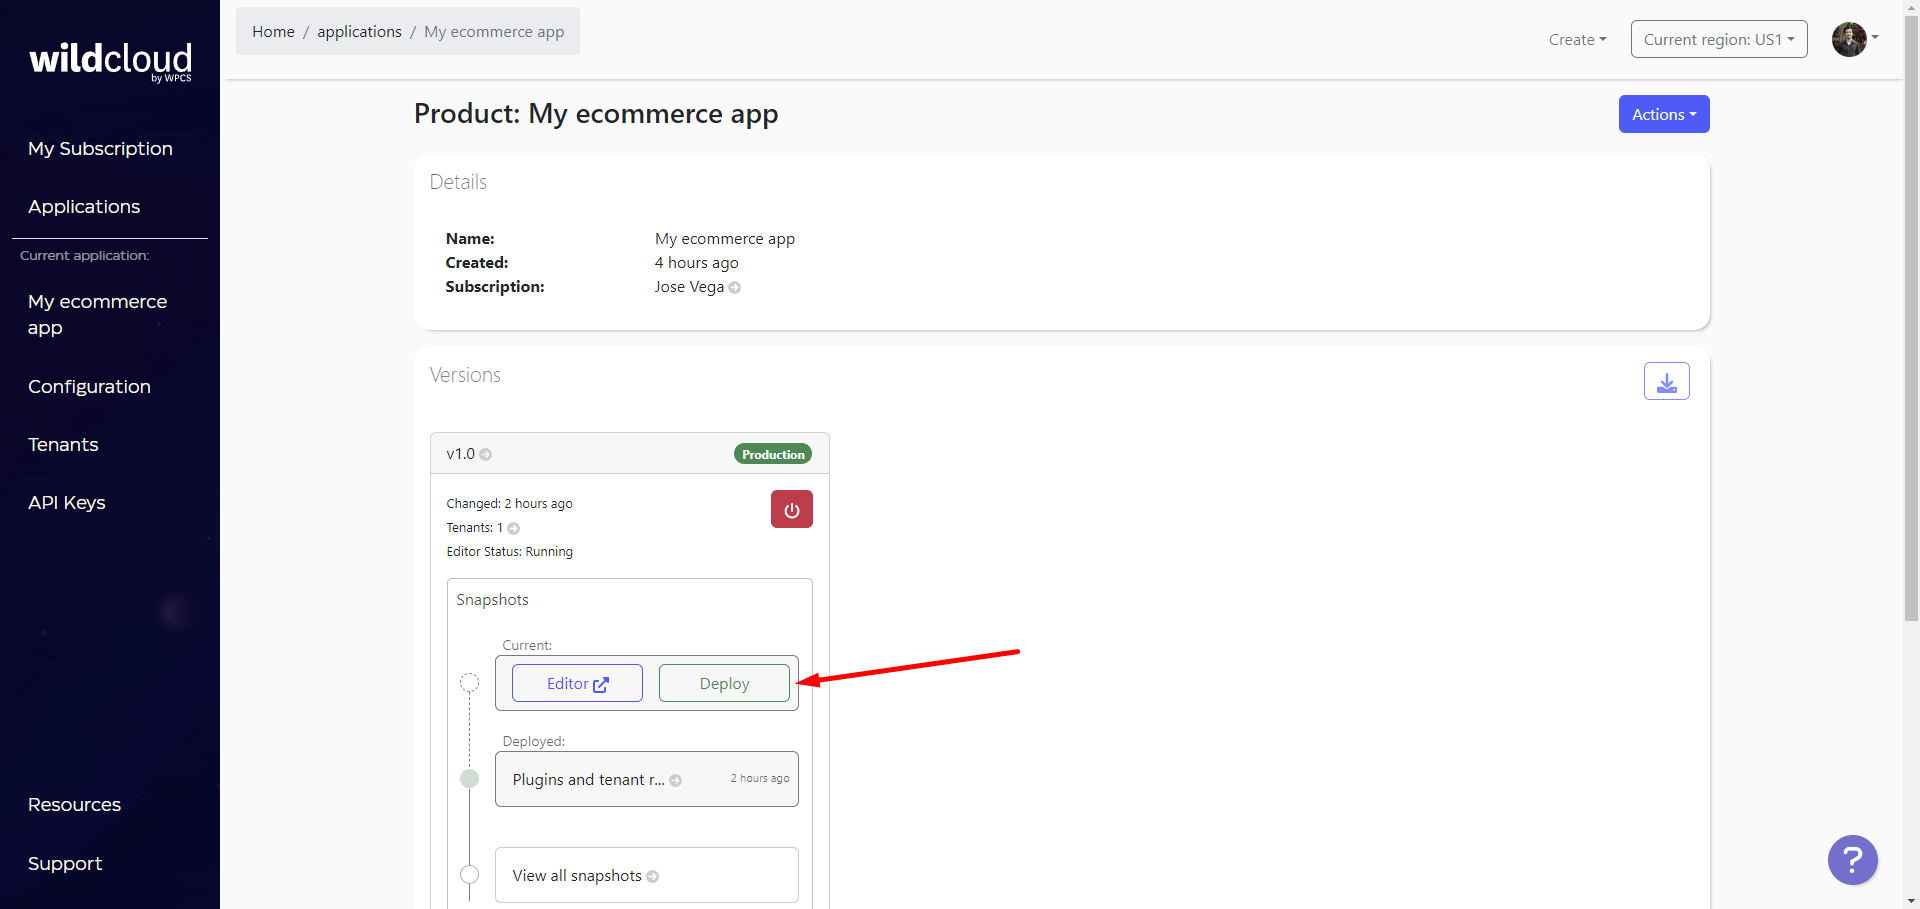
Finally, add a Name and some Comment for this version deployment, and click Submit.
Done. We have created a front-end dashboard for our ecommerce platform.
The configuration file contains all the dashboard settings that you need, and it also syncs the WP Frontend Admin license across all your sites/tenants.
In the next lesson, we are going to create a site template that will be cloned to clients’ sites every time they create a new site on our platform.
This way, they won’t have to design or configure the site from scratch.