This is a complete guide to show you how to create a front-end dashboard for the MailPoet plugin. This dashboard allows your users to manage MailPoet subscribers and newsletters completely from the front-end.
This is really useful if you work for clients who are bloggers and want to send newsletters but don’t know how to use WordPress.
You can build a dashboard like this using your theme’s design or using any page builder for WordPress. This is great because you can give it your own color scheme, logos, etc.
This is what our dashboard looks like:

We strongly believe that your dashboard can look way better than ours because you can use all the elements you want and train your creativity. 🙂
You just need to follow these simple steps:
Step 1. Install and configure the MailPoet plugin
You need to have the MailPoet plugin installed, activated, and configured on your website.
You can download it here.
Step 2. Install and activate the WP Frontend Admin plugin
To display the MailPoet admin pages on the frontend, you need to download the WP Frontend Admin plugin.
It allows you to display any wp-admin page on the front-end to create beautiful dashboards and web apps using WordPress plugins behind the scenes.
You can try the premium plugin on your website for free for 7 days.
After installing both the MailPoet and the WP Frontend Admin plugins on your WordPress site, you’re ready to build a beautiful dashboard to allow users to manage MailPoet subscribers and newsletters on the front-end.
Step 3. Display the MailPoet subscribers page on the front-end
In this section, we show you how to display the MailPoet subscribers page on the frontend to allow users to view and manage subscribers without having to use the WordPress dashboard.
Display the subscribers page on the front-end
You have at least two ways to display the MailPoet subscribers page on the front-end.
a) Display the MailPoet subcribers on the frontend with one click
You need to go to MailPoet > Subscribers and click View on the frontend.

b) Display the MailPoet subscribers on the front-end using a shortcode
You may want to build your MailPoet dashboard using any of the following page builders:
- Elementor
- Visual Composer
- Gutenberg
- Divi
- Beaver Builder
- WP Page Builder
- Page Builder by SiteOrigin
- Oxygen
- Live Composer
- Brizy
- Etc.
You can use the following shortcode:
[vg_display_admin_page page_url="admin.php?page=wysija_subscribers"]
Now you need to click Preview to see the subscribers page on the front-end.
Note – WP Frontend Admin only works in live mode, so even if you use a page builder, you need to preview the page for WP Frontend Admin to show the wp-admin content on the front-end.
Select the subscribers front-end page’s basic info
Once the subscribers page has been displayed on the frontend, you need to use the Quick Settings panel to configure the page. You can start configuring the following info:
- Page title – We’ll call it “Subscribers”
- URL slug – We’ll enter “subscribers” as the URL slug
- Page template – You can select the Default page template to use your theme’s appearance settings. If you used any page builder, the page template will be inherited from what you selected on the editor mode.
- Add to this menu – You can add the pages to any menu. We’ll add it to the primary menu. If you don’t have any menu, the plugin will show a Create Menu link that will take you to Appearance > Menus where you have to create a new menu.

Hide any unnecessary elements and edit texts
WP Frontend Admin allows you to customize the front-end pages by hiding all the elements that your users will not need to manage the content on the front-end.
It also allows you to edit the texts of the admin pages on the front-end to make them clearer, shorter, etc.
Fortunately, MailPoet doesn’t have too many unnecessary elements and the texts are very clear. However, you decide which texts and elements stay on your subscribers page on the front-end.
To hide any unnecessary elements:
- Click Hide element.
- Click the element you want to hide.
You need to repeat these two simple steps with every element you want to hide.
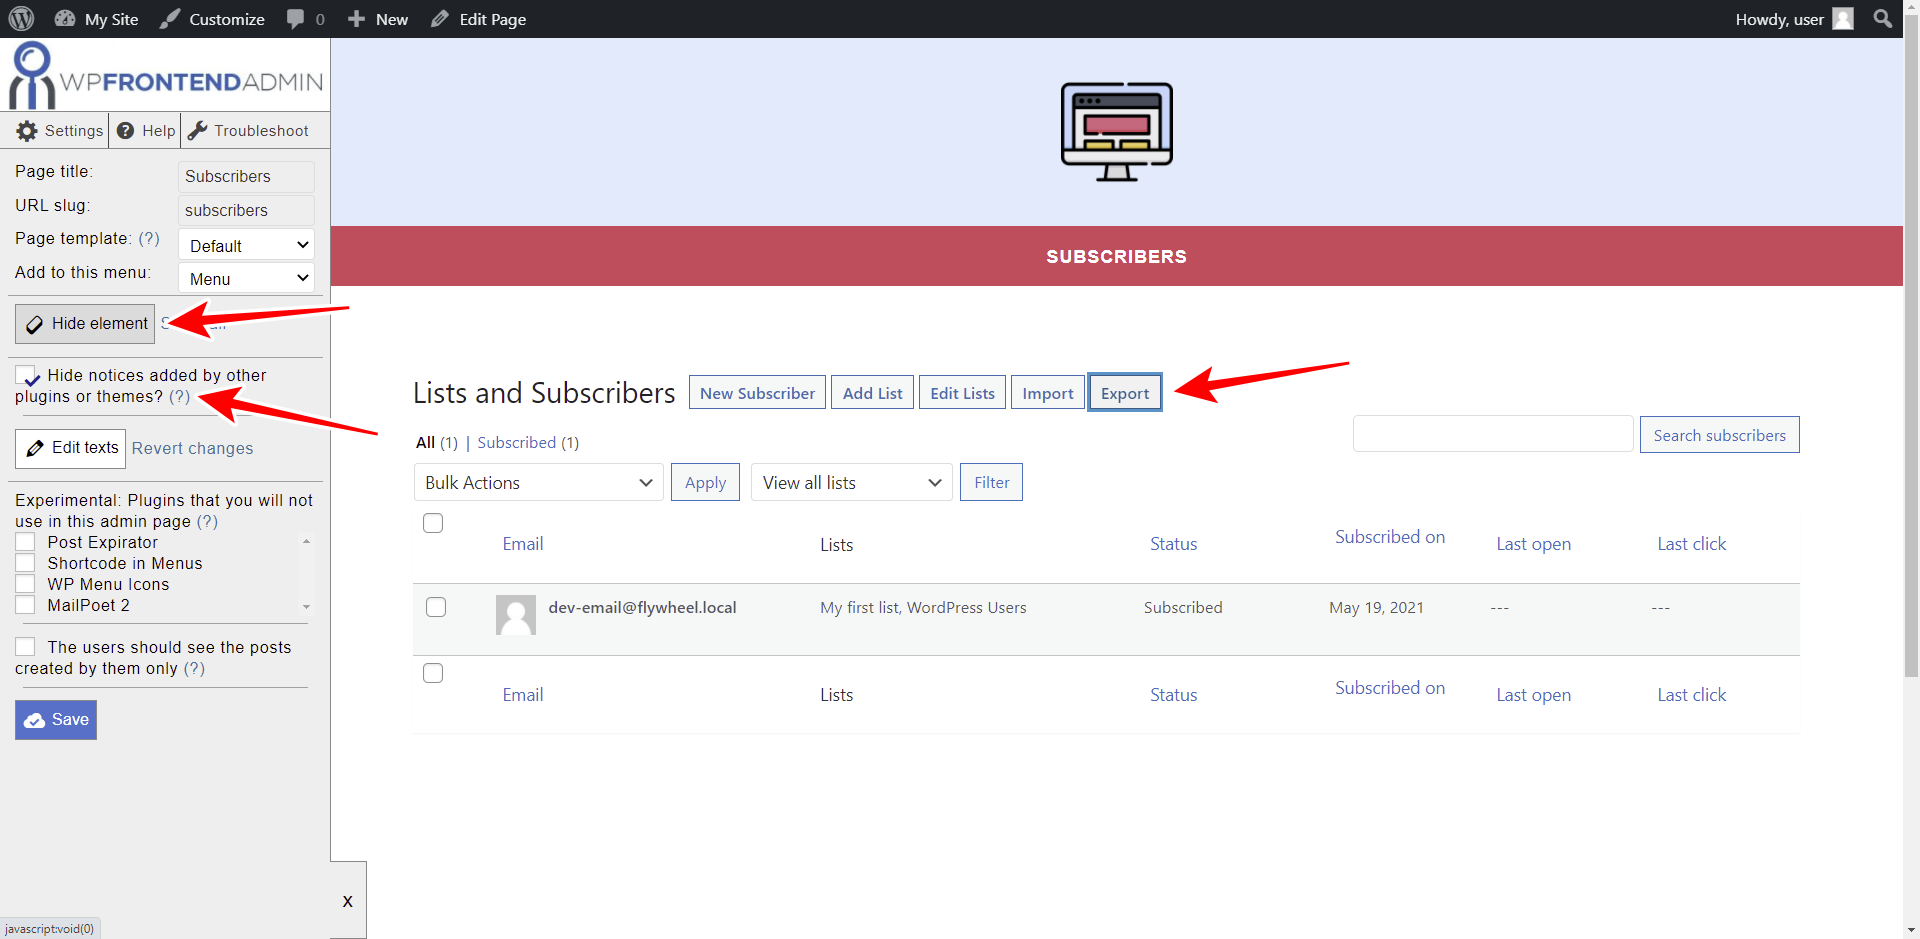
To edit the texts:
- Click Edit texts.
- Edit all the texts you want.
- Click Stop editing texts.

Once you’re done configuring your subscribers list page, you need to click Save to apply the changes.
Optional
At this point, you have completed the configuration of the page that displays the list of your subscribers on the front-end. Now you can open the Add New Subscriber, Add List, Edit Lists, Import, and Export forms to configure them by hiding unnecessary elements and editing the texts. Just remember to save the changes on each page.
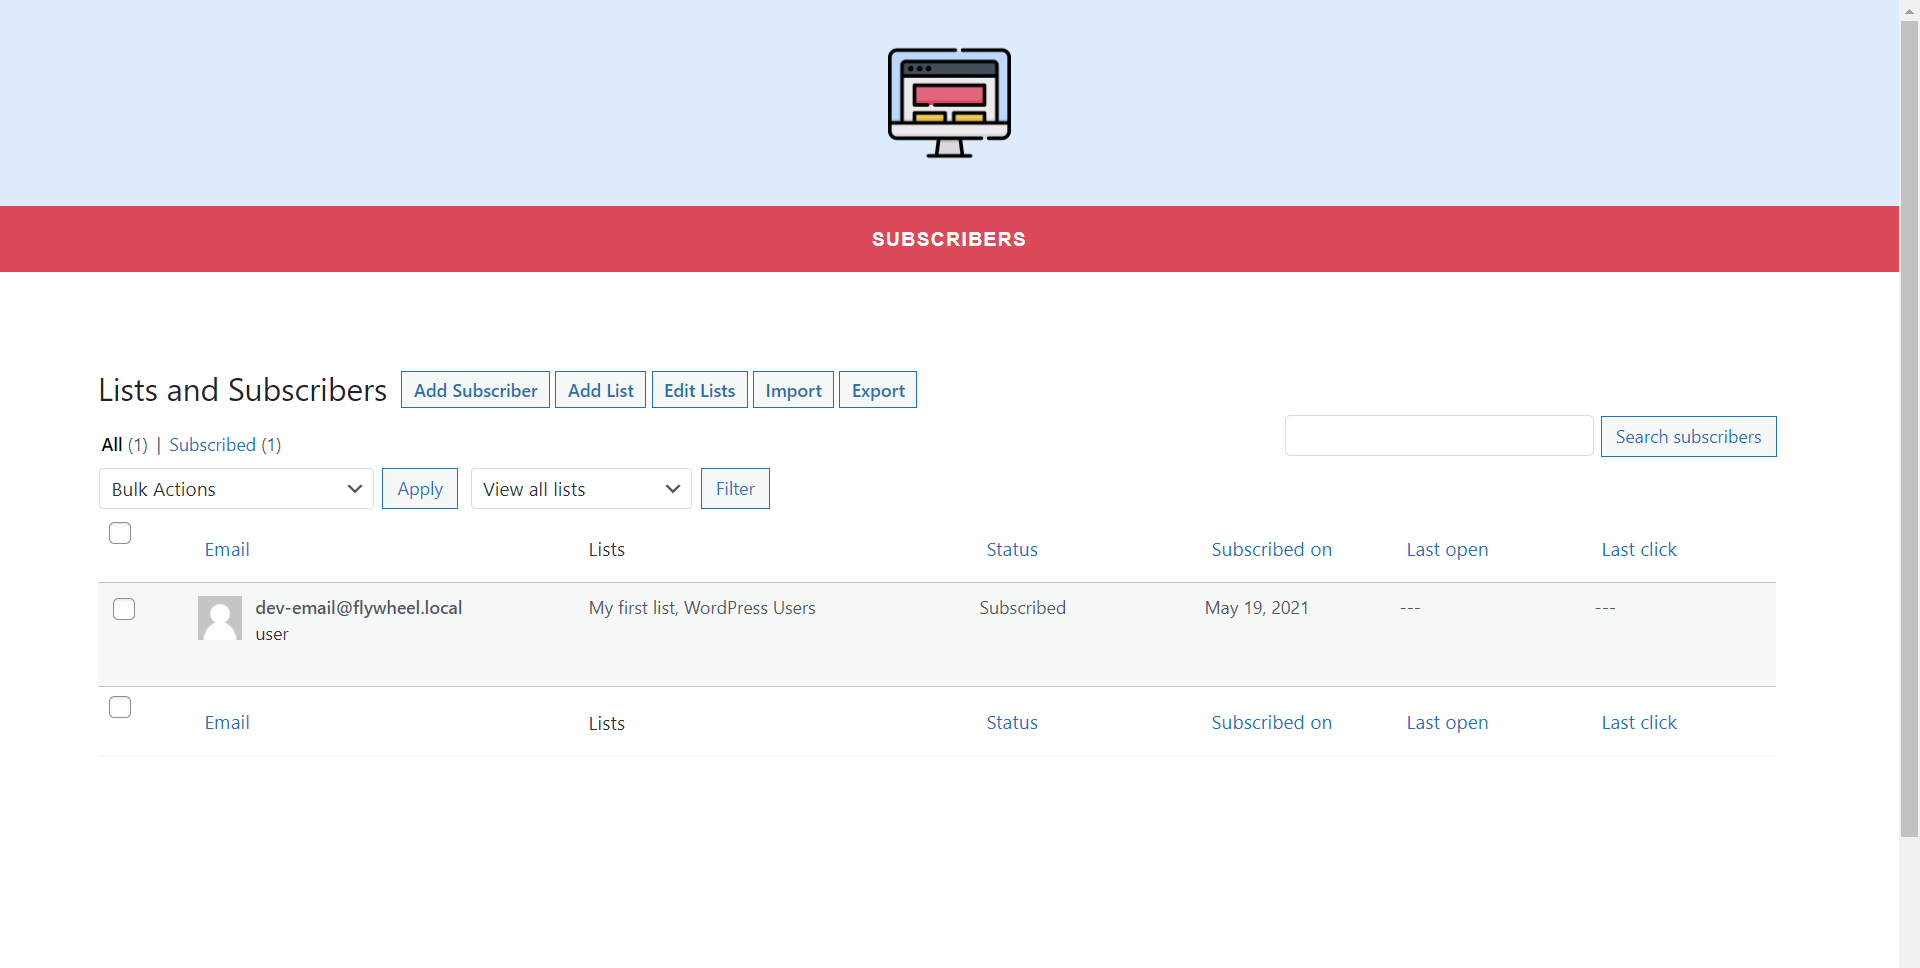
This is what the MailPoet subscribers page looks like in the frontend:
This is what the Add Subscriber form looks like on the front-end:

This is what your users will see when exporting subscribers on the front-end:

Step 4. Allow users to send MailPoet newsletters from the front-end
Once you complete the MailPoet subscribers front-end page, you can follow the same steps to display the Newsletters page on the front-end.
- Go to MailPoet > Newsletters.
- Click View on the frontend or use the following shortcode to display the newsletters page on the front-end using any page builder:
[vg_display_admin_page page_url="admin.php?page=wysija_subscribers"]
- Select the basic information of the front-end newsletters page: title, URL slug, template, and menu.
- Hide any unnecessary elements from this and the other related pages
- Edit any texts you want.
- Save the changes.
This is what our front-end Newsletters page looks like:
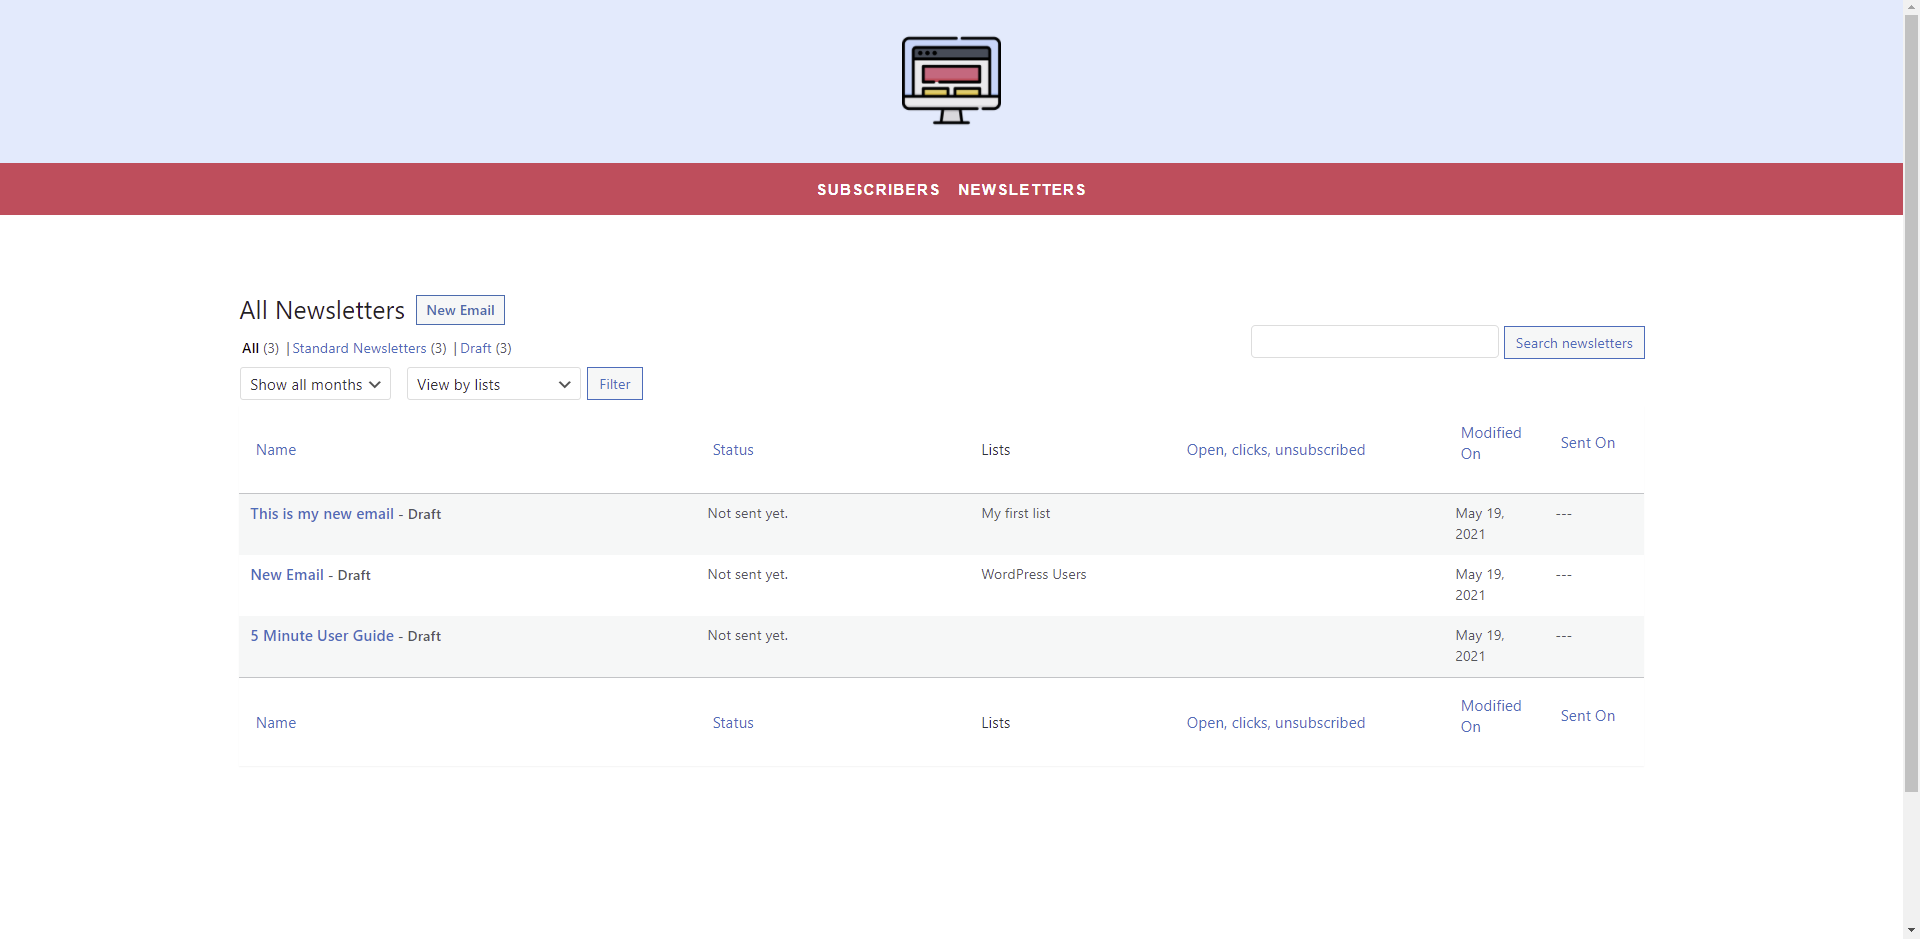
Users will be able to create and send newsletters right from the front-end. They will create standard and automatic newsletters, select content, images, styles, and themes for the newsletters on the front-end, send test newsletters to a specific email, etc.
Now it’s time to complete our front-end MailPoet newsletters dashboard with some additional steps.
Step 5. Optional – Add a “Log Out” button to the nav menu
You can add a Log Out button to the nav menu of your site so that the users can log out right from there.
For this, you need to install and activate the Shortcode in Menus plugin, which will make shortcodes work as clickable links in nav menus.
Once it’s installed and activated on your site, go to Appearance > Menus > Custom Links.
Now add this shortcode in the URL field and enter the Log Out text in Link Text:
[vg_display_logout_url]
Once you do that, click Save Menu.

Once you save the menu, the Log-Out link will be added to the nav menu of your MailPoet front-end dashboard.
This is what users will see when they log out.

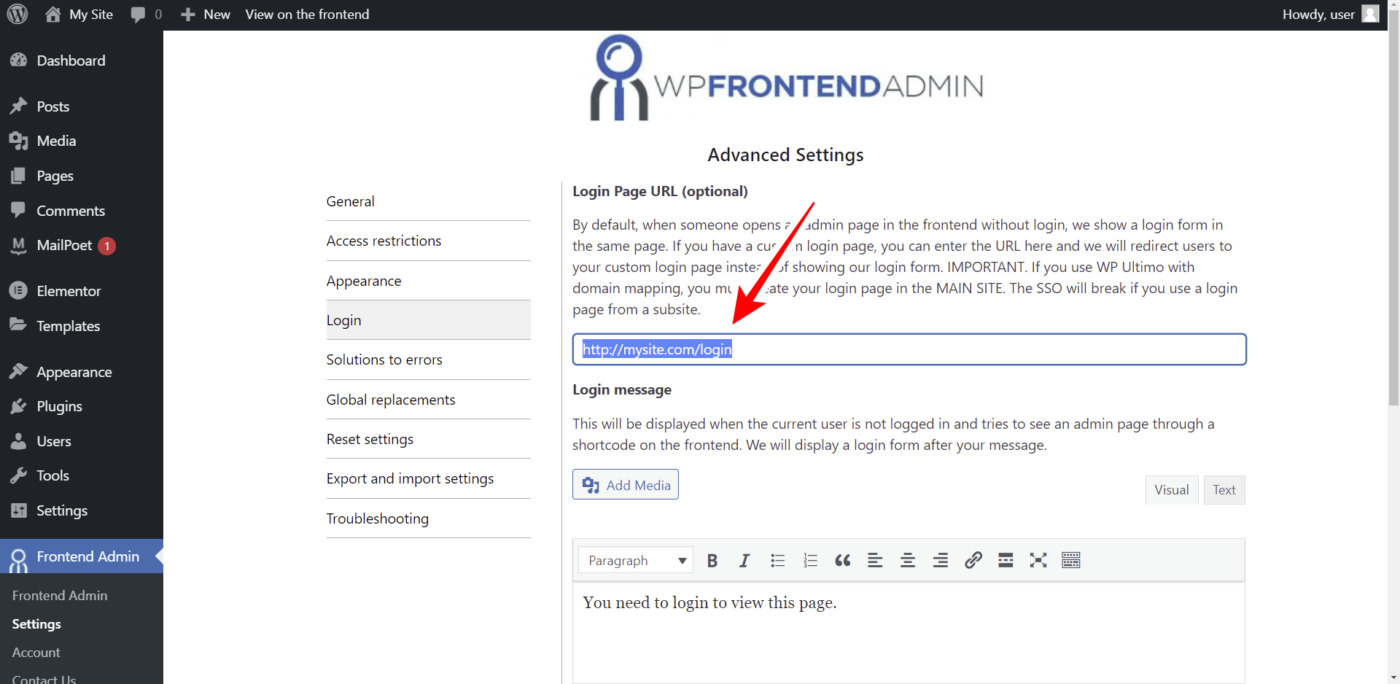
Option 6. Optional – Create a custom login page
WP Frontend Admin allows you to create a custom login page to prevent users from using the normal WordPress login page. You can create that custom login page using any page builder for WordPress.
This is a really simple page we created with Elementor free.

To display the login form on any page, you just need to use this shortcode:
[wp_frontend_admin_login_form]
After that, you can select the custom login page as the default login page for your site. Users won’t use the normal WordPress login page, but the custom one.
- Go to WP Frontend Admin > Settings > Login
- Paste the login page URL in Login Page URL (Optional)
- Save changes
Step 7. Optional – Allow users to write blog posts from the front-end
Here is a tutorial to guide you to display the posts page on the front-end and allow your users to write blog posts from the front-end. You can integrate that page with the MailPoet dashboard and thus prevent your clients from using the normal WordPress dashboard at all.
Step 8. Create or edit a user role to manage MailPoet newsletters and subscribers on the front-end
It’s really important to mention that only users with the following capabilities will be able to view and manage subscribers and newsletters on the front-end:
- wysija_newsletters
- wysija_style_tab
- wysija_theme_tab
- wysija_subscribers
- wysija_stats_dashboard
You have two options to make sure the right users have these capabilities: 1) you can edit an existing user role such as author or 2) you can create a completely new user role.
For any of these options, you need the User Role Editor plugin, which allows you to assign the capabilities needed to view and manage users and subscribers on the front-end.
Once you install and activate the plugin, go to Users > User Role Editor to edit an existing user role or create a new one.
- If you want to edit an existing role, select it in the Select Role and change its capabilities dropdown.
- If you want to create a new user role, click Add Role.

In case you choose to create a new user role, you will see the Add New Role pop-up where you need to add the new role’s basic information:
- Role name (ID): You can enter “newsletter_manager”
- Display Role Name: You can enter “Newsletter manager”
- Make copy of: This field allows you to copy an existing user role and edit it. This is OPTIONAL.
Once you select that information, hit Add Role.

Either you’re editing an existing role or creating a completely new role, you need to assign it these capabilities so that the users with that role be able to view and manage users and newsletters on the frontend.
- wysija_config
- wysija_newsletters
- wysija_style_tab
- wysija_theme_tab
- wysija_subscribers
- wysija_stats_dashboard
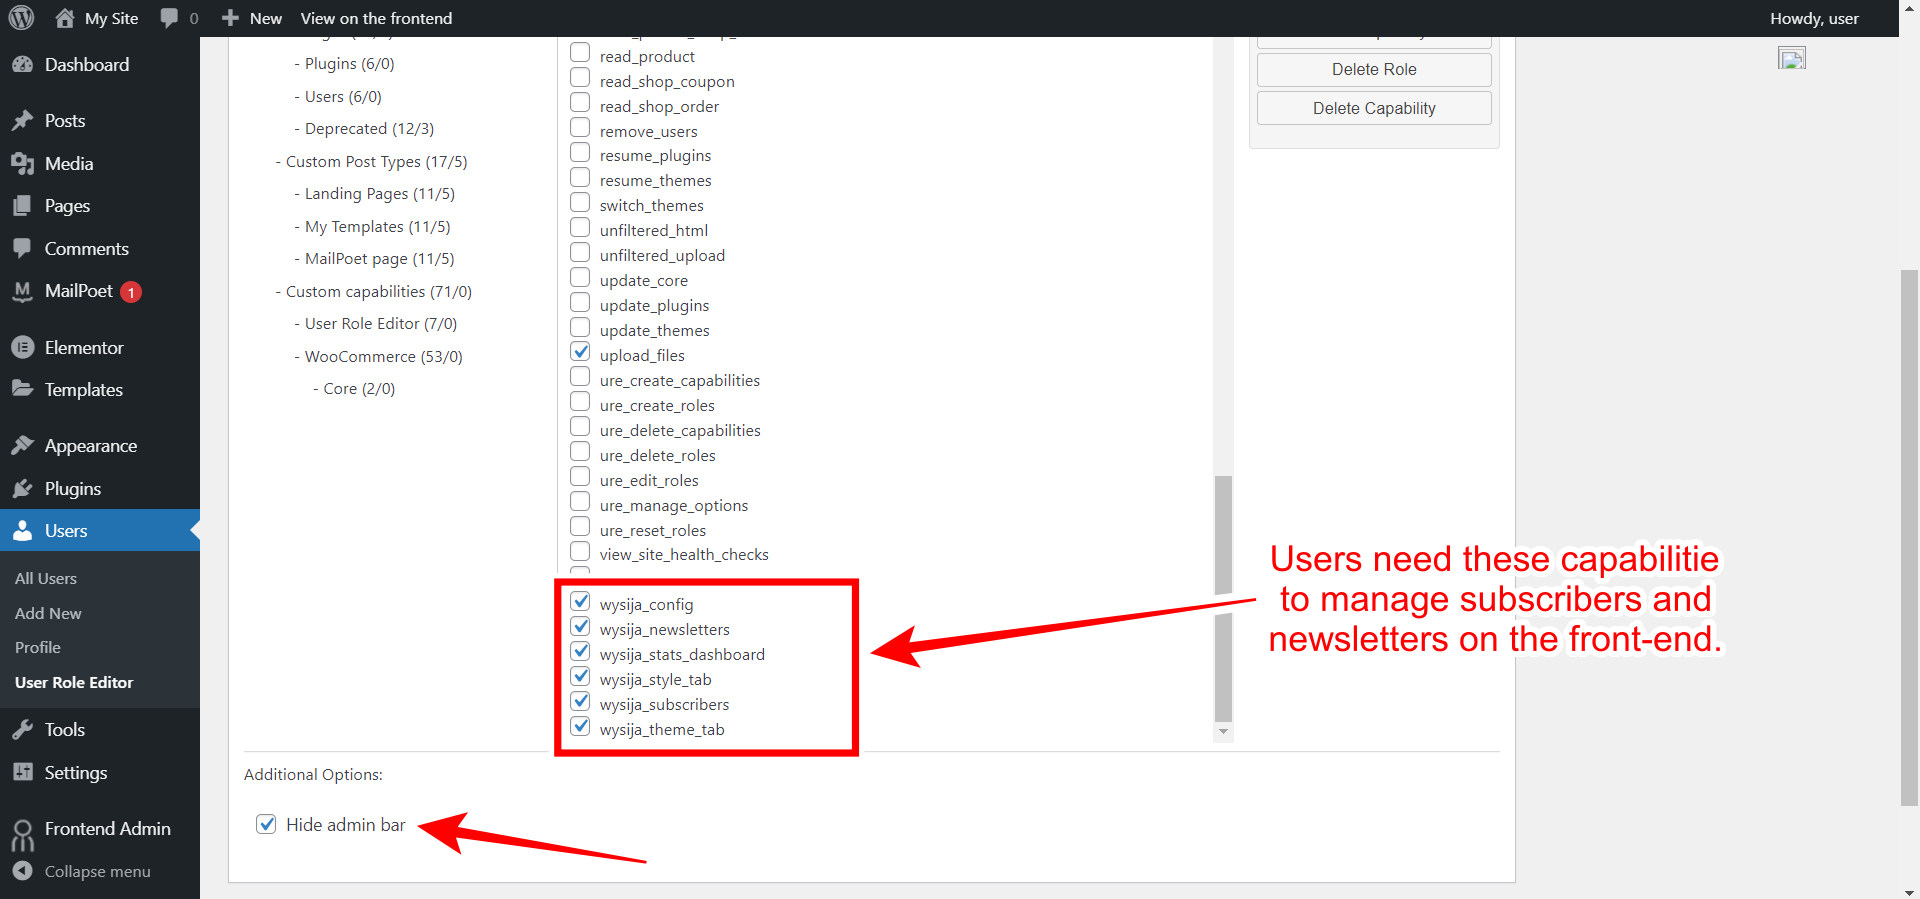
You can also tick the Hide admin bar checkbox so that the users don’t see the top bar WordPress displays to allow users to access wp-admin.
This is great because once you’ve added the necessary pages and the log-out button, users don’t need anything from wp-admin to manage newsletters on the front-end.
Now you just need to create a new user account with the new or the edited user role.
Start building your front-end web app
WP Frontend Admin allows you to create beautiful front-end dashboards and web apps with no programming knowledge.
You can try the premium plugin on your website for free for 7 days.