Building a WordPress multisite network means creating a unified, professional experience for all your users. This guide provides a detailed explanation of the General Settings in WP Frontend Admin, specifically tailored to help you manage your entire multisite network with ease and precision.
Preliminary Notes
- If you use WP Ultimo to power your network, be sure to read our integration guide. You’ll learn how to restrict features based on membership plans, solve common issues, and build a powerful platform.
- Check out our full list of shortcodes, which are the building blocks for creating your custom frontend dashboard pages.
The Master Switch: Centralized Management
To begin, navigate to Network Admin > Frontend Admin > Settings > General. The first and most important setting you’ll see is the master switch for your entire network.
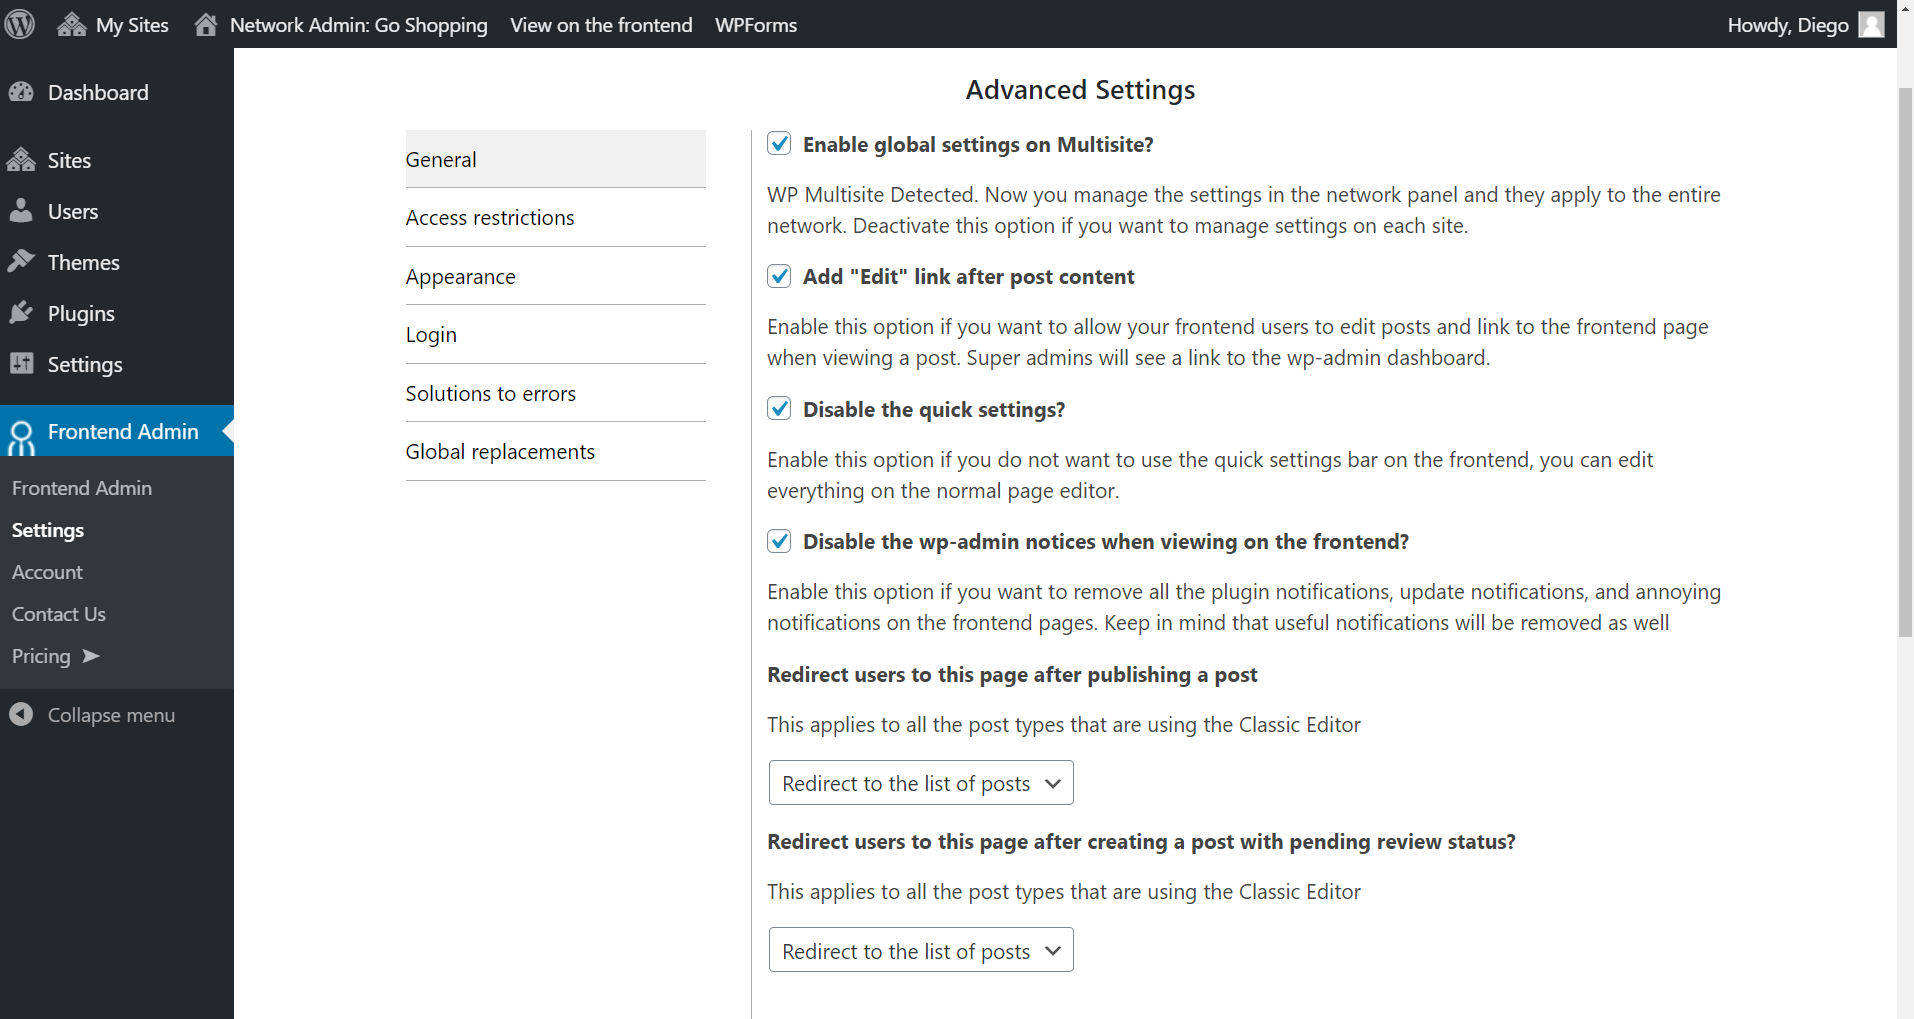
Enable global settings on multisite
Think of this as the main control for your network. When enabled, you manage all WP Frontend Admin settings from one central location (the Network Admin panel), and these settings apply to every single site on your network. This is the recommended approach for a consistent user experience.
If you disable this, settings will be managed individually on each subsite’s dashboard, allowing for different configurations across your network.
Improving the User Experience
These settings help you create a cleaner, more intuitive interface for your site administrators.
Disable the quick settings
When you, as a Network Admin, create a frontend page, you see a “Quick Settings” panel for hiding elements and editing text. This panel is not visible to your users (like subsite admins). You can check this option to disable it for yourself if you prefer to use the standard WordPress editor options instead.
Disable the wp-admin notices when viewing on the frontend
Enable this to give your users a clean, professional dashboard free of clutter. It will hide all plugin update reminders, theme notifications, and other admin notices that typically appear at the top of admin pages. Keep in mind this will hide potentially useful notices as well.
Disable the message indicating why a page didn’t load
If a user tries to access a page they don’t have permission for, we normally show a helpful message explaining why (e.g., “You need higher permissions”). While useful for admins, you may want to hide this from regular users. Check this box to disable that specific message.
Content and User Management

Add “Edit” link after post content
When this is active, an “Edit” link will automatically appear below the content of posts and pages for any logged-in user who has permission to edit them. This gives your users a convenient, one-click way to jump from viewing content to editing it on the frontend.
Redirect users after publishing a post
Control the workflow for your content creators. After a user clicks “Publish” on the frontend, you can automatically redirect them to one of three places:
- Redirect to the list of posts: Best for users working on multiple articles.
- Redirect to create a new post: Perfect for high-volume content creation.
- Redirect to view the new post: Great for users who want to immediately see their live post.
Redirect users after creating a post with pending review status
This setting applies to users who can’t publish directly (like Contributors). After they submit a post for review, you can choose where they are redirected, with the same options as above.
Default post/page editor for all the post types
This powerful feature lets you standardize the content editing experience across your entire network. You can set a default editor (e.g., Elementor, Classic Editor) that will automatically open when a user edits any post or page. You can also set different default editors for specific post types, giving you ultimate control over the workflow.
Auto select this user role when we are creating users in the frontend
Save your site admins time by pre-selecting a user role on the “Add New User” form. If your users are frequently adding “Subscribers” or “Editors,” you can set one as the default here.
Hide pages containing our shortcode
When using a Global Dashboard, site managers can still see their own site’s list of pages. Enabling this option will automatically hide the “system” pages that make up their frontend dashboard (i.e., any page with a WP Frontend Admin shortcode). This is crucial for preventing users from accidentally editing or deleting their own dashboard pages.
Restrict post types to only display/edit posts created by the current user
This is essential for any site with multiple content creators. Enter a comma-separated list of post type keys (e.g., post, product) here. For those post types, users will only be able to see and edit the items they created themselves. For example, on a marketplace platform, entering product would ensure vendors can only manage their own products.
The Global Dashboard: Your Network’s Central Hub
This is where you define the core of your multisite platform experience.
Use this site as the frontend dashboard for the entire network
This is the heart of our multisite functionality. You can create one site on your network to act as a “Global Dashboard.” Design it with all the frontend admin pages your users will need, and then select that site from this dropdown list. Now, instead of using wp-admin, all your subsite users will be redirected to this central dashboard to manage their own sites. They log into one place but see the data from their own site.

We even have several easy-to-import dashboard templates to get you started!
Excluded network site IDs
What if you want a few specific sites to use the normal wp-admin and bypass the global dashboard? No problem. Simply enter their Site IDs here, separated by commas. Our plugin will not run on these excluded sites, allowing their administrators to use the default WordPress backend. This is perfect for your own marketing site, demo sites, or support portals within the network.