In this guide, we will show you how to create a dashboard for authors using Elementor in WordPress. It’s the best solution for frontend post submissions in WordPress.
What is a custom dashboard for authors in WordPress?
A frontend dashboard for authors is a custom user interface that your authors or writers will use to add and manage articles, blog posts, essays, and other types of posts to your WordPress site.
Instead of using the normal wp-admin dashboard, they will use a beautiful dashboard like this.
A custom dashboard for authors can be useful if you’re working on any of these projects:
- A WordPress blog with multiple authors
- A news website where multiple users can add posts
- A site like Medium, where all users get an account and can publish content
- An online magazine with hundreds of writers
Besides, this guide is for you if you’re a developer who’s developing blogs for independent writers who want to publish content without having to know how to use WordPress.
Writers’ and blogger’s main interest is not knowing how to use WordPress. All they need is submit content to your site.
That’s why building a custom dashboard for authors can be the best option. And that’s what this complete guide is for.
Plugins to build a custom dashboard for authors with elementor
The following list of plugins will allow you to build a custom frontend dashboard for authors in Elementor.
1- Elementor
The free version of Elementor will allow you to design a clean and beautiful dashboard.
Click here to download it.
2- Elementor Header and Footer Builder
This free plugin adds some cool elements to the free version of Elementor, like navigation menus, page title, site logo, etc.
Click here to download it.
3- WP Frontend Admin
With this plugin, you can display any wp-admin page on the frontend, using any page builder or WordPress theme.
You can create bautiful frontend dashboards and web apps based on any WordPress plugin.
You can try the premium plugin on your website for free for 7 days.
4- WP Menu Icons
This plugin will allow us to add icons to our frontend dashboard’s navigation menu.
Click here to download it.
5- User Menus
This plugin can be useful to add a “Login” link to our primary menu.
It will also be useful to add a “Manage posts” link to the nav menu, which will be visible to logged-in authors only.
Besides, we’ll use it to add a “Logout” button to the frontend dashboard menu.
Click here to download it.
6- User role editor
This plugin will allow us to add the “manage_categories” capability to the “author” user role since authors don’t have that capability by default.
Click here to download it.
7- JetSticky for Elementor
This plugin allows you to make entire sections and columns built with Elementor sticky. It will be useful, especially if you use one of our frontend dashboard templates. See below.
Click here to download it.
8- WP Frontend Admin dashboard templates (optional)
We have prepared a gallery of frontend dashboard templates that you can use in Elementor.
Click here to view and download dashboard designs.
Note. In this guide, we’re using “Template 1” from the gallery.
Pages for the frontend dashboard for authors
We will create a beautiful frontend dashboard for authors that includes the following pages:
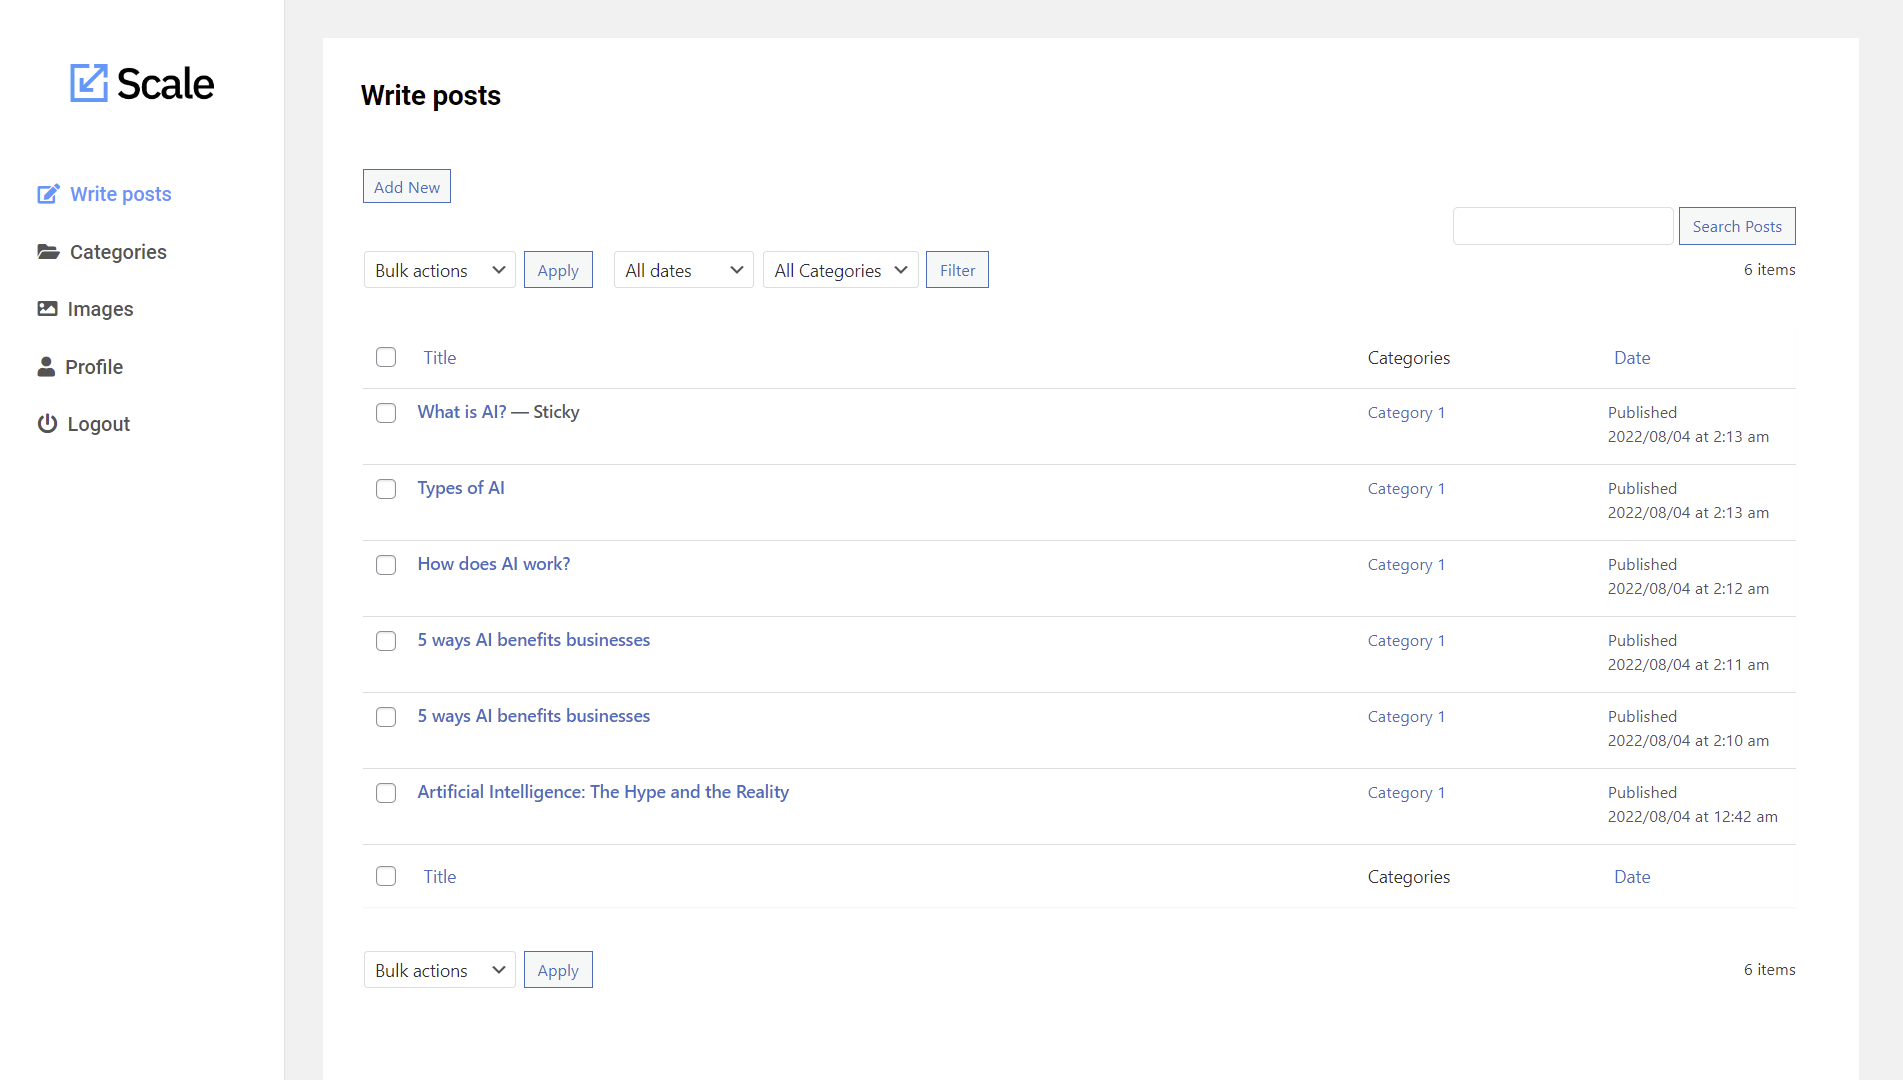
1- The “Write posts” page. Here we will display the WordPress posts page from the wp-admin dashboard. Users will be able to view their own posts only, edit existing posts, and add new posts.
This is what the Add new post form will look on the custom dashboard. Users will be able to add media to their posts, select categories, upload featured images, preview, and publish the posts or save them as drafts.

2- The “Categories” page. This page will allow authors to manage the WordPress categories on the frontend. They will be able to create new categories, edit existing categories, and remove categories.
Note. Although WordPress doesn’t allow authors to manage categories, we’ll show you how to grant the “manage_categories” capability to the “author” user role in Step 8 of this guide.

3- The “Images” page. Our users will be able to upload images to the Media Library from the frontend. This way, they will be able to manage the images uploaded to their posts.

4- The “Profile” page. On this page, our authors will be able to view and modify their WordPress user profile from the frontend. They will change their names, update emails, change passwords, upload personal information, etc.

Steps to build the custom dashboard for authors
You need to follow these steps to create the dashboard for authors in WordPress.
Step 1. Install and activate the necessary plugins
You need to install and activate the plugins we mentioned above.
Step 2. Import or design the Elementor template
If you prefer, you can design the template for your custom dashboard from scratch.
However, we recommend you using one of our templates to save some time.
You need to start by creating a new navigation menu for the dashboard.
- Go to Appearance > Menus.
- Enter the navigation menu name and click on Create menu.

Here’s how you can import them.
- Go to Templates > Saved templates in your wp-admin dashboard.
- Click on Import Templates.
- Click on Choose file and find the template on your computer.
- Click on Import now.

- Click on Edit with Elementor
- Customize the template as you like:
- Upload your own logo
- Select the navigation menu you just created
- Select your own colors
- Select your own typographies
- Etc.

Once you’re done, click on Update to save the changes to this Elementor template.
Step 3. Display the posts page on the frontend dashboard
Now we’re ready to start building the frontend dashboard for authors.
We’ll start by displaying the Posts page from wp-admin on the frontend.
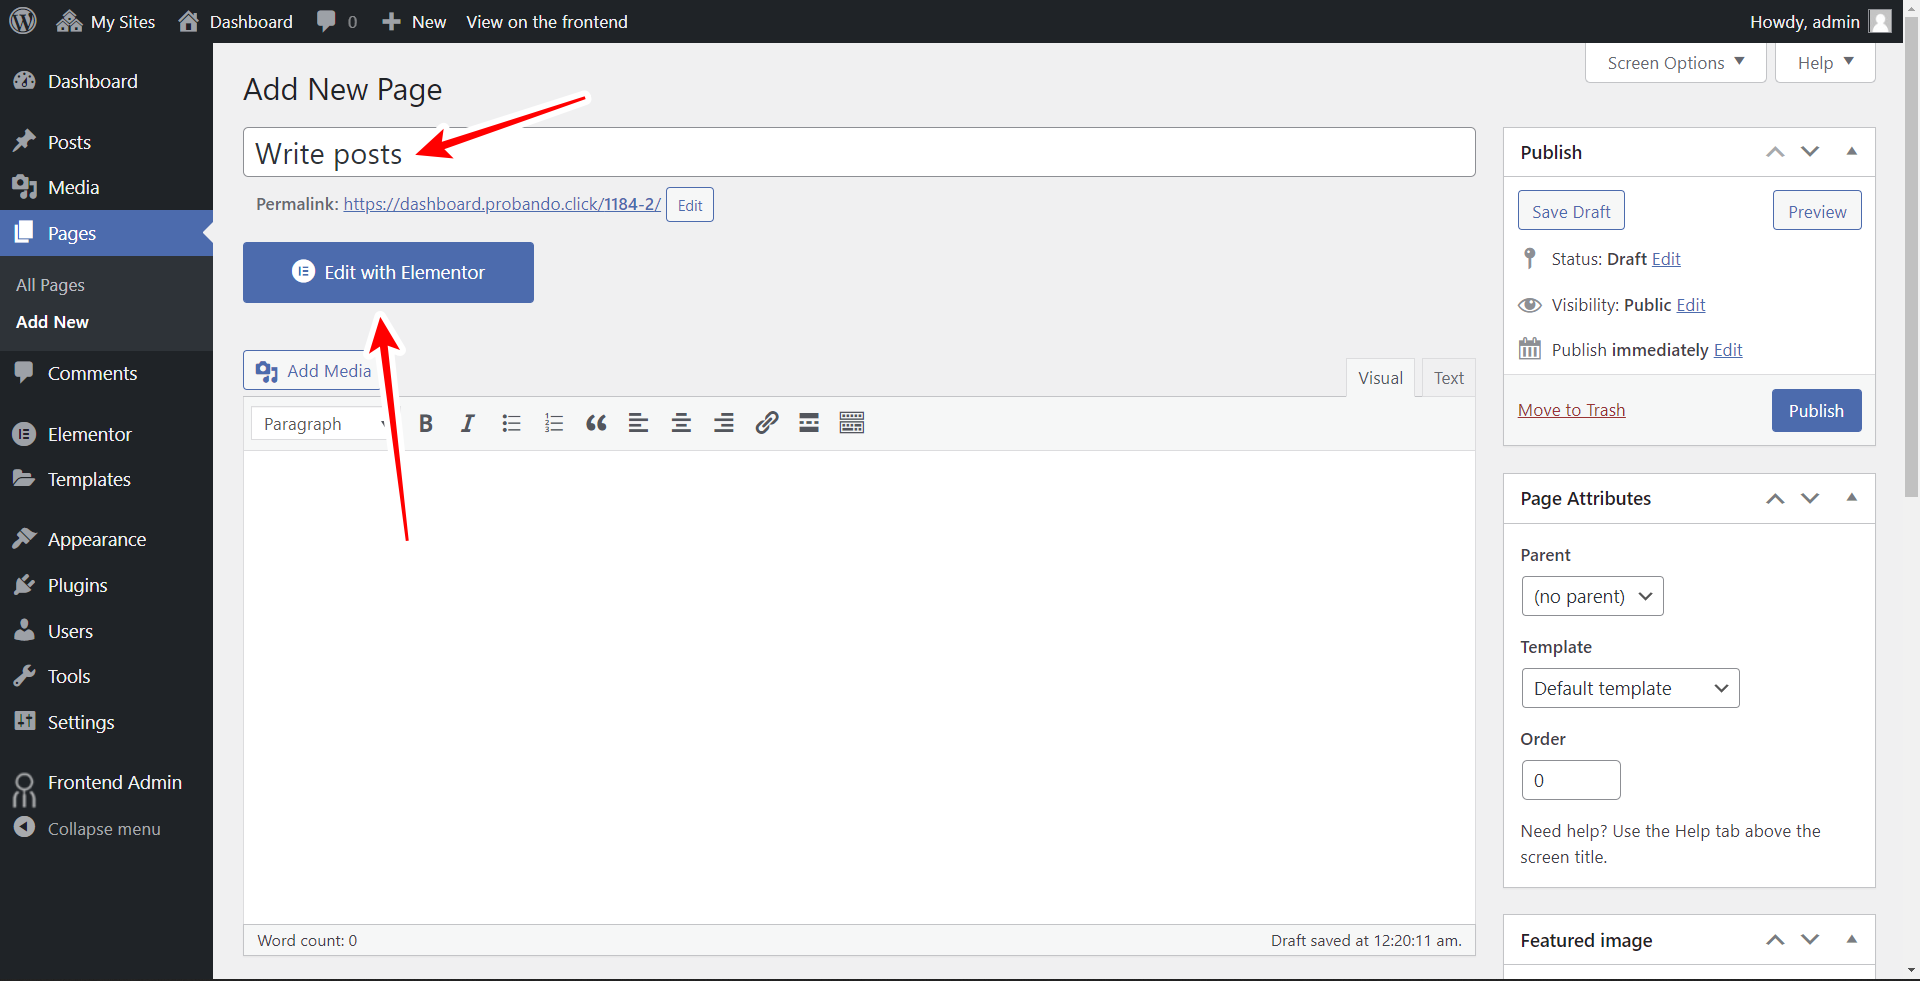
- Go to Pages > Add New in wp-admin.
- Enter the page title. In this case, we’ll call it “Write posts”.
- Click on Edit with Elementor.
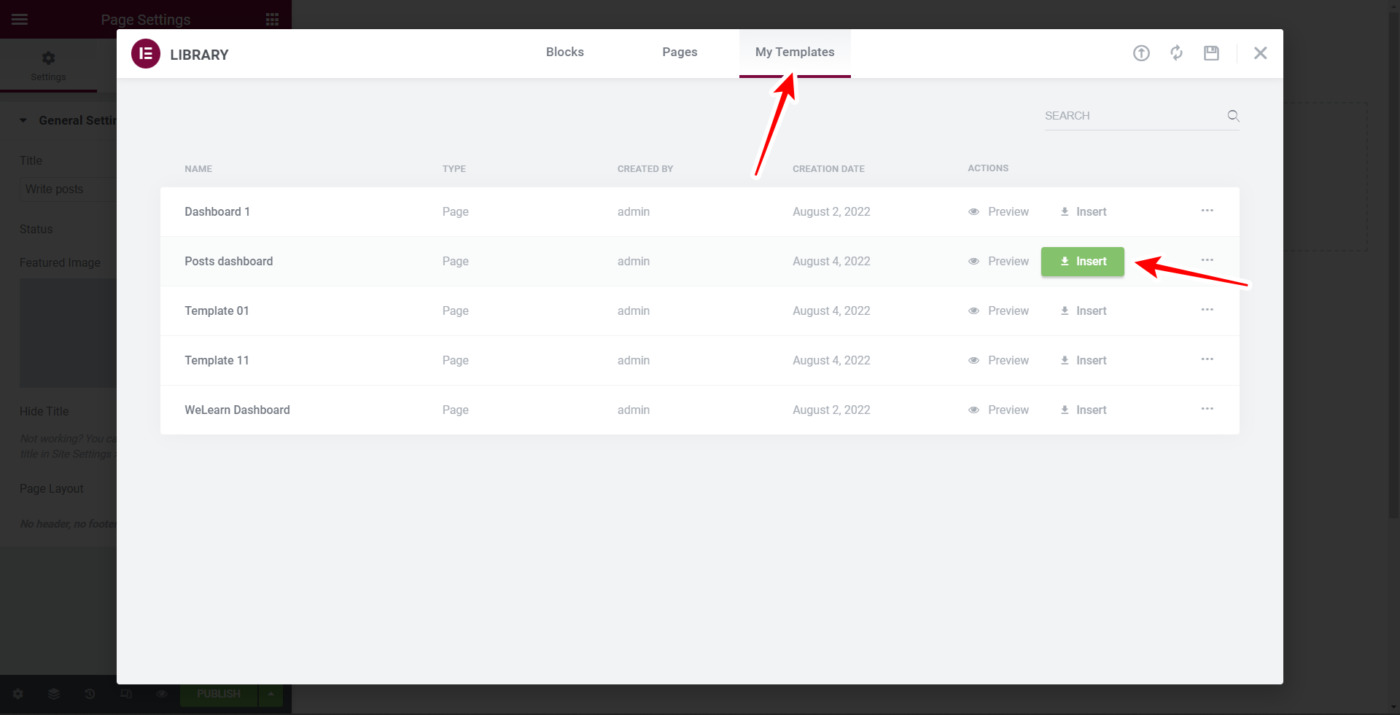
Once in Elementor, you need to import the template into this new page.
- Go to Page settings and select Elementor Canvas in Page Layout.
- Click on Add template.

Now you need to move to My Templates, find the template you will import into this new page, and click on Insert.
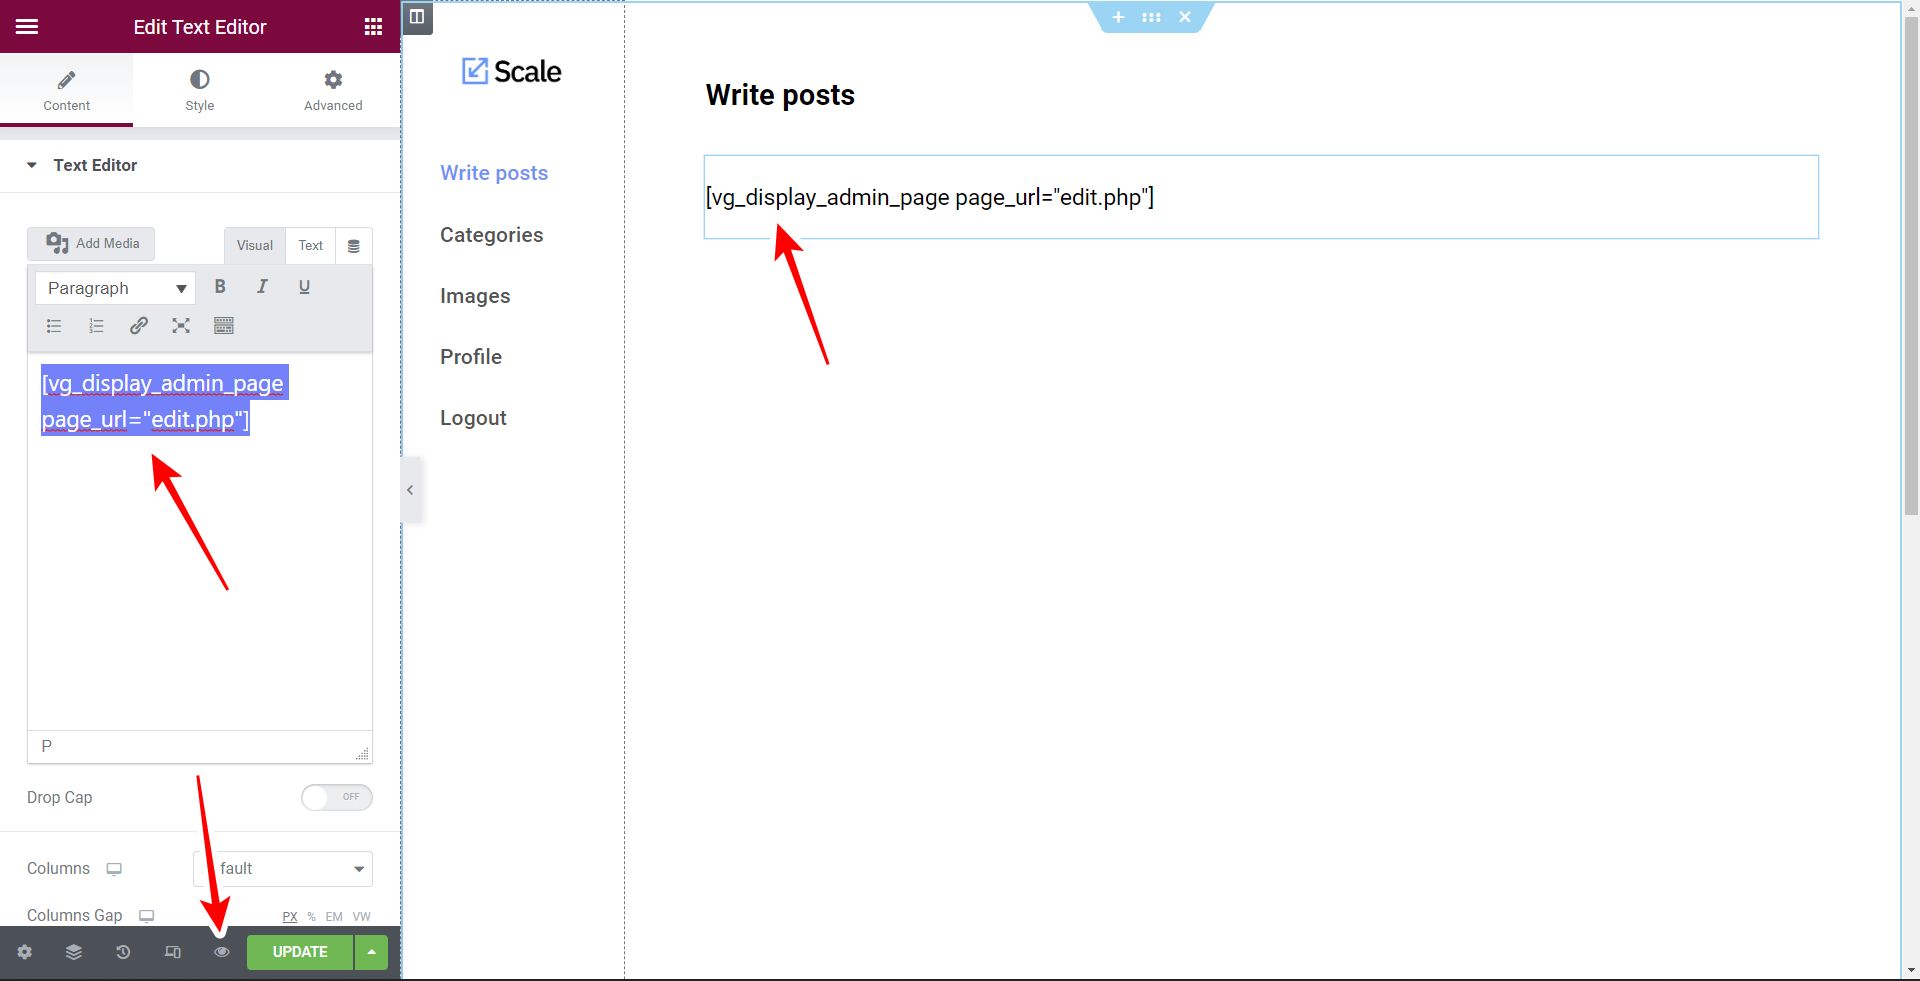
After importing the template, you need to add the following shortcode in the page content section.
[vg_display_admin_page page_url="edit.php"]
This shortcode will allow you to display the WordPress Posts page on the frontend, where your authors will be able to write articles.
Now click on Preview.
After you display the posts page on the frontend, you need to use the Quick Settings from the WP Frontend Admin plugin to configure your page.
You need to start by selecting the following information:
- Page title: We’ll call it “Write posts”
- URL slug: We’ll enter “write-posts”
- Page template: This must be Elementor canvas in this case.
- Add to this menu: Here you need to select the nav menu you created above.

You can customize your frontend dashboard for authors by hiding any unnecessary elements from this page. For example, we will remove the original page title because we’ve added a page title above the content.
Just click on Hide element and then click on the element you want to hide. You can hide any other element you don’t want to include in this page.
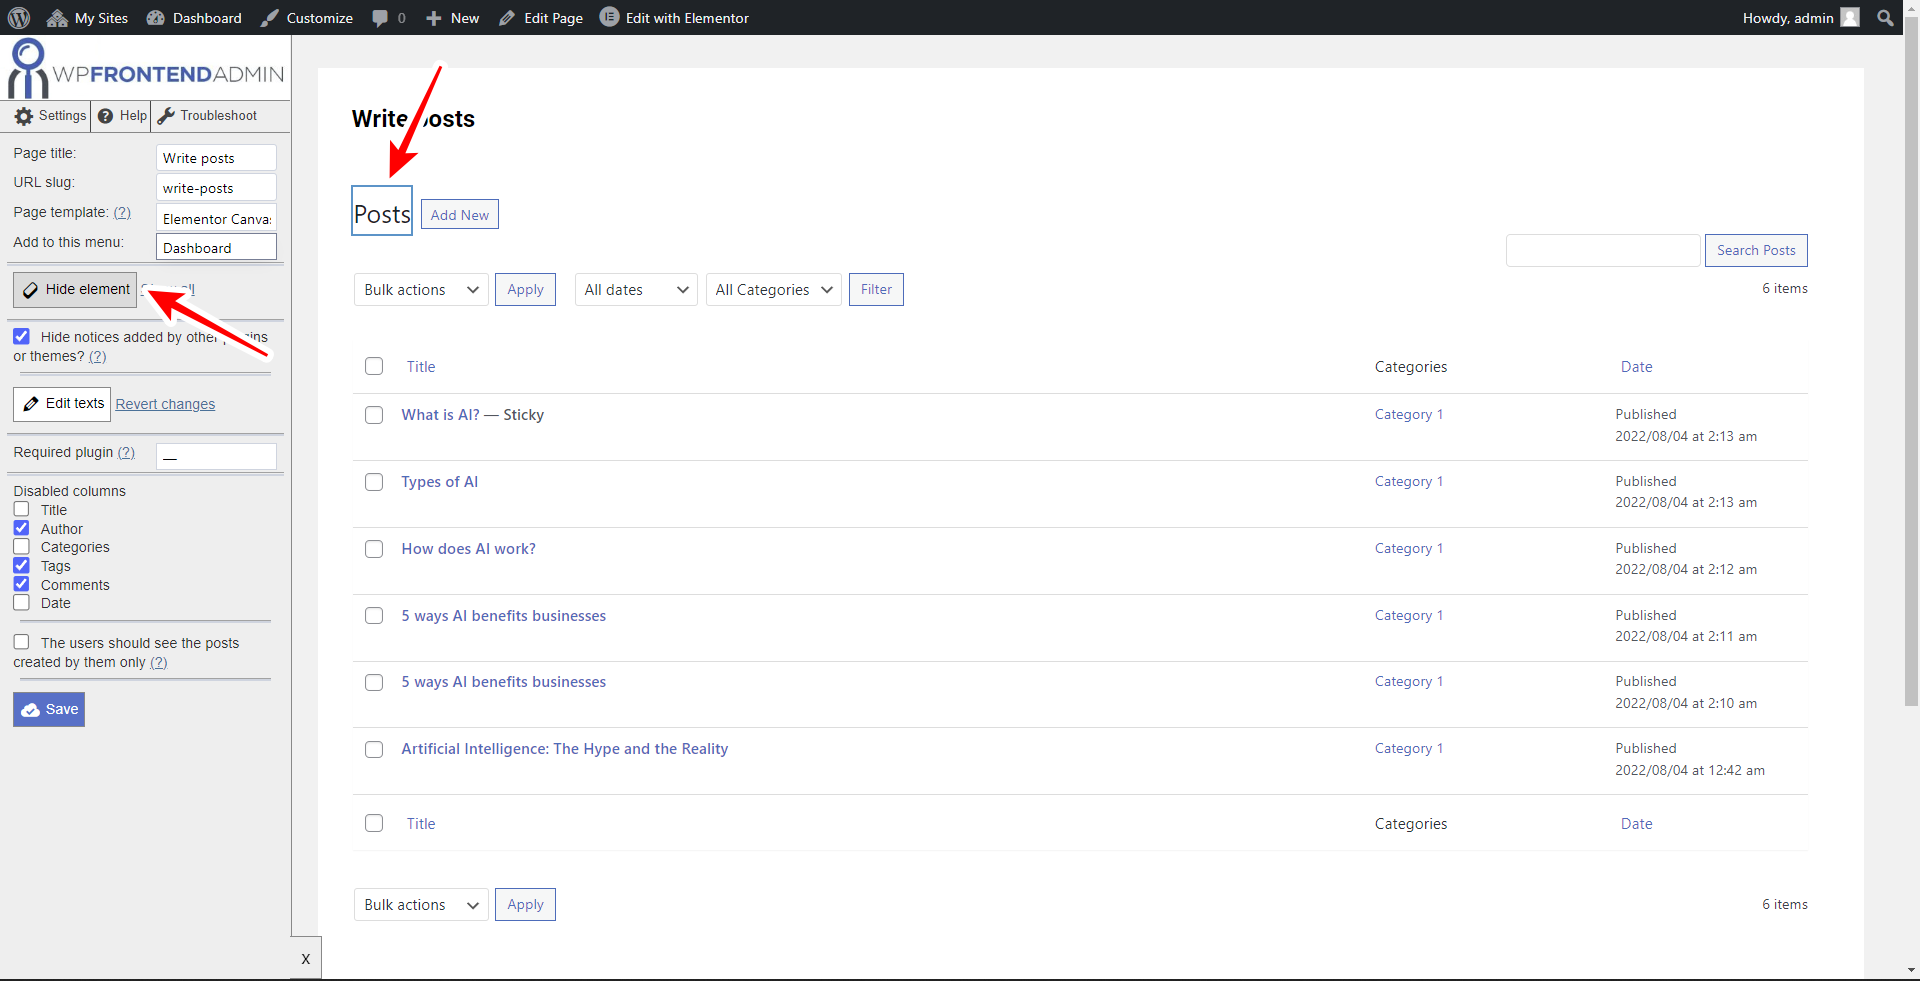
Besides hiding unnecessary elements, you can customize the texts on it. For example, we want to rename the Add New button with Write new post.
For this, we need to click on Edit texts.
Now let’s change the text of the button.
Finally, let’s click on Stop editing texts.
This button is useful to change any other texts on the page.

You can tick the Hide notices added by other plugins or themes checkbox.
You can also disable or hide specific columns from the posts page.
For example, we will hide these columns:
- Author
- Tags
- Comments
Since we want our users to view and manage their own posts only, we need to tick the The users should see the posts created by them only checkbox.
Finally, let’s click on Save to apply the changes on this page.

After applying these changes, you can continue building your frontend dashboard for authors by editing the Add New form.
Click on the Add New button (now called “Write new post”).
Once there, you can start hiding unnecessary elements and editing texts.
Here’s a list of elements you should hide:
- Edit with elementor button
- Visual/Text switcher
- Visibility options
- Publish button if you want users to submit posts for review only.
- Tags section
- Post attributes
- Post settings
- Custom fields
- Any other unnecessary button, field, or metabox
Remember that you decide which elements to keep and which elements to remove from the page.

Once you’re done editing the Add New form, you can click on Save to apply the changes.
Finally, you can go back to Elementor and Publish the page.
Step 4. Add the other pages to the frontend dashboard
Following the same steps from the previous step, you need to add the missing pages to the frontend dashboard for authors.
Here are the shortcodes you need to use on each page:
Categories:
[vg_display_admin_page page_url="edit-tags.php?taxonomy=category"]
Media library:
[vg_display_admin_page page_url="upload.php"]
Profile
[vg_display_admin_page page_url="profile.php"]
Note – In each page, you need to decide which fields and metaboxes you will remove and which you will keep.
Step 5. Set up the frontend dashboard’s navigation menu
After adding the necessary pages to the custom dashboard for authors and writers, you need to set up the navigation menu.
Here, we’ll add menu icons, and add “View site” and “Log out” links to the navigation menu.
First, let’s add menu icons.
- Go to Appearance > Menus.
- Edit the dashboard you created for the frontend dashboard.
- Click on the + button on each menu item and select the icon you want.
- Click on Save and edit another menu item.

Second, add a “View site” link to the dashboard’s navigation menu.
This link will allow our authors to visit our site, just as the “Visit site” link on the wp-admin dashboard. 🙂
- Add a Custom Link to the menu.
- In the URL field, enter the URL of your site.
- In the Link Text field, enter something like, “View site” or “Visit site”
- You can also add an icon to this new menu item.

Third, we’ll add a “Logout” link to the navigation menu.
In the User Menus plugin allows you to add a Log out button to your navigation menu.
- Move to the User Links section.
- Tick the Logout checkbox.
- Click on Add to menu.
- You can also add an icon to this new menu item.

Finally, click on Save Menu to apply the changes.
Step 6. Create a custom login page for WordPress
Something great about WP Frontend Admin is that it allows you to customize the login page in WordPress.
This will give your frontend dashboard a more professional look.
We’ll design this custom login page with elementor, and it will include the following elements:
- Your site’s logo
- The login form
- A link to go back to the home page of your site
Let’s start by adding a new page and clicking on Edit with Elementor.
Once in Elementor:
- Select Elementor canvas in Page Layout
- Add a 500px wide section, with Fit to screen height, and Middle column position.

Then, add an image element, a shortcode element, and a text editor element.
- In the Image element, upload your site’s logo.
- In the Shortcode element, add the following shortcode:
[wp_frontend_admin_login_form]
- In the Text Editor element, add something like, “Go to the home page” and insert a link to the home page of your site.
- Once you’re done, publish the page.
After creating and publishing the custom login page for your WordPress site, we need to select it as the default login page in the WP Frontend Admin settings.
Go to Frontend Admin > Settings > Login.
Now enter the URL of the login page you just created in the Login Page URL (optional) field.

You can also select “Login page” in the Log out redirection field. This way, your users will always be taken to the login page after they log out.
Once you’re done, click on Save to apply the changes.
Step 7. Set up the primary menu
Let’s set up some important settings in the primary menu of the site. For example, we will add a link to the login page, and a link to the dashboard for authors.
- Go to Appearance > Menus.
- Select your primary menu. Not the frontend dashboard menu.
- Add the Posts / Write posts page to the menu.
- Rename this new menu item to something like “Author’s dashboard”. Enter the new name in the Navigation label field.
- Select Logged In Users in the Who can see this link field.
- Select the Choose which roles can see this link option.
- Tick the Author user role.

We also recommend you to:
- Add the Login page to the navigation menu.
- Select Logged out users in Who can see this link.
- Click on Save Menu to apply the changes.

Step 8. Grant the “manage_categories” capability to authors (optional)
Using the User Role Editor plugin, we will enable the “manage_categories” to authors, so that they can add, edit and remove categories from the blog.
This is optional, so you can skip this step if you don’t want to do it. However, if you don’t do it, your users won’t be able to manage the categories on the frontend, so the Categories page will be useless.
Go to Users > User Role Editor and select the following values:
- Select Role and change its capabilities: Author
- Tick the manage_categories capability.
- Click on Update to apply the changes.

Step 9. Block access to wp-admin for authors
Let’s set up some settings to block access to the wp-admin dashboard for all authors. This is really useful because, if an author tries to open any wp-admin page, he’ll be redirected to the frontend dashboard page instead.
Go to Frontend Admin > Settings.
Once there, select the following values in the Access restrictions section:
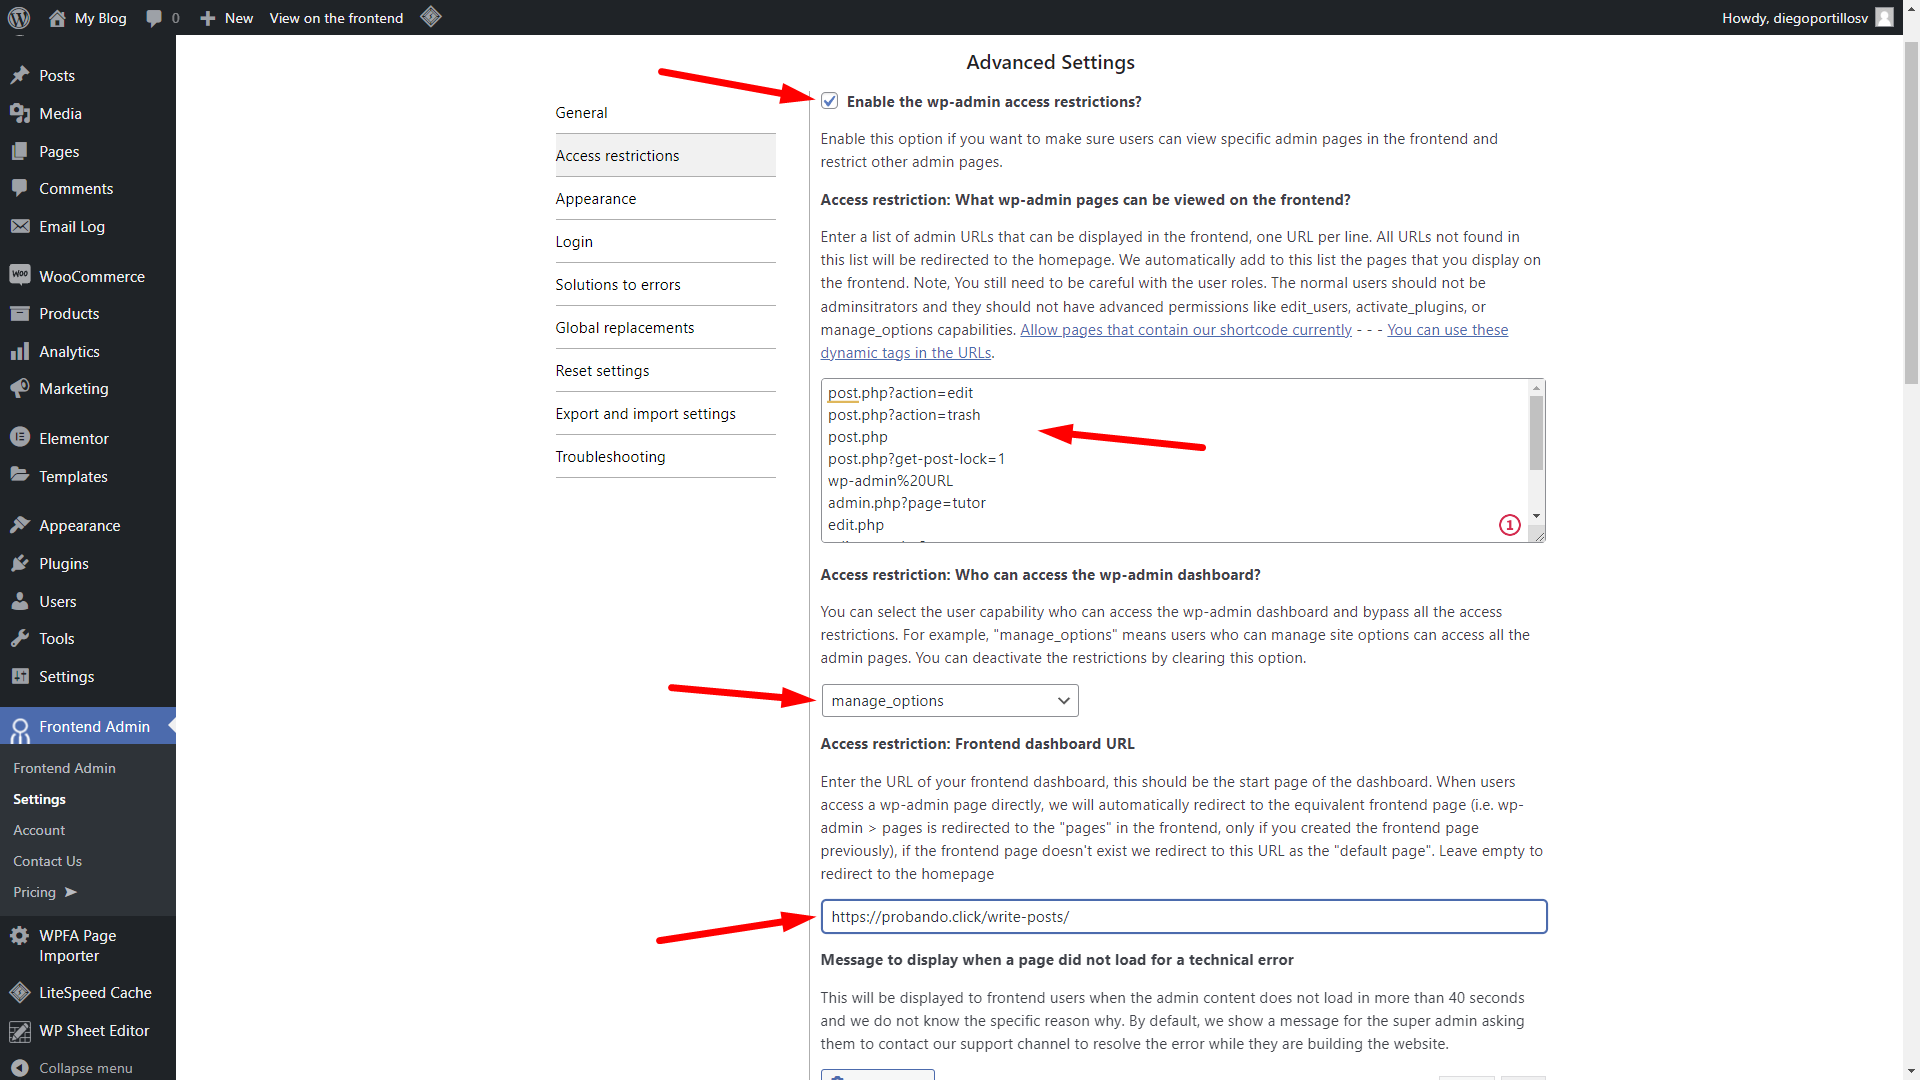
- Tick the Enable the wp-admin access restrictions checkbox
- Paste the following URLs in the Access resriction: What wp-admin pages can be viewed on the frontend field:
post.php?action=edit
post.php?action=trash
post.php
post.php?get-post-lock=1
wp-admin%20URL
admin.php?page=tutor
edit.php
edit-tags.php?taxonomy=category
upload.php
profile.php
term.php?taxonomy=category
When any author tries to open any other wp-admin page, they will be redirected to the frontend dashboard page.
- Access restriction: Who can access the wp-admin dashboard: manage_options
- Access restriction: Frontend dashboard URL: Paste here the URL of the “Write posts” page.
Scroll down and the select this setting:
- These user roles will use the frontend dashboard: author

Finally, click on Save and apply the changes.
This is how you can create a custom dashboard for your WordPress authors using Elementor.