This guide walks you through importing the restaurants platform into a local WordPress Multisite installation using subdomains. We’ll assume you have downloaded the zip file named restaurants-platform.zip.
Prerequisites
- A local WordPress Multisite installation with subdomain support enabled.
- The restaurants-platform.zip file, which, when unzipped, contains two folders:
- files: Contains the platform’s files.
- database: Contains the database files.
- Note: These folders will be referenced throughout this guide.
- Premium plugin license for WP Frontend Admin.
- Premium plugin license for WooCommerce Food.
Step 1: Set Up a WordPress Multisite Installation with Subdomains
If you don’t already have a WordPress Multisite installation, follow these steps to create one or convert an existing single-site installation.
For a New Installation
- Install WordPress locally using a tool like XAMPP, MAMP, or Local by Flywheel.
- During setup, ensure you enable Multisite with subdomains (not subdirectories).
Converting an Existing Single-Site to Multisite
If you have a single-site WordPress installation, you can enable Multisite with subdomains by modifying the wp-config.php file:
- Navigate to your WordPress installation folder (e.g.,
htdocs/wordpressor equivalent). - Locate and open the wp-config.php file in a text editor.
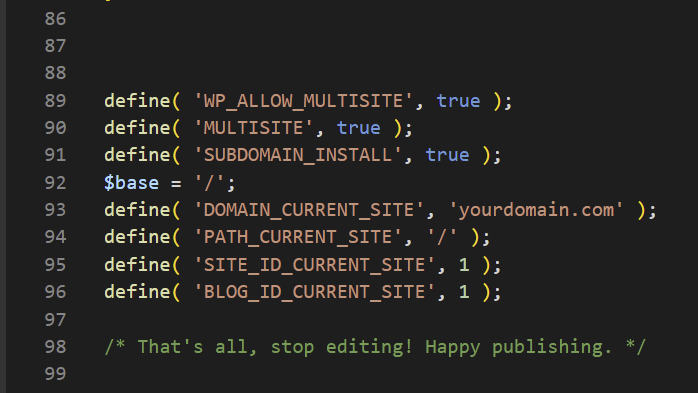
- Add the following code just above the line:
/* That's all, stop editing! Happy publishing. */:
define( 'WP_ALLOW_MULTISITE', true );
define( 'MULTISITE', true );
define( 'SUBDOMAIN_INSTALL', true );
$base = '/';
define( 'DOMAIN_CURRENT_SITE', 'yourdomain.local' );
define( 'PATH_CURRENT_SITE', '/' );
define( 'SITE_ID_CURRENT_SITE', 1 );
define( 'BLOG_ID_CURRENT_SITE', 1 );
- Replace yourdomain.local with your actual local domain (e.g.,
mysite.local). - Save the wp-config.php file.
Your wp-config.php should resemble this:
Step 2: Add Premium Plugins to the Platform Files
The restaurants-platform.zip file, when unzipped, creates a folder named restaurants-platform containing two subfolders:
- files: Contains the platform’s core files (plugins, themes, etc.).
- database: Contains the database files.
To ensure the platform functions correctly, you need to add the following premium plugins:
- WP Frontend Admin: Required for front-end management features (get it here).
- WooCommerce Food: Required for turning the WooCommerce products form into a food product form (get it here).
- Note. Previously, our platforms used WP Ultimo, a premium plugin, but it was discontinued by its creator. Therefore, we now use a free fork plugin created by the WP Ultimo community. You can read more about it here. This plugin is already included in the platform files, so you don’t need to add it.
Steps to Add Premium Plugins
- Unzip the restaurants-platform.zip file to access the restaurants-platform folder.
- Download and unzip the .zip file for each premium plugin (e.g., WP Frontend Admin).
- Copy the unzipped plugin folders to the following directory:
restaurants-platform/files/wp-content/plugins. - Verify that the plugin folders are correctly placed in the
wp-content/pluginsdirectory alongside other platform files.
Step 3: Copy the Platform Files to Your Local Installation
Transfer the platform files from the restaurants-platform folder to your local WordPress Multisite installation.
- Locate the files folder within the unzipped restaurants-platform directory.
- Copy all contents of the files folder to your WordPress installation’s root directory.
- When prompted, choose to Replace existing files to ensure the platform files overwrite any conflicting files.
- Confirm that key directories (
wp-content/plugins,wp-content/themes) now contain the restaurants platform’s files, including the premium plugins added in Step 2.
Step 4: Import the Database
Replace your local WordPress Multisite database with the restaurants platform’s database.
- Access your local database using a management tool like phpMyAdmin or MySQL Workbench.
- Select all existing tables in your WordPress database and choose Drop to delete them. This clears the database for the new import.
- Navigate to the Import tab in your database management tool.
- Locate the database file (
database.sql) in therestaurants-platform/databasefolder. - Upload the
database.sqlfile and initiate the import process (e.g., click Go in phpMyAdmin).

Warning: Dropping tables will erase all existing data in your database. Ensure you have a backup before proceeding.
Step 5: Replace URLs in the Database
The imported database contains URLs referencing the restaurantsplatform.local domain. You need to update these to match your local domain.
- Download the latest version of the Search and Replace DB script. Click here to find the latest version.
- Unzip the script and ensure the folder is named
Search-Replace-DB-master(or note the actual folder name if different). - Place the
Search-Replace-DB-masterfolder in your WordPress installation’s root directory. - In your browser, navigate to
http://yourdomain.local/Search-Replace-DB-master/index.php, replacingyourdomain.localwith your actual local domain. - Enter the following values in the Search and Replace tool:
- Replace:
restaurantsplatform.local - With:
yourdomain.local(use your actual local domain)
- Replace:
- Click Search and Replace to update the URLs.

Optional: Switch from HTTP to HTTPS
If you want to use the https protocol instead of http, perform an additional search and replace:
- In the Search and Replace tool, enter:
- Replace:
http:// - With:
https://
- Replace:
- Click Search and Replace to apply the changes.
Important: Always use the latest version of the Search and Replace DB script to ensure compatibility and security. Back up your database before performing any replacements.
After completing all database replacements, you can:
- Click Delete me in the Search and Replace tool to remove the utility from your WordPress folder.
- Alternatively, keep the tool for future use and simply close the browser window.

Step 6: Activate Premium Plugin Licenses
After importing the restaurants platform, log in to your WordPress Multisite installation to activate premium plugins and make any necessary customizations.
- Log in to the WordPress admin dashboard using the following credentials:
- Username:
admin - Password:
password
- Username:
- Navigate to My Sites > Network Admin > Plugins.
- Activate the premium plugins using the licenses you purchased. The following plugins require a paid license:
- Note: All other plugins included in the platform are free, including the community-maintained fork of WP Ultimo.
- Update all plugins, themes, and the WordPress core to their latest versions to ensure compatibility and security:
- Go to Dashboard > Updates to check for and apply updates.
Important: Ensure you have valid licenses for premium plugins before activation. Using unlicensed plugins may result in limited functionality or security risks.
Once the plugins are activated and updates are applied, you can start using your restaurants platform and make any desired customizations.
This tutorial guides you through importing the restaurants platform into a WordPress Multisite installation using cPanel. The downloaded restaurants-platform.zip file, when unzipped, creates an restaurants-platform folder containing two subfolders: files and database.
Prerequisites
- Access to cPanel with Softaculous installed.
- The restaurants-platform.zip file downloaded and unzipped.
- Premium plugin license for WP Frontend Admin.
- Premium plugin license for WooCommerce Food.
Step 1: Create a WordPress Multisite Installation (Subdomain-Based)
Ensure your WordPress Multisite uses subdomains, not subdirectories.
Using Softaculous in cPanel
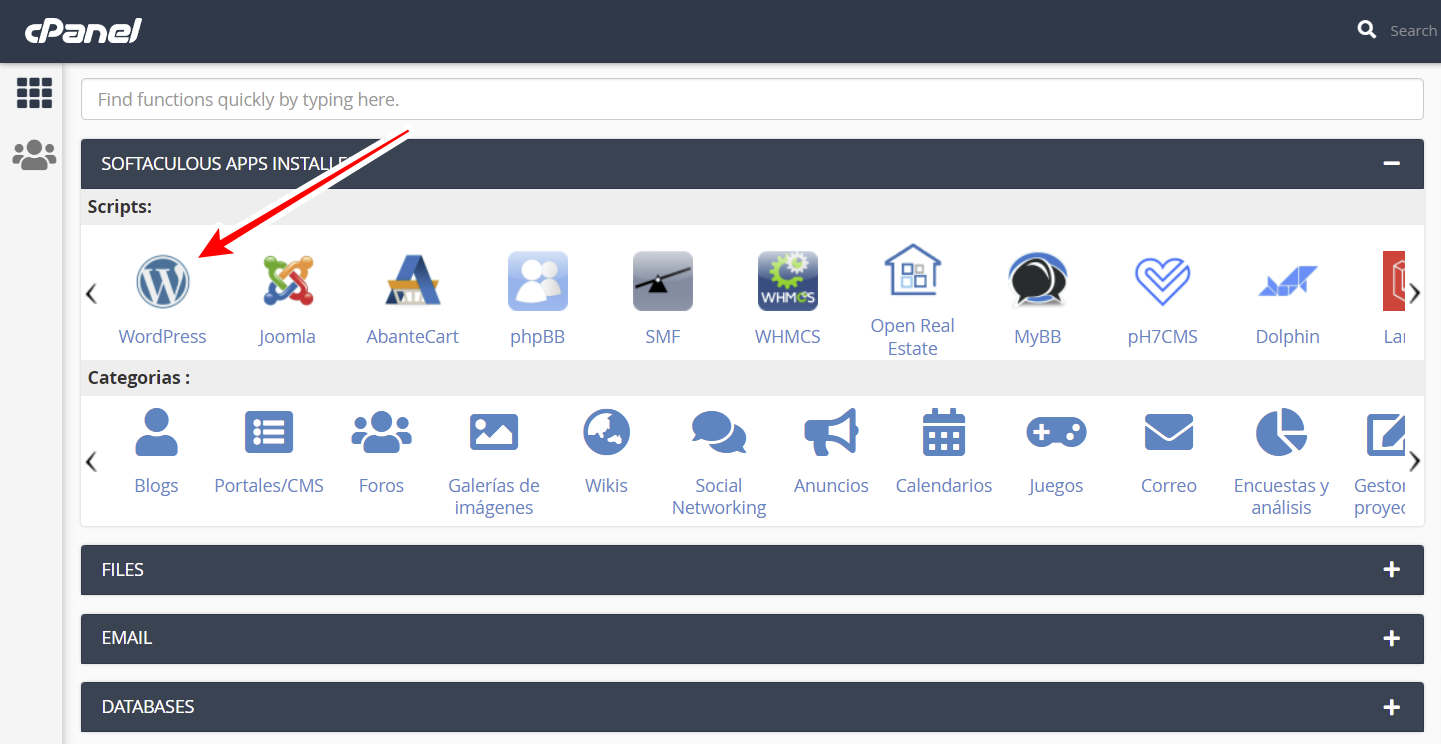
- In cPanel, navigate to Softaculous Apps Installer.
- Click WordPress.
- Click Install.

- Add the Site Name.
- Check the Enable Multisite (WPMU) checkbox.
- Enter site credentials (e.g., admin username and password).
- Click Install.


Verify Subdomain Configuration
- In cPanel, go to Files > File Manager.

- Locate your WordPress installation folder (e.g., public_html for the primary domain).
- Find wp-config.php, right-click, and select Edit.

- Ensure the following line exists:
define('SUBDOMAIN_INSTALL', true); - If absent, add the line and save the file.
Step 2: Add Premium Plugins to Platform Files
The restaurants-platform folder contains files and database.
- Obtain plugins:
- WP Frontend Admin
- WooCommerce Food
- Note. Previously, our platforms used WP Ultimo, a premium plugin, but it was discontinued by its creator. Therefore, we now use a free fork plugin created by the WP Ultimo community. You can read more about it here. This plugin is already included in the platform files, so you don’t need to add it.
- Unzip each plugin’s .zip file.
- Copy the unzipped plugin folders to restaurants-platform > files > wp-content > plugins.
Step 3: Compress Platform Files
Compress the files folder into files.zip.
Step 4: Upload Platform Files
- In cPanel, go to Files > File Manager.
- Navigate to your WordPress installation folder (e.g., public_html).
- Select all files and click Delete.

- Click Upload.

- Select files.zip, and upload.

- Right-click files.zip and select Extract to the installation folder.

- Click Extract Files.

- Make sure you Replace existing files.
Step 5: Import the Database
- In cPanel, go to Databases > phpMyAdmin.

- Select your site’s database.
- Check Check all.
- Select Drop from the With selected dropdown.
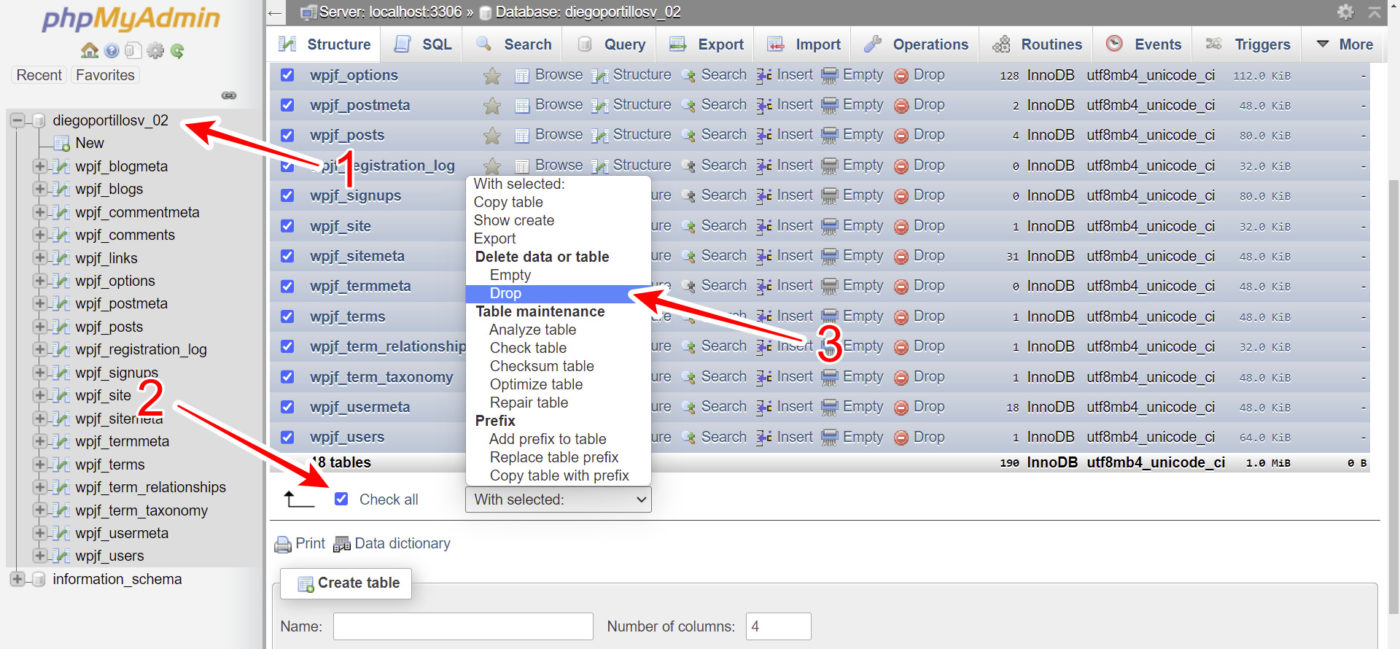
- When you see the message Do you really want to execute the following query, tick the Enable foreign key checks checkbox, and click on Yes.

- Go to the Import tab.
- Click Choose File.
- Select database.sql from restaurants-platform > database.
- And click Go.

- Confirm the import with the message: Import has been successfully finished, X queries have been executed.

Step 6: Replace URLs in the Database
- Navigate to yourdomain.com/Search-Replace-DB-master/index.php.
- Enter:
- Replace: restaurantsplatform.local
- With: Your domain (e.g. yourdomain.com)
- Click Search and replace.
- Optionally, for HTTPS:
- Replace: http://
- With: https://
- Click Search and replace.
Once you’re done replacing domains and protocols:
- Click Delete me to remove the utility or close the window.
Important
Make sure you always use the latest version of the Search and Replace DB script. Click here to find the latest version.
When you unzip the script, ensure the folder is named Search-Replace-DB-master (or note the actual folder name if different).
When typing the file path, you must use the actual folder name, as in yourdomain.com/Search-Replace-DB-master/index.php. If it’s a different name, make sure you edit the path.
Step 7: Configure Subdomains in cPanel
Option 1: Add Subdomains Manually
New sites require manual setup.
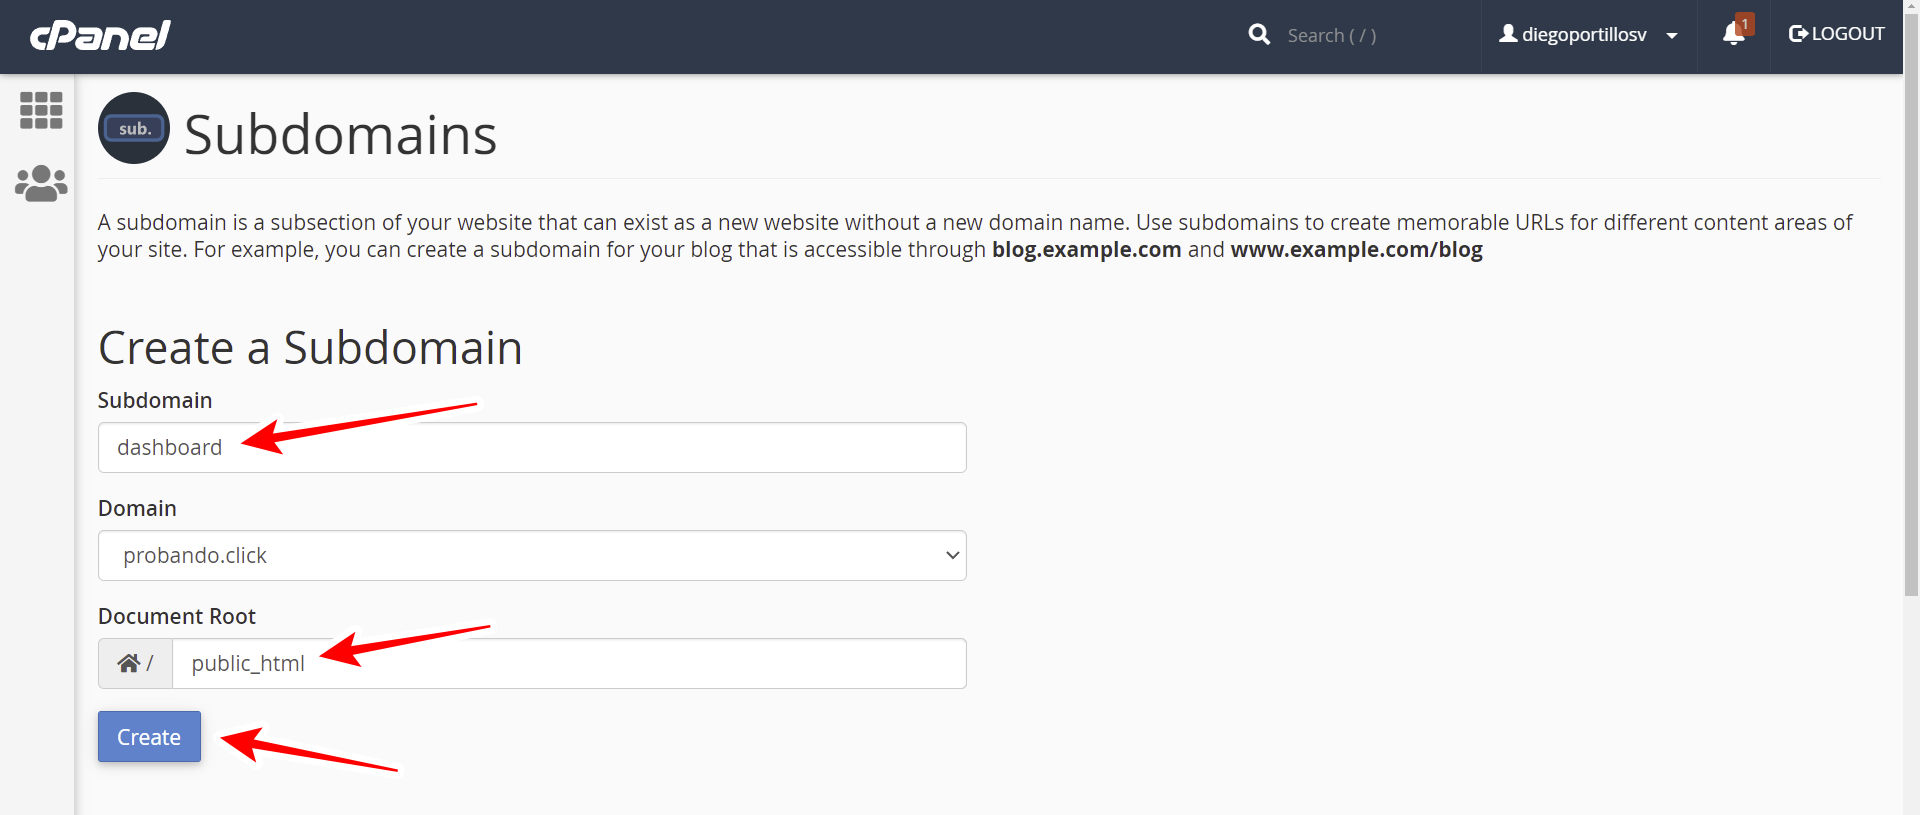
- In cPanel, go to Domains > Subdomains.
- Add subdomains (e.g., dashboard, template, test) one at a time.
- Set Document Root to your WordPress installation folder (e.g., public_html).
- Click Create for each.
Option 2: Create a Wildcard Subdomain
Ideal with a Wildcard SSL Certificate; new sites don’t require manual setup.
- In cPanel, go to Domains > Subdomains.
- Enter an asterisk (*) in Subdomain.
- Set Document Root to your WordPress installation folder (e.g., public_html).
- Click Create.
- Skip if a wildcard subdomain was automatically created.

Step 8: Activate Premium Plugin Licenses
- Log in with:
- Username: admin
- Password: password
- Go to Network Admin > Plugins.
- Activate premium plugins using their licenses.
- Change the default credentials immediately!
Final Notes
- If the Kadence theme is incompatible with your PHP version, adjust it in cPanel > Software > Select PHP Version or use another theme.
- Your platform is ready for customization on your domain.


