Here’s an explanation of the Access Restrictions options from WP Frontend Admin, designed to give you complete control over who can access what on your site’s backend and frontend dashboards.
General Access Settings
Enable the wp-admin access restrictions?
This is the main switch for this entire section. When you enable this option, you can create rules to prevent users from accessing the normal WordPress admin area (wp-admin), forcing them to use the frontend dashboard you’ve created. If you leave it disabled, users can access both the frontend dashboard and the regular wp-admin dashboard according to their user role permissions.
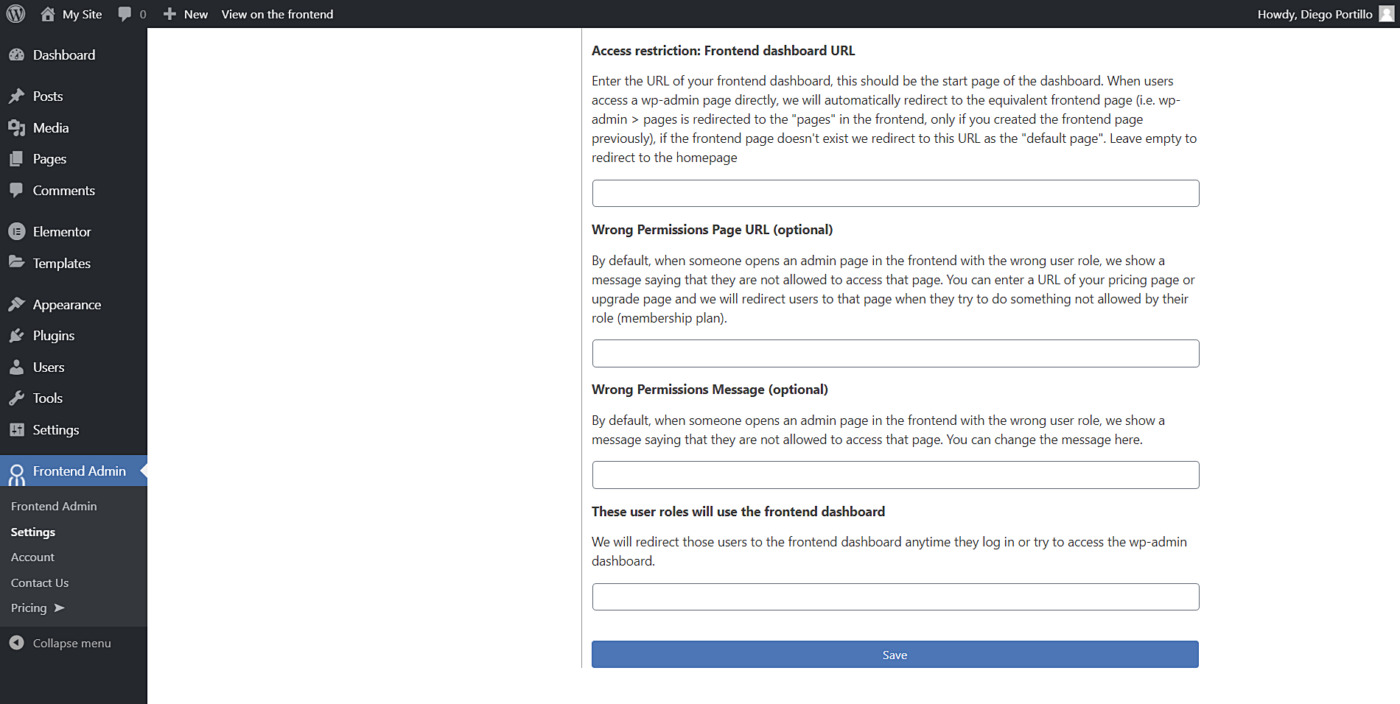
Access restriction: Frontend dashboard URL
Enter the main URL for your frontend dashboard here. This is the “home base” for your users. We’ll redirect users to this URL in various situations, like after they log in or if they try to access a restricted wp-admin page. For example, you might set this to https://yoursite.com/dashboard/.
Note for Multisite users: If you’re using our “global dashboard” feature, you should enter the homepage URL of your central dashboard site here.
These user roles will use the frontend dashboard
Specify which user roles should be redirected to the frontend dashboard. Enter a comma-separated list of user role keys (e.g., editor, author, contributor). Whenever users with these roles log in or try to access any wp-admin page, they’ll be automatically sent to the frontend dashboard URL you set above.
Allowed & Blocked Pages
Access restriction: What wp-admin pages can be viewed on the frontend?
Once you’ve enabled restrictions, you need to create a “whitelist” of wp-admin pages that are allowed to be shown on the frontend. Enter one admin URL per line. Any wp-admin URL not in this list will be blocked, and users trying to access it will be redirected.
Don’t worry, you don’t have to do this all manually! When you’re in wp-admin and use our toolbar link to “View on the frontend,” we automatically add that page’s URL to this list for you. You’d only need to edit this manually for special cases, like allowing specific tabs within a settings page that have their own unique URLs.
Tip: Use Learning Mode for an Incredibly Fast Setup
Manually copying and pasting every URL into the whitelist can be time-consuming, especially for complex plugins with many screens. To solve this, we created Learning Mode.
When you activate Learning Mode, the plugin will automatically add any admin page you visit to the whitelist for the next 10 minutes. It’s the fastest way to build your list of allowed pages.
Here’s how to use it:
- Find the “What wp-admin pages can be viewed on the frontend?” setting.
- Click the “Start learning mode” link next to it.
- For the next 10 minutes, simply browse through every wp-admin page you want to allow on the frontend. Click on every tab, button, and link that your users will need.
- Once you’ve visited all the necessary pages, you can click “Stop learning mode” or just wait for the 10-minute timer to expire.
That’s it! Your whitelist will be perfectly populated without any copy-pasting, saving you a ton of time and effort.
Blacklisted Page URL (optional)
By default, if a user tries to access a blocked admin page, they are sent to your main frontend dashboard URL. This option lets you send them to a different, specific page instead. For example, if you’ve restricted access to advanced settings, you could redirect them to a page that says, “This feature is available on our Pro plan,” and link to your pricing page.
Permission Handling

Access restriction: Who can access the wp-admin dashboard?
This powerful setting lets you choose which users can completely bypass all the restrictions and access the full wp-admin dashboard. You select a user capability, and anyone with that capability gets full access. For a standard site, manage_options is a good choice for Administrators. On a Multisite network, manage_network is perfect for Super Admins. If you leave this field empty, all restrictions are disabled to prevent you from locking yourself out.
Wrong permissions page URL (optional)
This is perfect for upselling. When a user tries to access a feature their current role or plan doesn’t allow, you can redirect them to a specific URL. For example, if a “Basic” plan user tries to access a “Pro” feature, you can send them directly to your upgrade page. This is a great way to show users what they’re missing and encourage them to upgrade.
Wrong permissions message (optional)
Similar to the option above, but instead of redirecting the user, it displays a custom message on the page. You could show a message like, “You need to be a Gold Member to access this page. Click here to upgrade your account.”
Message to display when a page did not load for a technical error
Sometimes, a page might fail to load due to a server timeout or a plugin conflict. Instead of your users seeing a confusing error, you can define a friendly, helpful message here. For example: “We’re sorry, but this page is taking too long to load. Please try again in a few moments or contact support if the issue persists.”
User Role Visibility
Users with role [role name] can view/edit/create users with these roles (optional)
This gives you granular control over the “Users” page. By default, anyone who can see the users list can see all users. With this setting, you can limit that. For each role on your site, a field appears where you can list which other roles they are allowed to see.
For example, you could create a “Team Manager” role and configure it to only see users with the “Team Member” role. This prevents them from seeing other managers or administrators, keeping your user list tidy and secure.
Multisite-Specific Settings
Allow site owners to register users for their subsites?
Enable this to empower your subsite administrators. They’ll be able to create new user accounts specifically for their own site (e.g., adding editors or authors to their team) without needing your intervention as the Super Admin. This is a must-have for any WaaS (Website as a Service) platform.
Allow main site administrators to access the regular wp-admin?
This is useful if you have team members who manage your main network site but aren’t Super Admins. If you’ve restricted wp-admin access, this option creates an exception, allowing main site admins to use the normal backend while your subsite users are directed to the frontend dashboard.
Redirect to this URL when a user visits the dashboard without belonging to any site yet?
What should a brand new user see when they log in but don’t have a site assigned to them yet? Instead of a blank page, you can redirect them to a welcome page, a “create your first site” wizard, or a pricing page. This creates a much better onboarding experience for new customers on your network.