In this tutorial, we will show you how to create a Fluent CRM frontend dashboard:
This dashboard will be like a custom user interface or web application for users to:
- Manage contacts from the frontend
- Create and send emails in the frontend
- Create and manage email sequences from the frontend
- Create and manage forms and automations from the frontend
And the best part is that your users won’t have to use the wp-admin dashboard, which means they don’t need to know how to use WordPress.
We will use the WP Frontend Admin plugin, which allows you to display any wp-admin page in the frontend.
You can easily create frontend desktops or build web applications based on any WordPress plugin.
You can make money by building your own platform, and in this case you will use Fluent CRM plugin to create an email marketing automation platform on the frontend.
You can try the premium plugin on your website for free for 7 days.
Once you install WP Frontend Admin on your website, you need to follow these simple steps to display the Fluent CRM dashboard on the frontend:
1- Display the Fluent CRM dashboard on the frontend
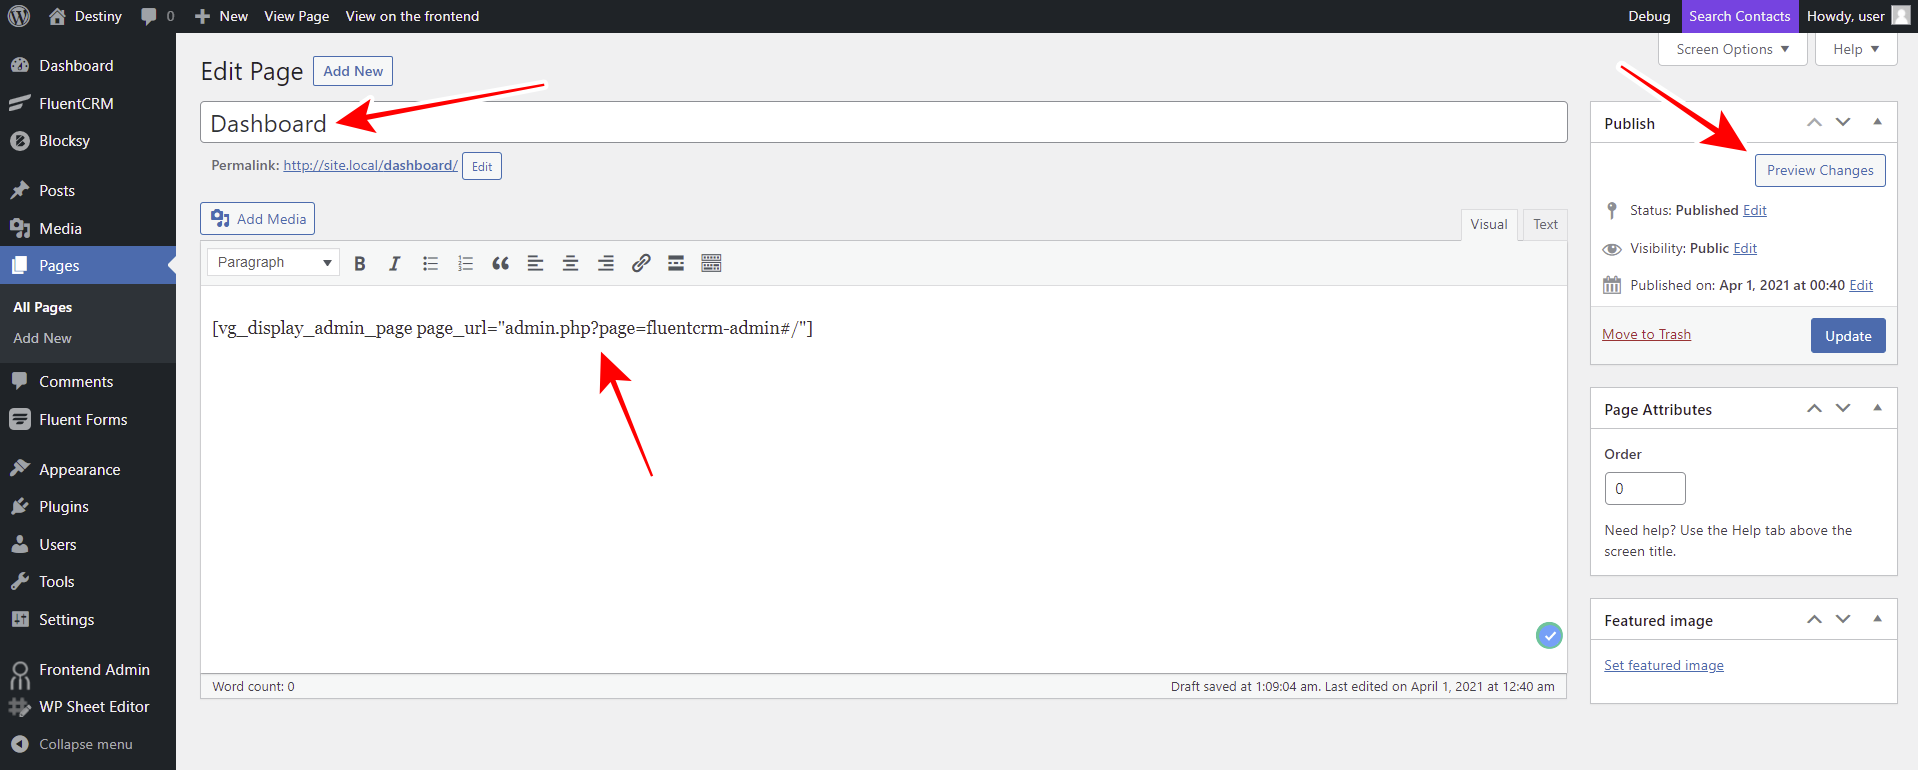
To display the Fluent CRM dashboard page on the frontend, you need to create a new page, so go to Pages > Add New.
Now you need to:
- Add the page title.
- Add the following shortcode as the page content:
[vg_display_admin_page page_url="admin.php?page=fluentcrm-admin#/"]
- Click Preview Changes.
2- Select your Fluent CRM dashboard page’s basic info
WP Frontend Admin allows you to set up your frontend pages using the Quick Settings panel on the right side of the screen.
You can start setting up the frontend Fluent CRM dashboard page by selecting this basic information:
- Page title: Here you need to assign a title to the new page. Since you already entered in the normal page editor, it will be inherited. However, you can change it here.
- URL slug: Enter the URL slug here. It can be also inherited from the page editor, but you can change it here.
- Page template: Since we’re using our theme’s design, we’ll use the Default template. However, it is inherited when you create your pages with page builders like Elementor, for example.
- Add page to this menu: You can create a menu to add the dashboard pages to it. Select the menu here.
3- Hide any unnecessary elements from your frontend page
WP Frontend Admin allows you to customize your frontend pages. In this case, it allows you to customize your frontend Fluent CRM dashboard.
These are some elements that can be removed from the frontend Fluent CRM dashboard page:
- Fluent CRM logo
- Get Pro button
- Documentations links.
- Any Pro settings if you’re using the free version of Fluent CRM.
- And any other element your users won’t need to manage contacts, emails, forms, automation, etc.
You just need to follow these two steps to hide any unnecessary elements from your frontend Fluent CRM dashboard page:
- Click Hide Element.
- Click the element you want to hide.
- Repeat that with every element you want to hide.
You can even move between tabs to remove any unnecessary elements from each tab. That means you can remove elements from the Dashboard tab, then from the Contacts tab, and so on.
4- Edit any texts on your frontend Fluent CRM dashboard
To take your frontend page’s customization even farther, you can edit any texts on your frontend pages with a few clicks. Again, you can change any texts on any Flient CRM tabs.
Just follow these simple steps:
- Click Edit texts.
- Edit any text you want.
- Click Stop editing texts.
With these three simple steps, you’ll have customized all the texts on your frontend Fluent CRM dashboard page.
5- Make the final changes and publish the page
Once you’re done removing any unnecessary elements and fields and editing the texts, you can:
- Toggle the Hide notices added by other plugins or themes checkbox to prevent users from seeing any wp-admin notices on the frontend.
- Click Save to apply the changes and publish the page.
6- Enjoy your frontend Fluent CRM dashboard
With the simple steps explained above, you’ll be able to create a frontend Fluent CRM dashboard. Your users will have everything they need to manage the email marketing department of your (or another person/client’s) company.
This is the frontend Fluent CRM Dashboard page. Here, users will be able to get a quick overview of contacts, campaigns, email templates, etc. Also, they will see the subscriber’s growth across time.
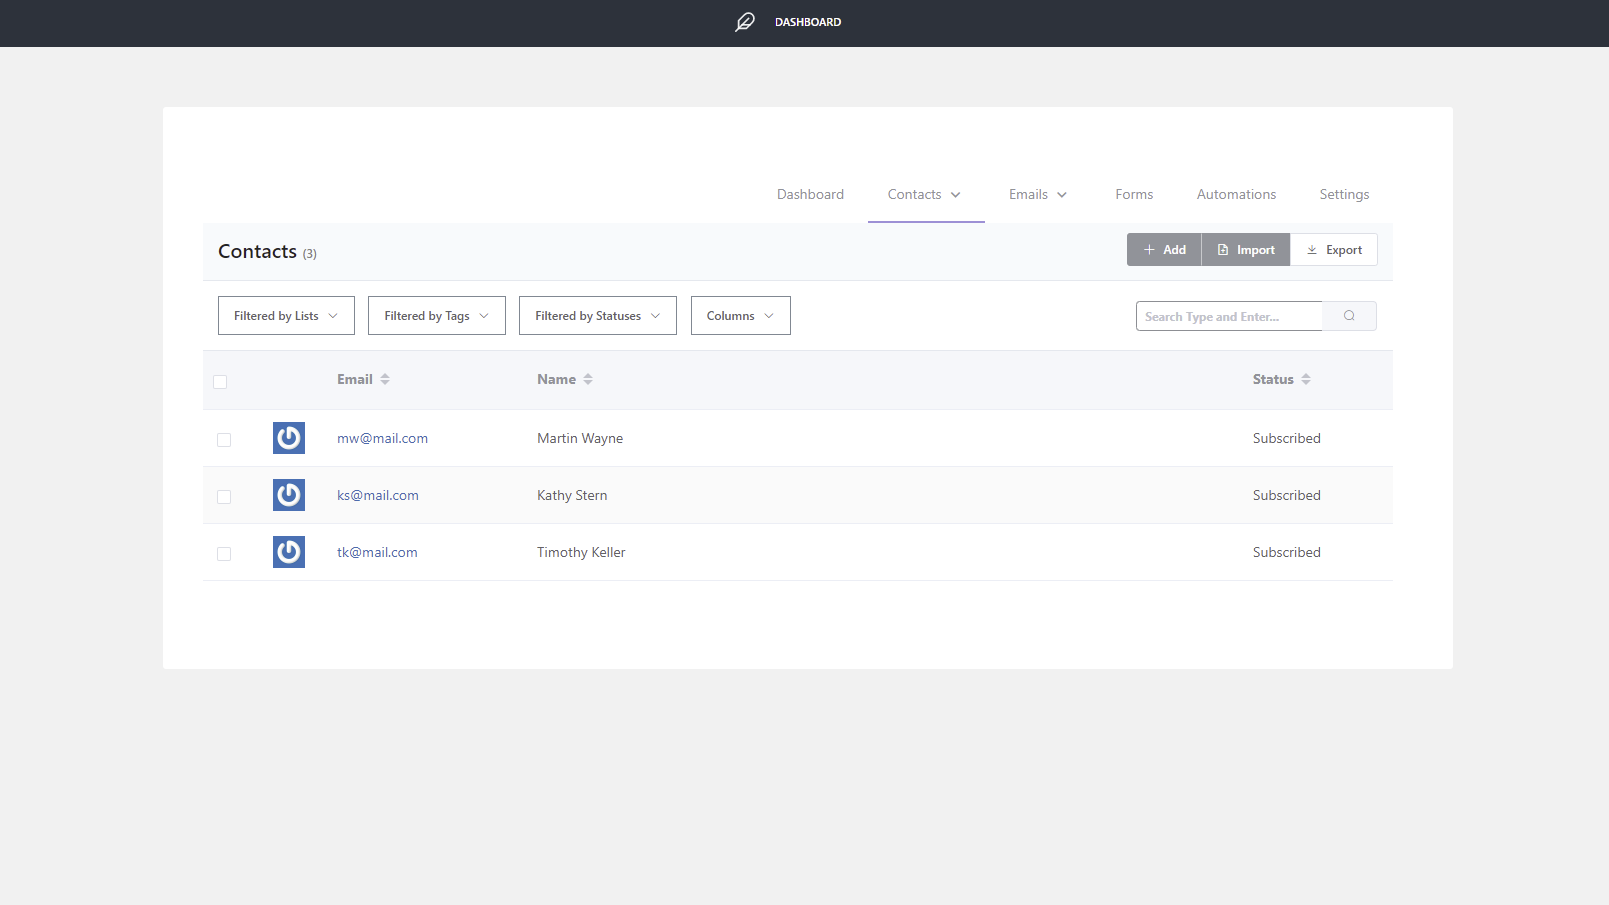
On the Contacts tab, users will be able to view all the existing contacts, add more contacts, and import or export contacts using CSV files. This will be a great option to migrate clients form one site to another or to make backups of clients and team members.
The Emails tab will allow your users to create, edit, and delete email marketing campaigns. Also, they will have access to the email sequences and templates.
On the Forms tab, users will be able to create new forms, copy form shortcodes, edit forms, etc.
It’s important to mention that you need install and activate the Fluent Forms plugin to be able to manage forms on the frontend.
Besides, your users will be able to manage the Fluent CRM‘s settings.
They will have access to the business settings, the email settings, the general settings, and any other type of settings you allow them to manage.
If there are some settings that can be managed with the plugin’s pro version only, you can hide them just as we showed you above.
As you can see, with WP Frontend Admin, you have everything to build a frontend Fluent CRM dashboard/web app. If you’re building a platform for a client, the users won’t even notice you’re using WordPress and Fluent CRM behind the scenes. It all looks like (and is) a professional web app.
You can try the premium plugin on your website for free for 7 days.


